


How to integrate MailerSend with Supabase
Supabase's built-in email service is meant for testing only. It sends to a limited number of addresses per hour and only to members of your Supabase organization. When it's time to go to production, you'll need to connect your own SMTP server.
With MailerSend, you can connect in a few simple steps and start sending immediately. Plus, you'll get full visibility into every email.
What you need before you start
Make sure you have:
A MailerSend account with a verified sending domain. Emails can only be sent from addresses on a verified domain. Read our domain verification guide to learn more
A Supabase project, and access to its dashboard as an Owner or Admin
A sender address you want to use, like no-reply@yourdomain.com. It must be on your verified domain
Step 1: Generate your SMTP credentials
1. In MailerSend, go to Emails > Domains and open the verified domain you want to use.
2. Scroll to the SMTP section and click Generate new user.
3. Enter a name for the SMTP user you'll connect to your Supabase project and click Generate user. MailerSend will generate the following credentials, which you'll need for the next step:
Setting | Value |
|---|---|
Server | smtp.mailersend.net |
Port | 587 |
Encryption | TLS (STARTTLS) |
Username | Your generated SMTP username |
Password | Your generated SMTP password |
Step 2: Configure your Supabase SMTP settings
1. From your project overview in Supabase, navigate to Authentication from the sidebar menu.
2. In the Notifications section, click Emails, then select the SMTP settings tab.
3. Switch on the Enable custom SMTP option.
4. Fill in:
Your Sender details: The sender email address and name you want to use. Note that the domain of your sender email address must match your verified domain
Your SMTP provider settings. This is where you add your MailerSend SMTP credentials:
Host: The MailerSend SMTP server URL smtp.mailersend.net
Port number: 587
Username: Your SMTP username
Password: Your SMTP password
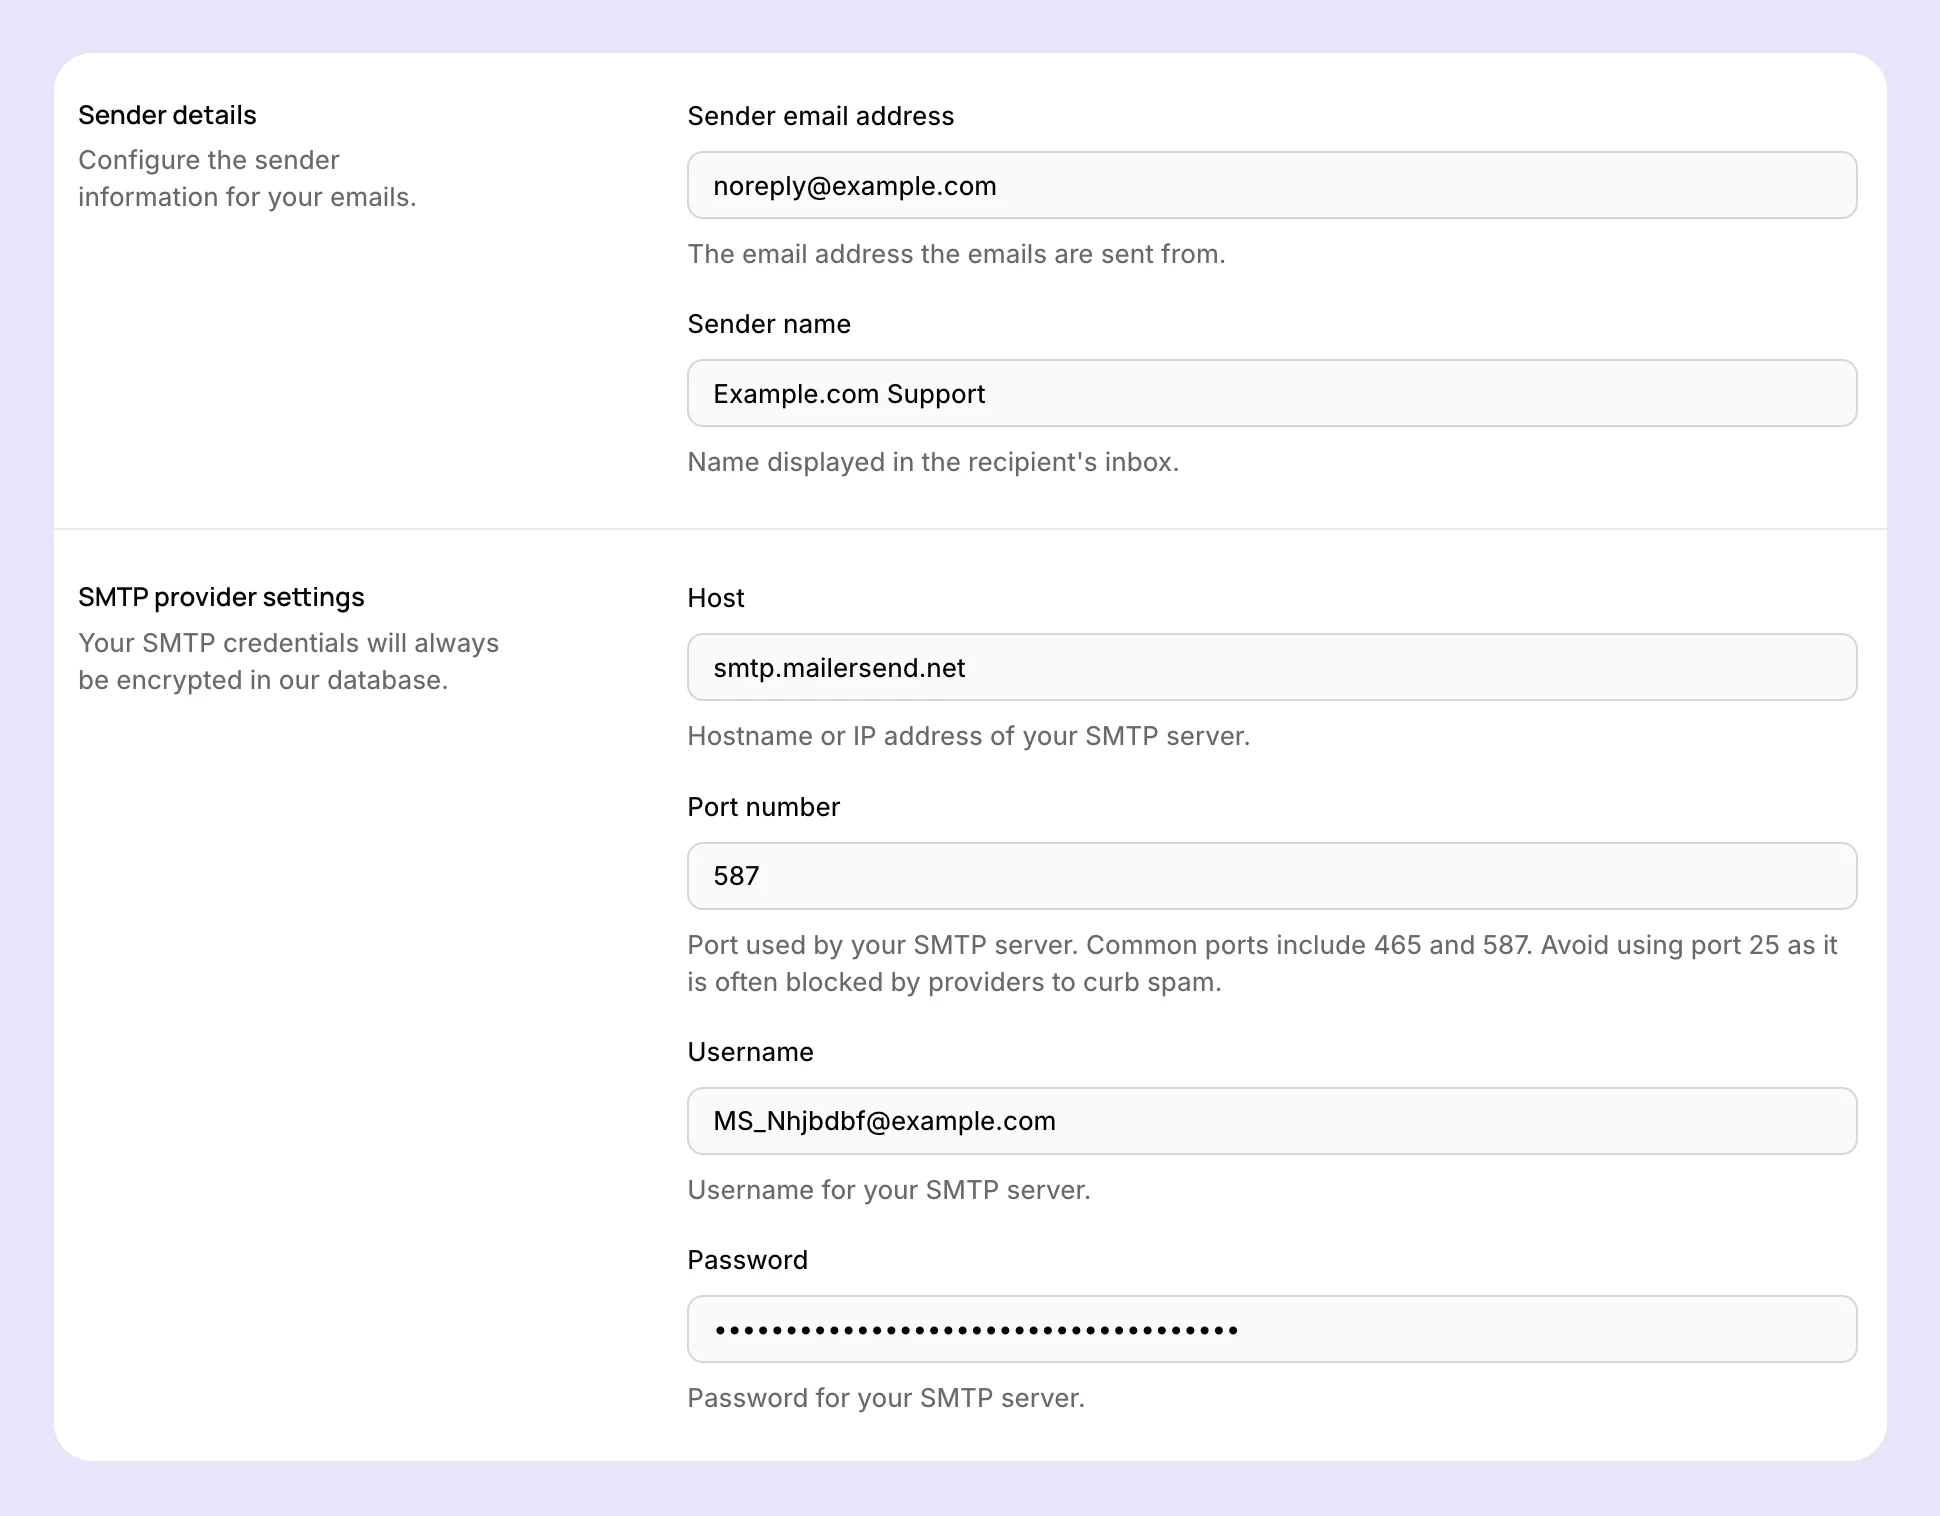
5. Click Save changes.
If you prefer, you can also configure SMTP with Supabase's Management API:
export SUPABASE_ACCESS_TOKEN="your-access-token"
export PROJECT_REF="your-project-ref"

# Configure custom SMTP
curl -X PATCH "https://api.supabase.com/v1/projects/$PROJECT_REF/config/auth" \
  -H "Authorization: Bearer $SUPABASE_ACCESS_TOKEN" \
  -H "Content-Type: application/json" \
  -d '{
    "external_email_enabled": true,
    "mailer_secure_email_change_enabled": true,
    "mailer_autoconfirm": false,
    "smtp_admin_email": "Your Sender Email",
    "smtp_host": "smtp.mailersend.net",
    "smtp_port": "587",
    "smtp_user": "your-smtp-username",
    "smtp_pass": "your-smtp-password",
    "smtp_sender_name": "Your Sender Name"
  }'
Step 3: Adjust rate limits and email templates
Rate limits: Once you've configured custom SMTP, Supabase limits Auth emails to 30 per hour by default. You can adjust this limit by going to Rate Limits in the Configuration section of your Authentication settings. Set a value that fits your expected sign-up volume, but remember to keep it within your MailerSend plan's daily quota.
Email templates: Supabase sends its own email content through MailerSend's SMTP relay, so you'll need to adjust your templates in Supabase. To customize the content, go to Emails in the Authentication settings, and adjust your templates in the Templates tab. You can edit these templates:
Authentication templates
Confirm sign up
Invite user
Magic link or OTP
Change email address
Reset password
Reauthentication
Security templates
Password changed
Email address changed
Phone number changed
Sign-in method linked
Sign-in method removed
MFA method added
MFA method removed
You can use variables like {{ .ConfirmationURL }}, {{ .Token }} and {{ .SiteURL }} to insert dynamic content. Check out Supabase email templates for the full list.
Step 4: Test the integration
1. Trigger an Auth email from your app. For example, sign up with a test address or request a password reset.
2. Check that the email arrives in the inbox, from the sender address you set in Supabase.
3. In MailerSend, go to Emails to see the email and its status, like Sent, Delivered or Bounced.
That's it! Your Supabase Auth emails are now sent through MailerSend.
Troubleshooting
Emails aren't sending and nothing shows in MailerSend Activity
Check the host, port, username and password in Supabase. Credentials are case-sensitive, so copy them exactly. If you reset your SMTP credentials in MailerSend, update them in Supabase too.
I get a sender or domain error
The Sender email in Supabase must use your verified MailerSend domain and be in lowercase. Check the domain's status on the Domains page.
Some users don't get emails during busy periods
You may be hitting the Supabase Auth rate limit (30 per hour by default) or your MailerSend daily quota. Raise the Supabase limit in Rate Limits, or upgrade your MailerSend plan.
Emails land in spam
Make sure your domain's SPF and DKIM records are verified in MailerSend, and add a DMARC record.
Can I use a MailerSend template for Supabase emails?
No. MailerSend templates can't be sent via SMTP. Edit the email content in Supabase's Email Templates instead.
Need more info?
Feel free to reach out to support@mailersend.com. A member of our support team will gladly assist you.