How to enable Google Email Actions & Highlights
The Actions and Highlights enable you to add a CTA (Call-To-Action) alongside a message in the inbox, or highlight important information from your email content, displaying them as easy-to-see ‘chips’ above the email, in the inbox preview, search results, or the Happening soon section.
This means you can place quick-access buttons for confirming a subscription, tracking a package, leaving a review, and many more. Or highlight flight information, restaurant reservation details, and other important information from the main email message.
How to add Google Email Actions and Highlights to your emails
Enabling Actions and Highlights involves adding a script snippet to your email body and getting approval from Google.
To do this, you’ll need to meet Google’s requirements and complete a registration form. Here’s what that looks like:
Step 1: Ensure you follow the registration guidelines for Email Sender Quality
Before you register with Google, you need to make sure that you comply with the following:
Your emails are authenticated with SPF and DKIM. Check out our guide on how to verify and authenticate a sending domain
The domain of the SPF check or DKIM signature must match the domain of your From address
You must send emails from a static email address
Your emails must follow Google’s general email sender guidelines.
You are a high-volume sender with at least 100 emails per day sent to Gmail addresses (for at least a few weeks)
You have a low spam complaint rate. Google’s sender guidelines state that 0.1% is considered low, while 0.3% is the limit
Your emails are transactional only. Google does not allow Actions or Highlights for emails that contain promotional content
You only use secure HTTPS URLs
Step 2: Add the markup/schema to your email
For the Actions and Highlights to work, your email <body> must contain schema markup that Gmail can parse the data from.
How to add the snippet to an email
There are 2 ways to add the schema markup to your email:
1. In your API call
Simply add the snippet into the HTML of your API call, for example:
import 'dotenv/config';
import {
	MailerSend,
	EmailParams,
	Sender,
	Recipient
} from "mailersend";

const mailerSend = new MailerSend({
	apiKey: process.env.API_KEY,
});

const sentFrom = new Sender("bob@yourbusiness.com", "Bob");

const recipients = [
	new Recipient("pam@theoffice.com", "Pam")
];

const htmlContent = `
<div itemscope itemtype="http://schema.org/EmailMessage">
  <div itemprop="potentialAction" itemscope itemtype="http://schema.org/ConfirmAction">
    <meta itemprop="name" content="Confirm Email Address"/>
    <div itemprop="handler" itemscope itemtype="http://schema.org/HttpActionHandler">
      <link itemprop="url" href="https://myemail.com/confirm?verifyId=abc123"/>
    </div>
  </div>
  <meta itemprop="description" content="Confirm email address for new account creation"/>
</div>
  <p>Hey there!</p>
  <p>Welcome to Your Business, we're happy to have you here!</p>
  <p>Please confirm your email address by clicking <a href=”https://myemail.com/confirm?verifyId=abc123”>here</a>.</p>
  <p>Remember to check out our guides and contact support if you need anything.</p>
  <br>
  <p>Regards,</p>
  <p>The Your Business Team</p>
`;

const emailParams = new EmailParams()
	.setFrom(sentFrom)
	.setTo(recipients)
	.setReplyTo(sentFrom)
	.setSubject("Welcome! Your free trial is ready.")
	.setHtml(htmlContent)
	.setText("Hey there! Welcome to Your Business, we're happy to have you here! Please confirm your email address by clicking here.Remember to check out our guides and contact support if you need anything. Regards, The Your Business Team");

mailerSend.email.send(emailParams)
	.then(response => {
		console.log("Email sent successfully:", response);
	})
	.catch(error => {
		console.error("Error sending email:", error);
	})
2. To a template
Drop the snippet into your template using one of the builders.
For the Drag & drop and Rich-text builders:
a) Select the main body block of your template and toggle to HTML.
b) Paste in the snippet and click Save.
For the HTML builder:
Simply paste the snippet anywhere in the <body> section of your code.
Here’s a basic Microdata example for a One-Click Action to confirm an email address:
<div itemscope itemtype="http://schema.org/EmailMessage">
  <div itemprop="potentialAction" itemscope itemtype="http://schema.org/ConfirmAction">
    <meta itemprop="name" content="Confirm Email Address"/>
    <div itemprop="handler" itemscope itemtype="http://schema.org/HttpActionHandler">
      <link itemprop="url" href="https://myemail.com/confirm?verifyId=abc123"/>
    </div>
  </div>
  <meta itemprop="description" content="Confirm email address for new account creation"/>
</div>
And here’s another example for adding a flight reservation highlight:
<div itemscope itemtype="http://schema.org/FlightReservation">
  <meta itemprop="reservationNumber" content="RXJ34P"/>
  <link itemprop="reservationStatus" href="http://schema.org/Confirmed"/>
  <div itemprop="underName" itemscope itemtype="http://schema.org/Person">
    <meta itemprop="name" content="Eva Green"/>
  </div>
  <div itemprop="reservationFor" itemscope itemtype="http://schema.org/Flight">
    <meta itemprop="flightNumber" content="110"/>
    <div itemprop="airline" itemscope itemtype="http://schema.org/Airline">
      <meta itemprop="name" content="United"/>
      <meta itemprop="iataCode" content="UA"/>
    </div>
    <div itemprop="departureAirport" itemscope itemtype="http://schema.org/Airport">
      <meta itemprop="name" content="San Francisco Airport"/>
      <meta itemprop="iataCode" content="SFO"/>
    </div>
    <meta itemprop="departureTime" content="2027-03-04T20:15:00-08:00"/>
    <div itemprop="arrivalAirport" itemscope itemtype="http://schema.org/Airport">
      <meta itemprop="name" content="John F. Kennedy International Airport"/>
      <meta itemprop="iataCode" content="JFK"/>
    </div>
    <meta itemprop="arrivalTime" content="2027-03-05T06:30:00-05:00"/>
  </div>
</div>
Check out Google’s reference to see all of the supported markup types and their properties.
Step 3: Send an email from your production servers
So that Google can check that you comply with their registration guidelines, you’ll need to send them an email for review. This step should be completed before you submit the registration form.
The email must be sent from your production servers or a server with the same DKIM, SPF, From, and Return-Path headers
The email must also include the markup/schema required, which we covered in Step 2
Send the email to schema.whitelisting+sample@gmail.com
Note:
If you don’t send an email for review, or send a test/blank email, your application won’t proceed, and you won’t receive any feedback from Google
Since Gmail removes markup data when forwarding an email, you should not forward the email for review, but send it directly
Step 4: Register with Google
Once you’re sure that you comply with Google’s guidelines and you’ve sent an email for review, you can fill out the registration form. Google will get back to you to update you on the status of your approval. They might also request further information to proceed with your application.
Structured data/Markup types
In the registration form, you’ll need to select the structured data types that you plan to add to your emails.
One-Click Action: Allows users to perform an action without leaving Gmail. There are 2 types of One-Click Actions: ConfirmAction and SaveAction
ConfirmAction: One-click confirm buttons that allow users to confirm, approve or acknowledge something. View the properties available for ConfirmAction
SaveAction: Can only be clicked on once and allows users to, for example, save a coupon or song to a playlist
Go-To Action: Takes the user to your website or app so they can complete an action there. There are 2 types of Go-To Actions: ViewAction and TrackAction
ViewAction: Adds a button prompting the user to go to your website to complete an action, like update their billing information. View the properties available for ViewAction
TrackAction: Adds a button so that users can go to your website to track the status of something, like a package delivery. View the properties available for TrackAction
Flight interactive cards: Summarize key flight information in a card-style format at the top of the message. They can include flight data and buttons like Check in or Manage booking. View the properties available for Flight Reservations
Bus Highlight: Can display reservation information and notify the user when they should leave to make the reservation on time. You can also add a check-in URL, which will be displayed to the user 24 hours before the journey. View the properties available for Bus Reservations
Car Rental Highlight: Summarizes key car rental details such as the rental agency, pickup and drop off times and dates, location, and reservation number. View the properties available for Rental Car Reservations
Flight Highlight: Summarizes key flight information such as the flight number, departure times, airport, and confirmation number. View the properties available for Flight Reservations
Event Highlight: This highlight is for events with tickets, and summarizes the event information such as the event name, venue, and time and date. View the properties available for Event Reservations
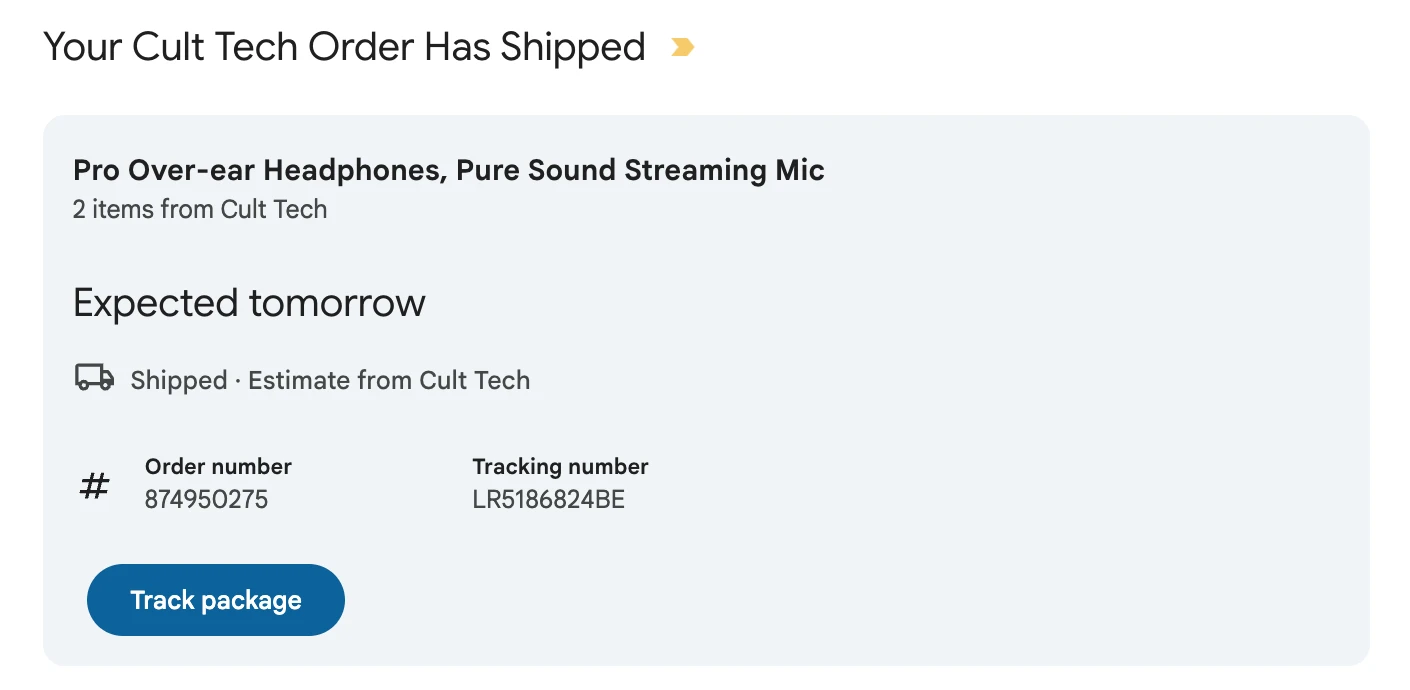
Order and parcel delivery Highlights: Summarizes order delivery details such as the retailer name, order number, tracking number, and estimated delivery. View the properties available for Orders and Parcel Delivery
Hotel Highlight: Summarizes hotel reservation details such as hotel name, check-in and check-out dates, and confirmation number. View the properties available for Hotel/Lodging Reservations
Invoice Highlight: Summarizes invoice details such as the invoice number, amount, and due date. View the properties available for Invoices
Restaurant Highlight: Summarizes restaurant reservation details such as the restaurant name, date and time, and number of guests. View the properties available for Restaurant Reservations
Train Highlight: Summarizes train journey reservation details such as departure and arrival stations, departure date and time, and seats. View the properties available for Train Reservations
Calendar Flight Reservation: Automatically adds flight reservations, with flight details, to the user’s Google Calendar
Calendar Event for events with tickets: Automatically adds a calendar event for ticketed events, including the event information such as ticket details, venue, and date and time
Calendar Hotel Reservation: Automatically adds a calendar event for hotel reservations, including information such as the hotel name, location, and check-in/check-out time and date
Calendar Restaurant Reservation: Automatically adds a calendar event for restaurant reservations, including information such as the restaurant name, date and time, and number of guests
Types of Actions
You’ll also need to select the type of Action you intend to use, if any. Consider carefully the best action for your use case for the best chances of approval.
One-Click Action: Allows users to perform an action on your app or website with a single click from their inbox. For example, confirming a dinner reservation, verifying an email address, or adding a song to a playlist
RSVP Action: Allows users to RSVP to meeting and event invitations. Clicking on this action opens a modal within Gmail with additional information and the response options
Review Action: Allows users to quickly submit a review. This can be used for restaurants, accommodation, or other products and services. Clicking on this action opens a modal within Gmail that allows the user to provide a star rating and submit a written review (which can be made optional). You can also choose the review platform to which you would like the review to be forwarded
Go-To Action: Allows users to click to go to whichever URL you define, for example, a parcel tracking page. Google is more strict about the use of Go-To Actions, taking into account the usefulness and quality of the use case. So, consider carefully whether this is the best Action for the job.
Bearer Identity Tokens
The registration form also asks if your action handler requires bearer identity tokens. These are needed if your server needs to verify the identity of the user (for example, if a user clicks ‘Manage booking’ in Gmail, you’ll need to confirm it's the person or email address to whom the booking belongs).
By default, Bearer Identity Tokens are not enabled. So, if you need Google to automatically send a token to verify the user, you’ll need to select ‘Yes’ and then configure the functionality to verify the requests coming from Google. Google recommends that you use the open-source Google API Client Library to verify Bearer tokens.
If the token generated by Google doesn’t verify, the service will respond to the request with 401 (Unauthorized).
Generate your own tokens
If you prefer not to have bearer tokens generated by Google, you can also generate your own time-limited, single-use tokens and embed them in your Action URLs.
When you’re sure you have everything configured correctly and you have accurately filled in the registration form, you can submit your request.
Need more info?
Feel free to reach out to support@mailersend.com. A member of our support team will gladly assist you.