How to add and verify your sending domain
Verifying your domain proves that you are authorized to use it to send emails. Authentication also helps to improve deliverability, and helps with brand reputation and trust, as your messages will appear in inboxes with your domain as the sender.
How to add and verify a sending domain
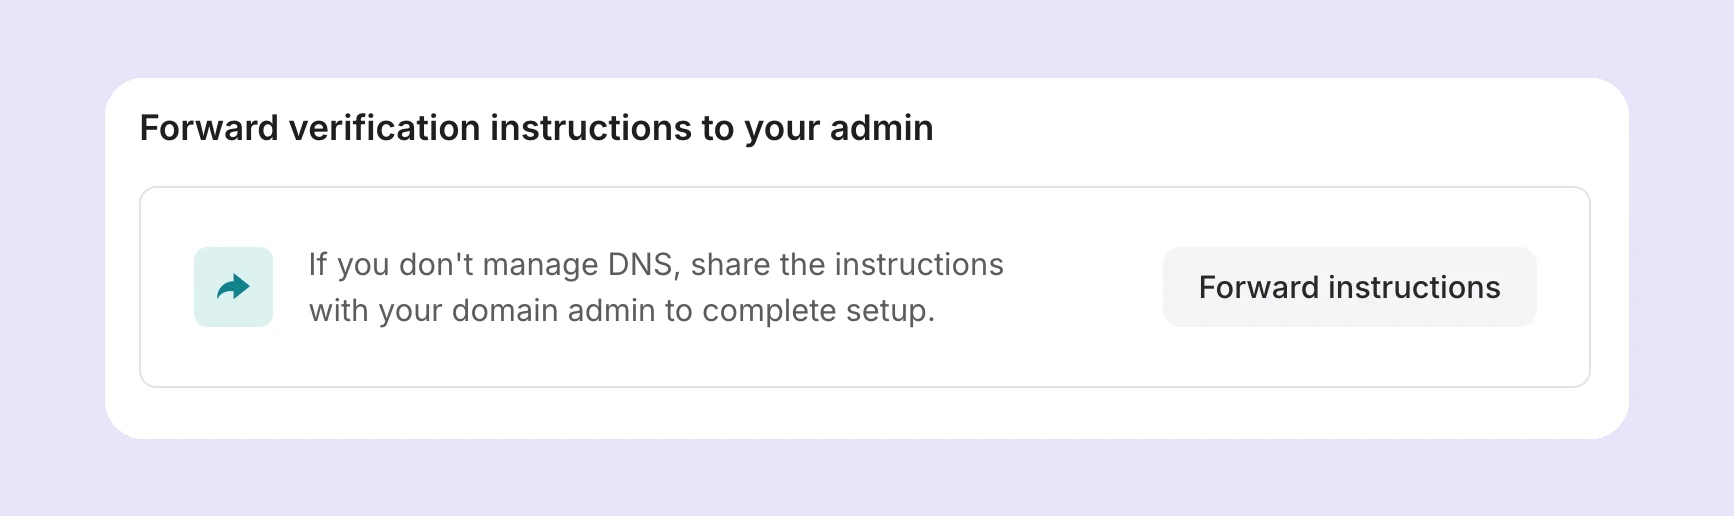
Please note that you need to have access to the domain’s DNS records so you can verify your domain. If you do not have access, after you add you domain, you can click Forward instructions on the domain's DNS settings page to send the DNS records to the person managing your domain.
Add a domain
1. Navigate to Email > Domains in the left-hand navigation menu.
2. Click on Add domain.
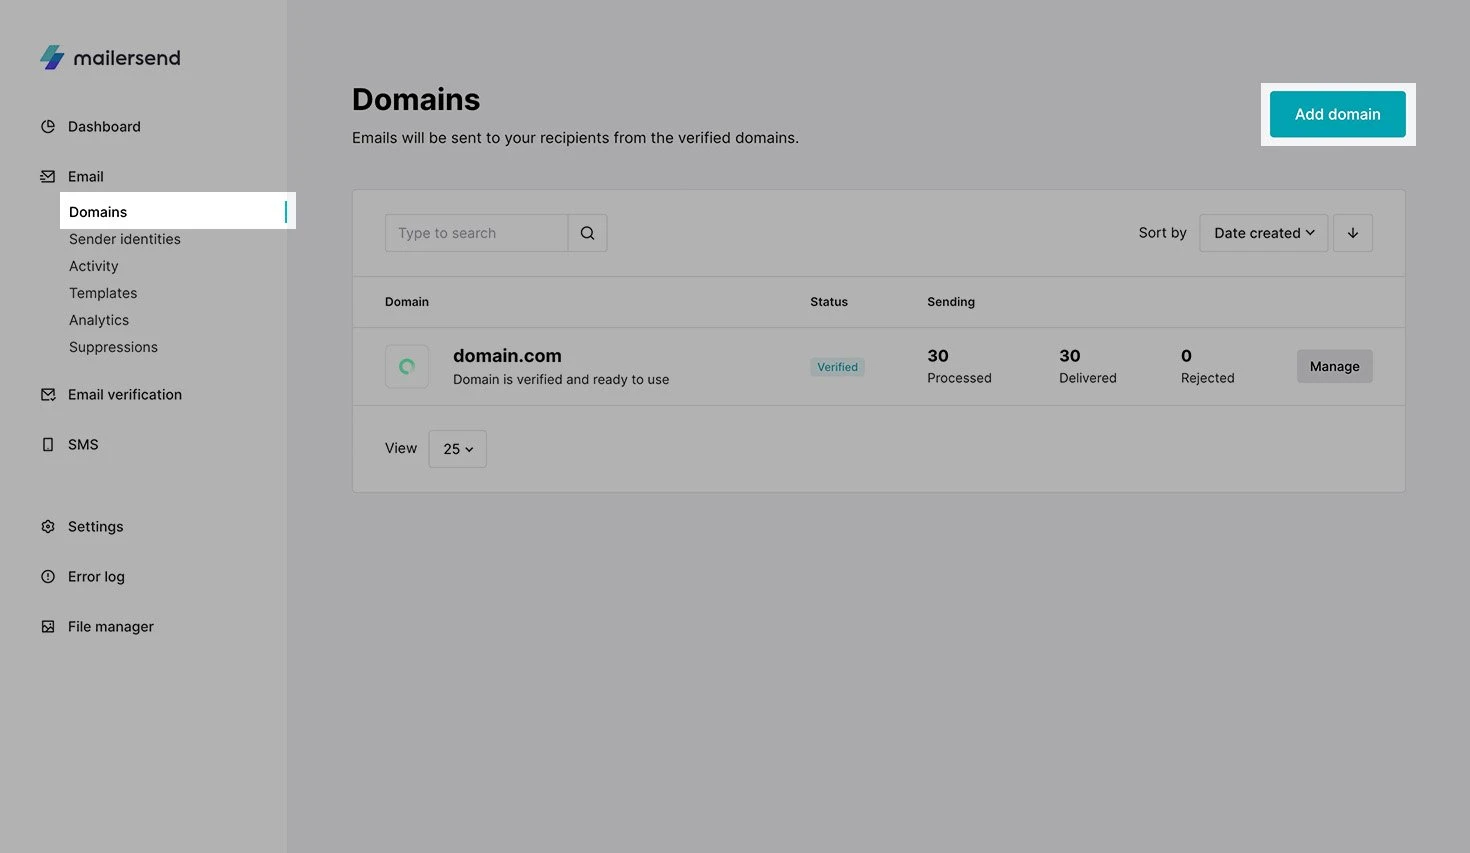
3. Enter your domain name and click Add domain. You will be prompted to connect your domain automatically.
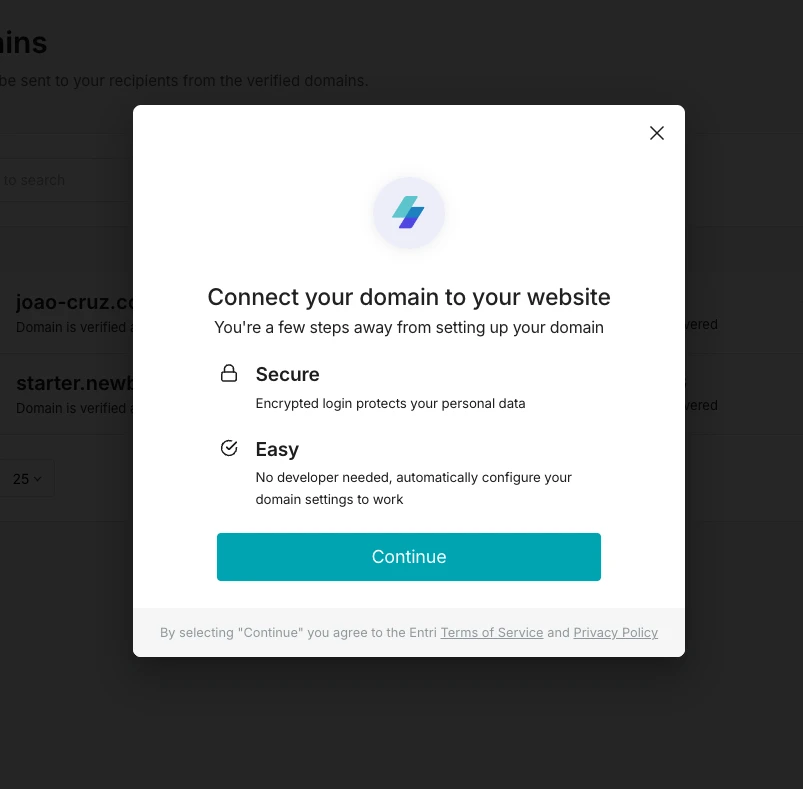
Automatic domain authentication
Automatic domain authentication involves logging in to your domain registrar account and authorizing access for the DNS records to be added automatically for you. If you'd like to proceed with automatic domain verification, click Continue and follow the steps.
If you prefer to add your domain records manually, simply close the pop-up.
Manual DNS configuration
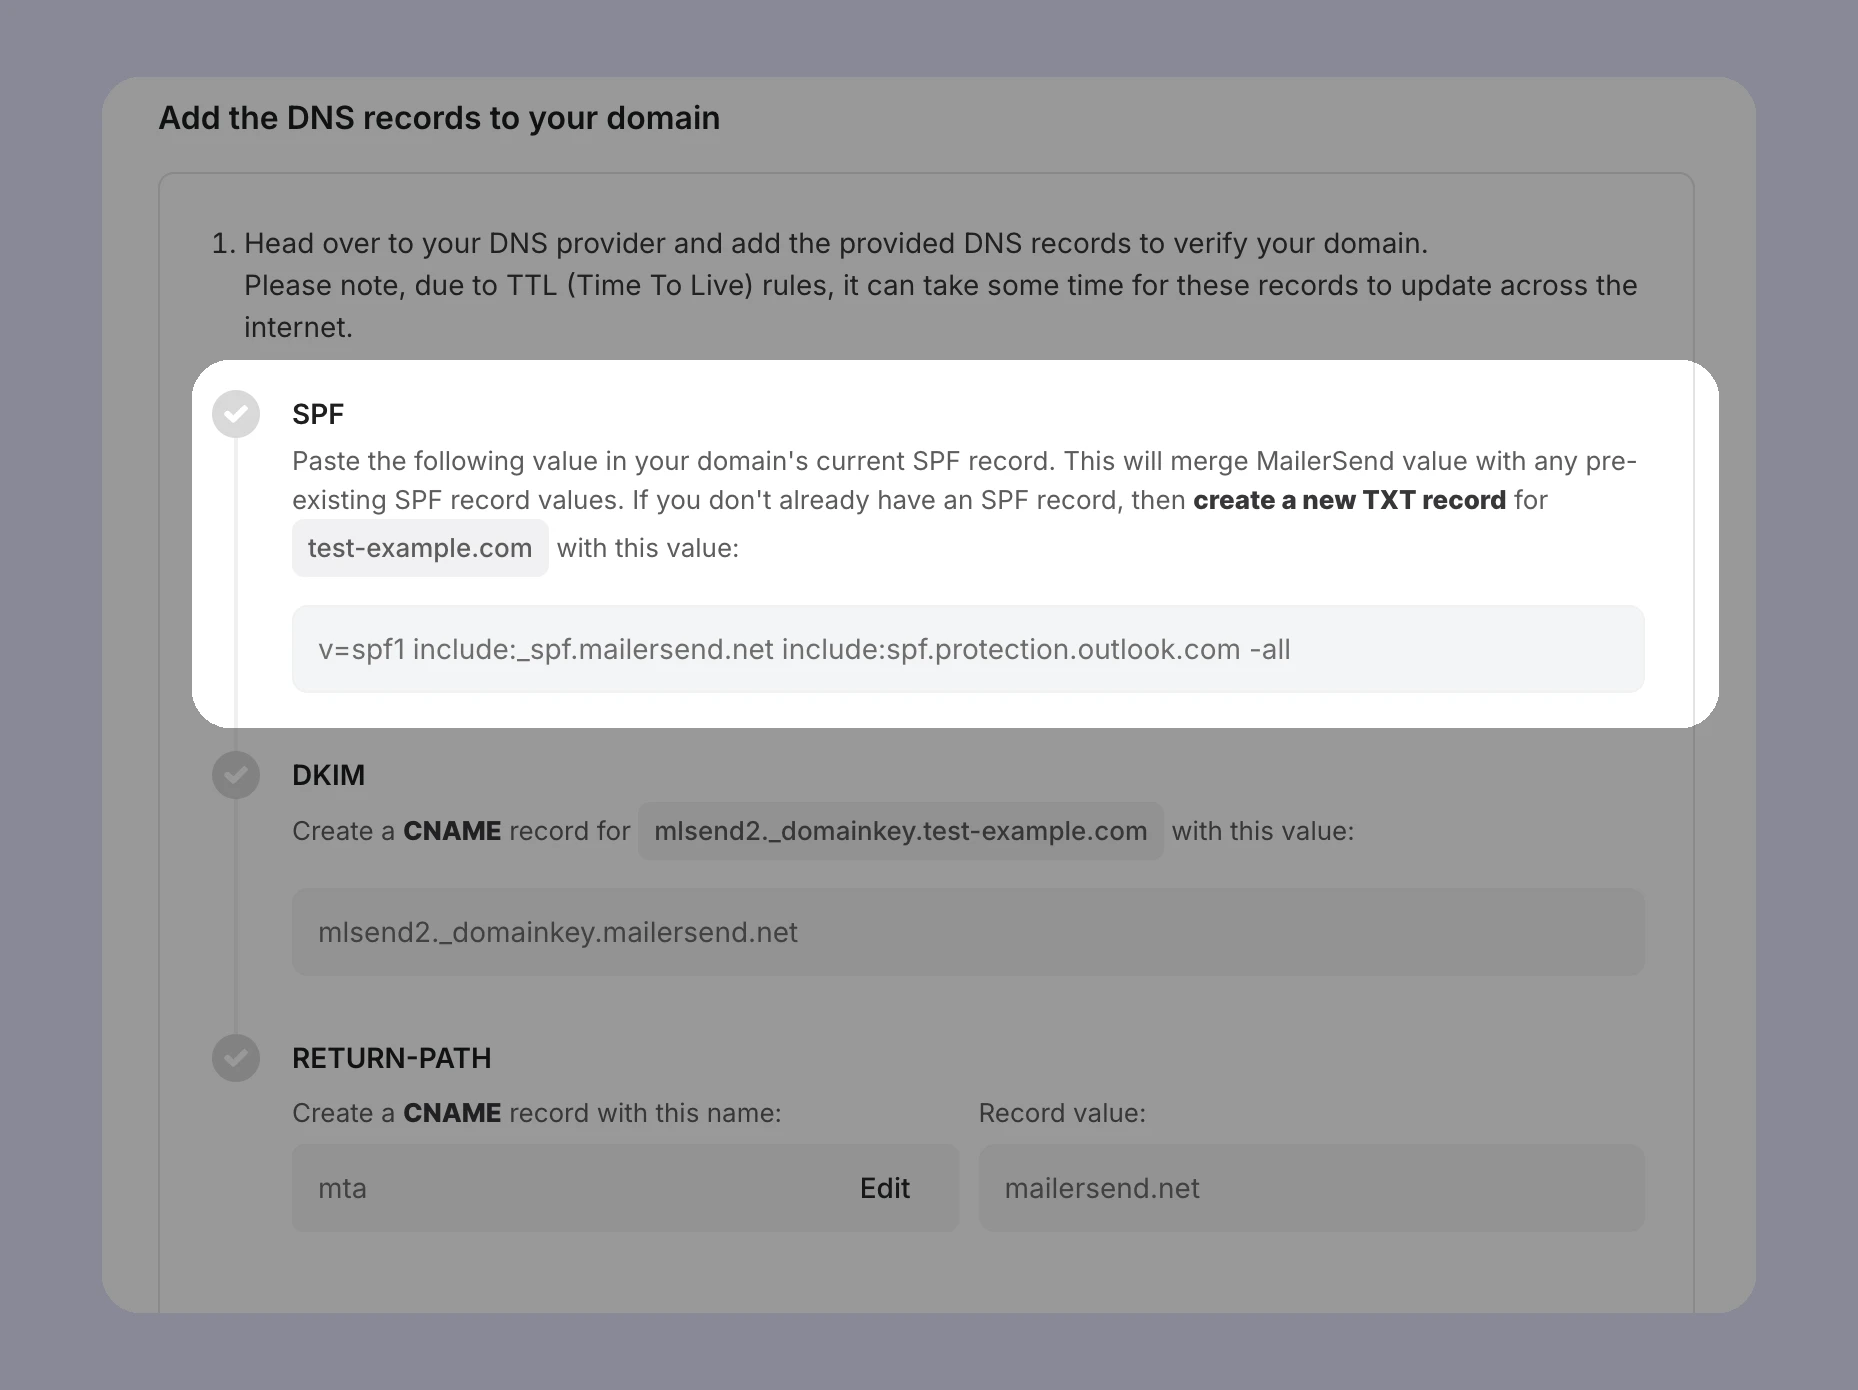
If you skip automatic domain authentication, you will see instructions for adding DNS records to your domain’s DNS page.
If your provider is able to be identified by MailerSend, you will see specific instructions for that provider, such as GoDaddy or IONOS. If not, you will see general instructions for adding DNS records.
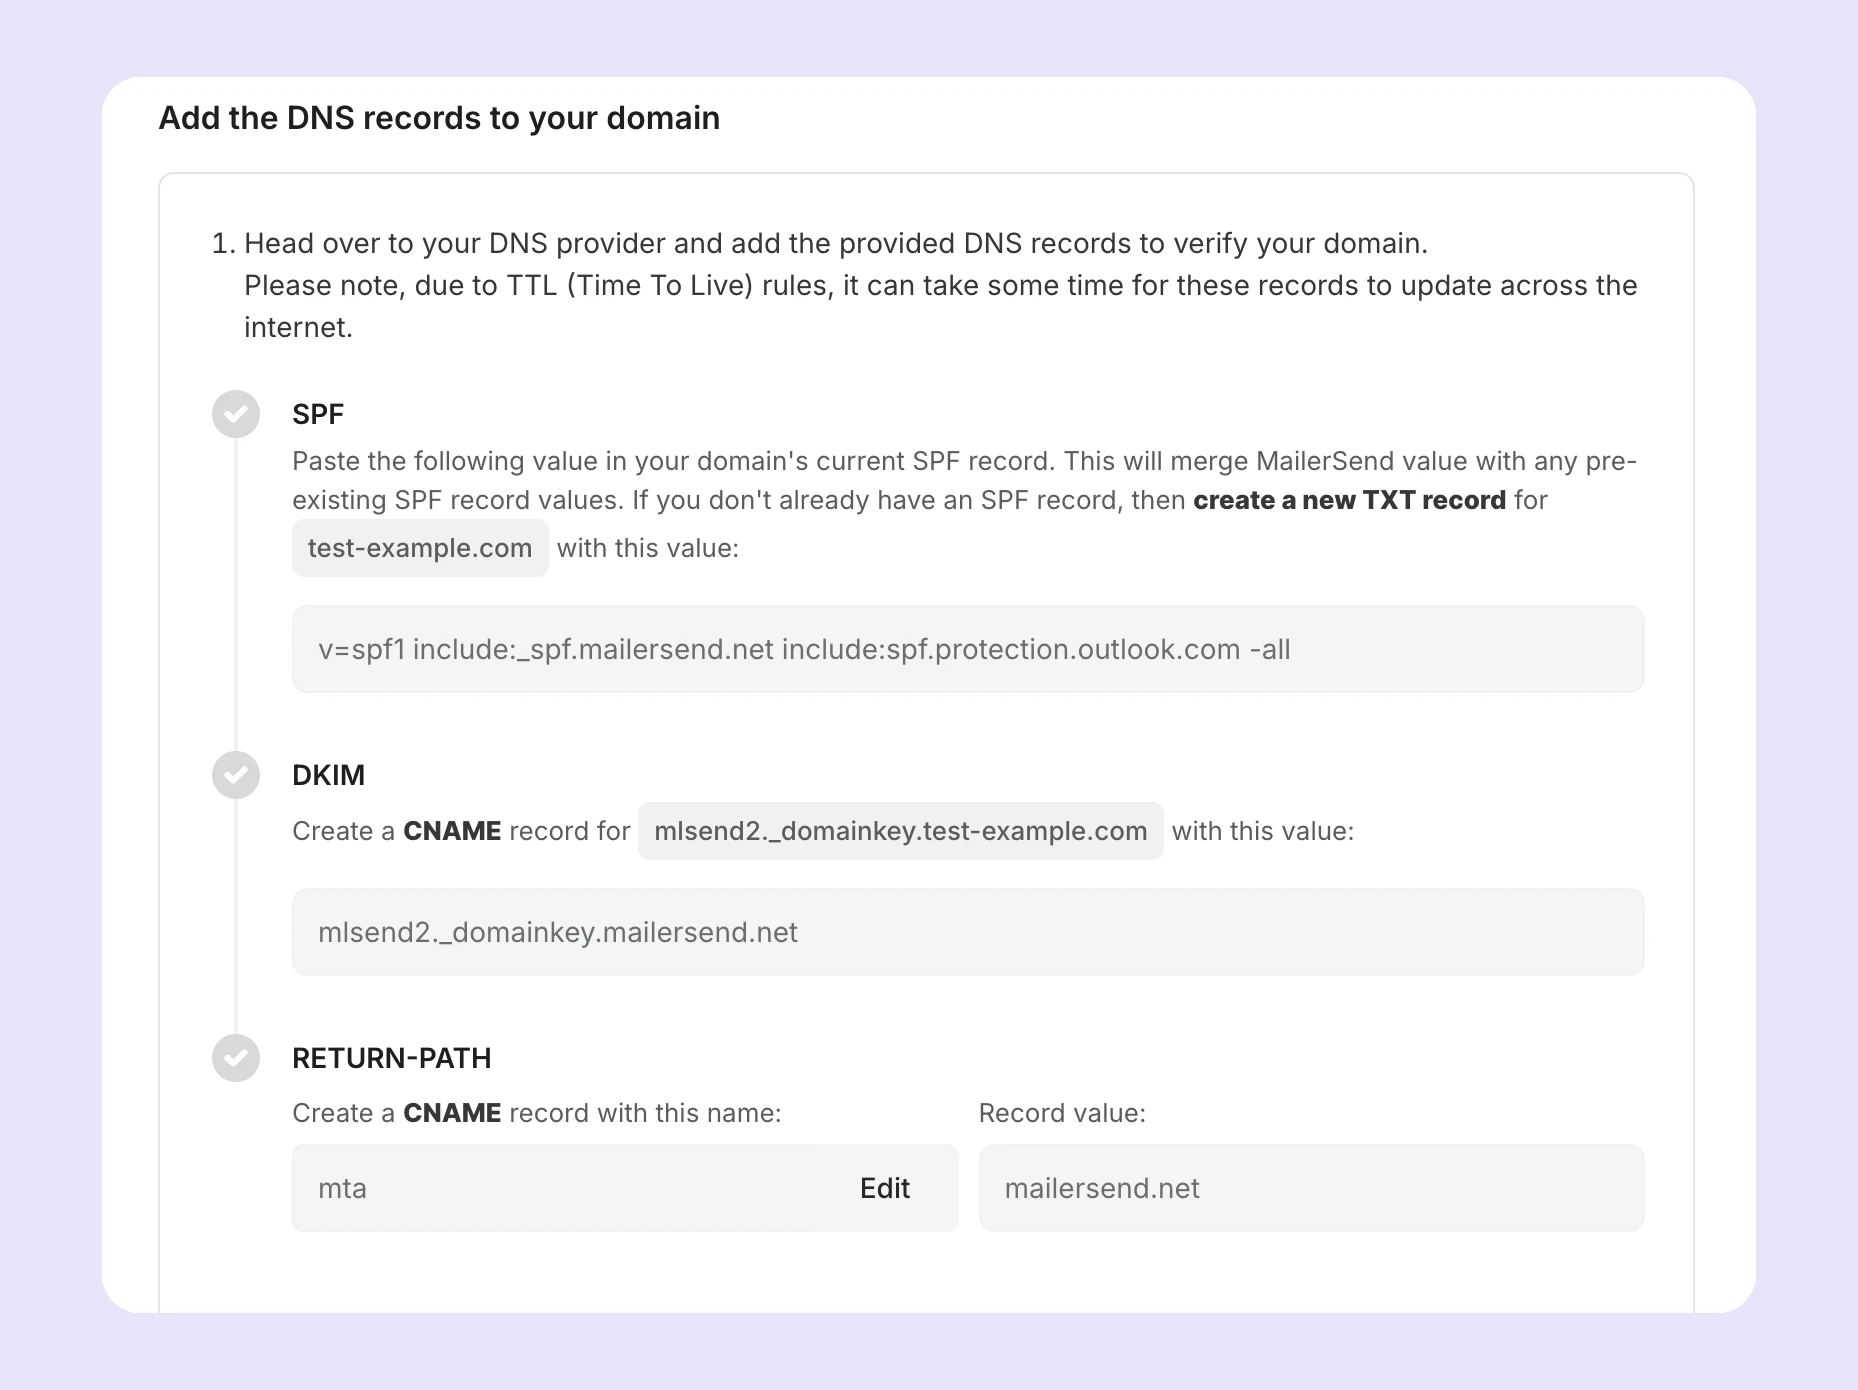
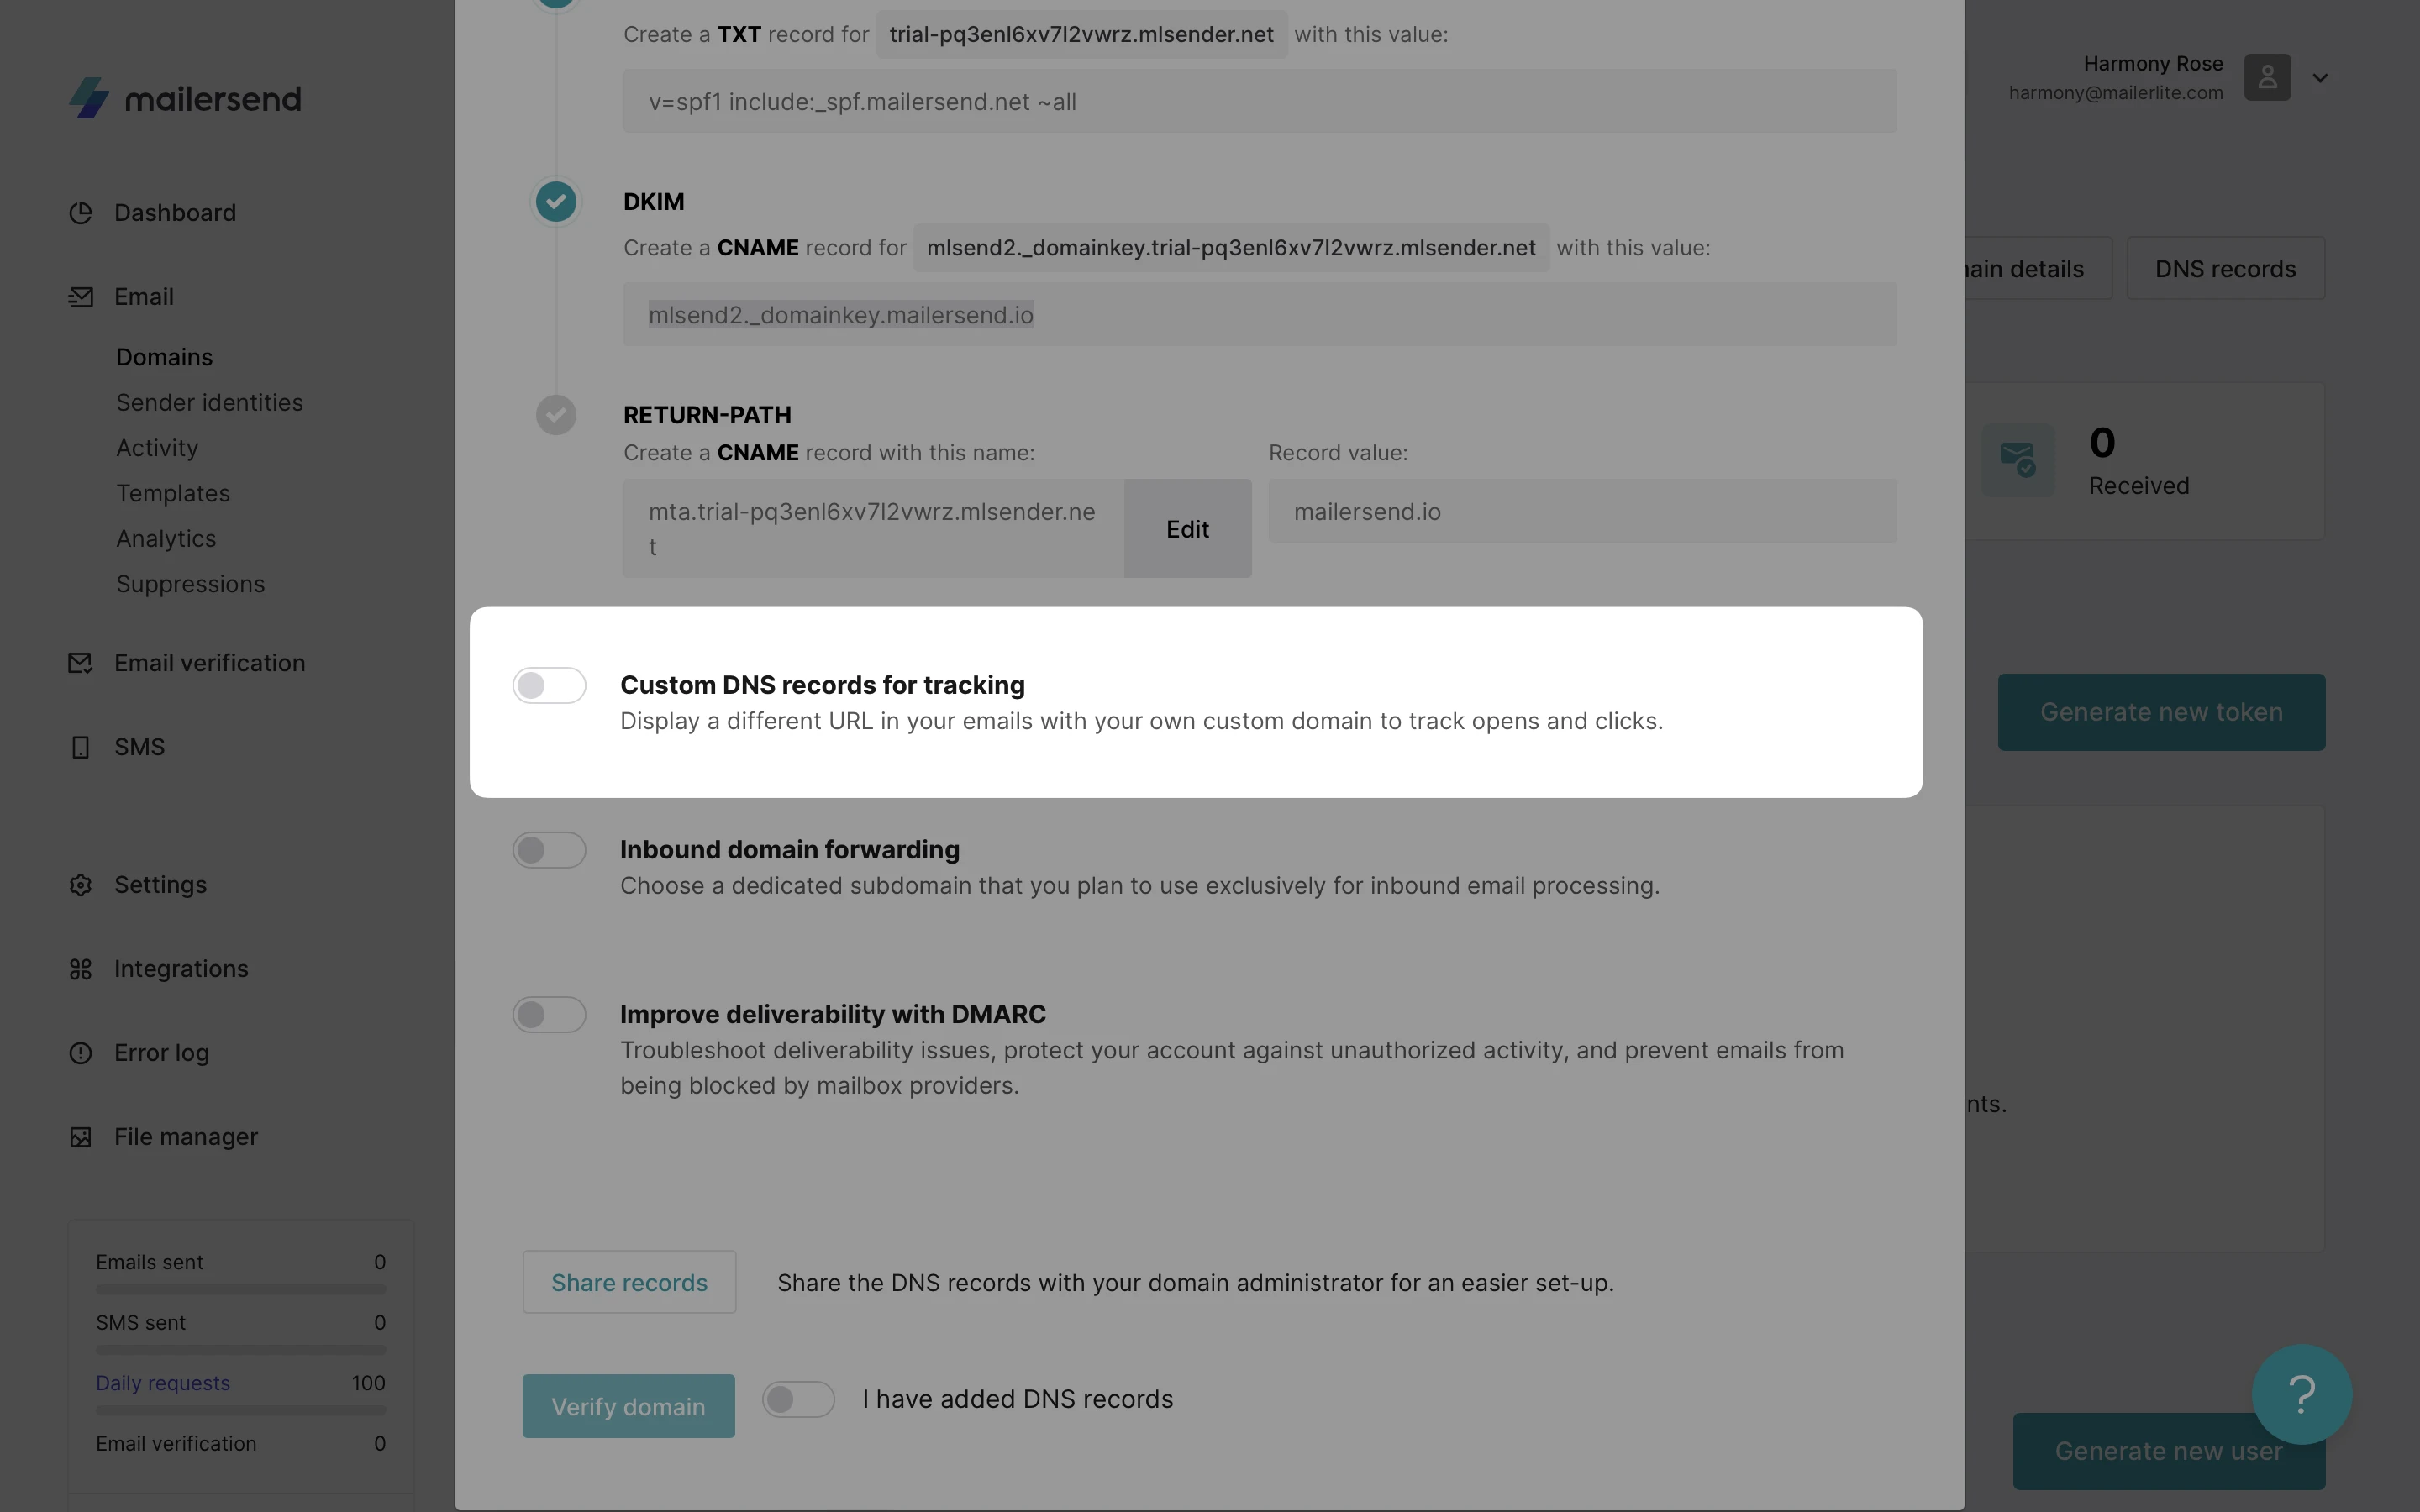
Although each provider has their own format for accepting records, all platforms will provide the following options needed for MailerSend when adding new records:
SPF: Sends the mail server IP validation
DKIM: Like SPF, but uses cryptographic methods for validation
CNAME for Return-Path: The address where bounces and other email feedback are sent to. It’s specified by the Return-Path header in an email
You can click on each field value to automatically copy it.
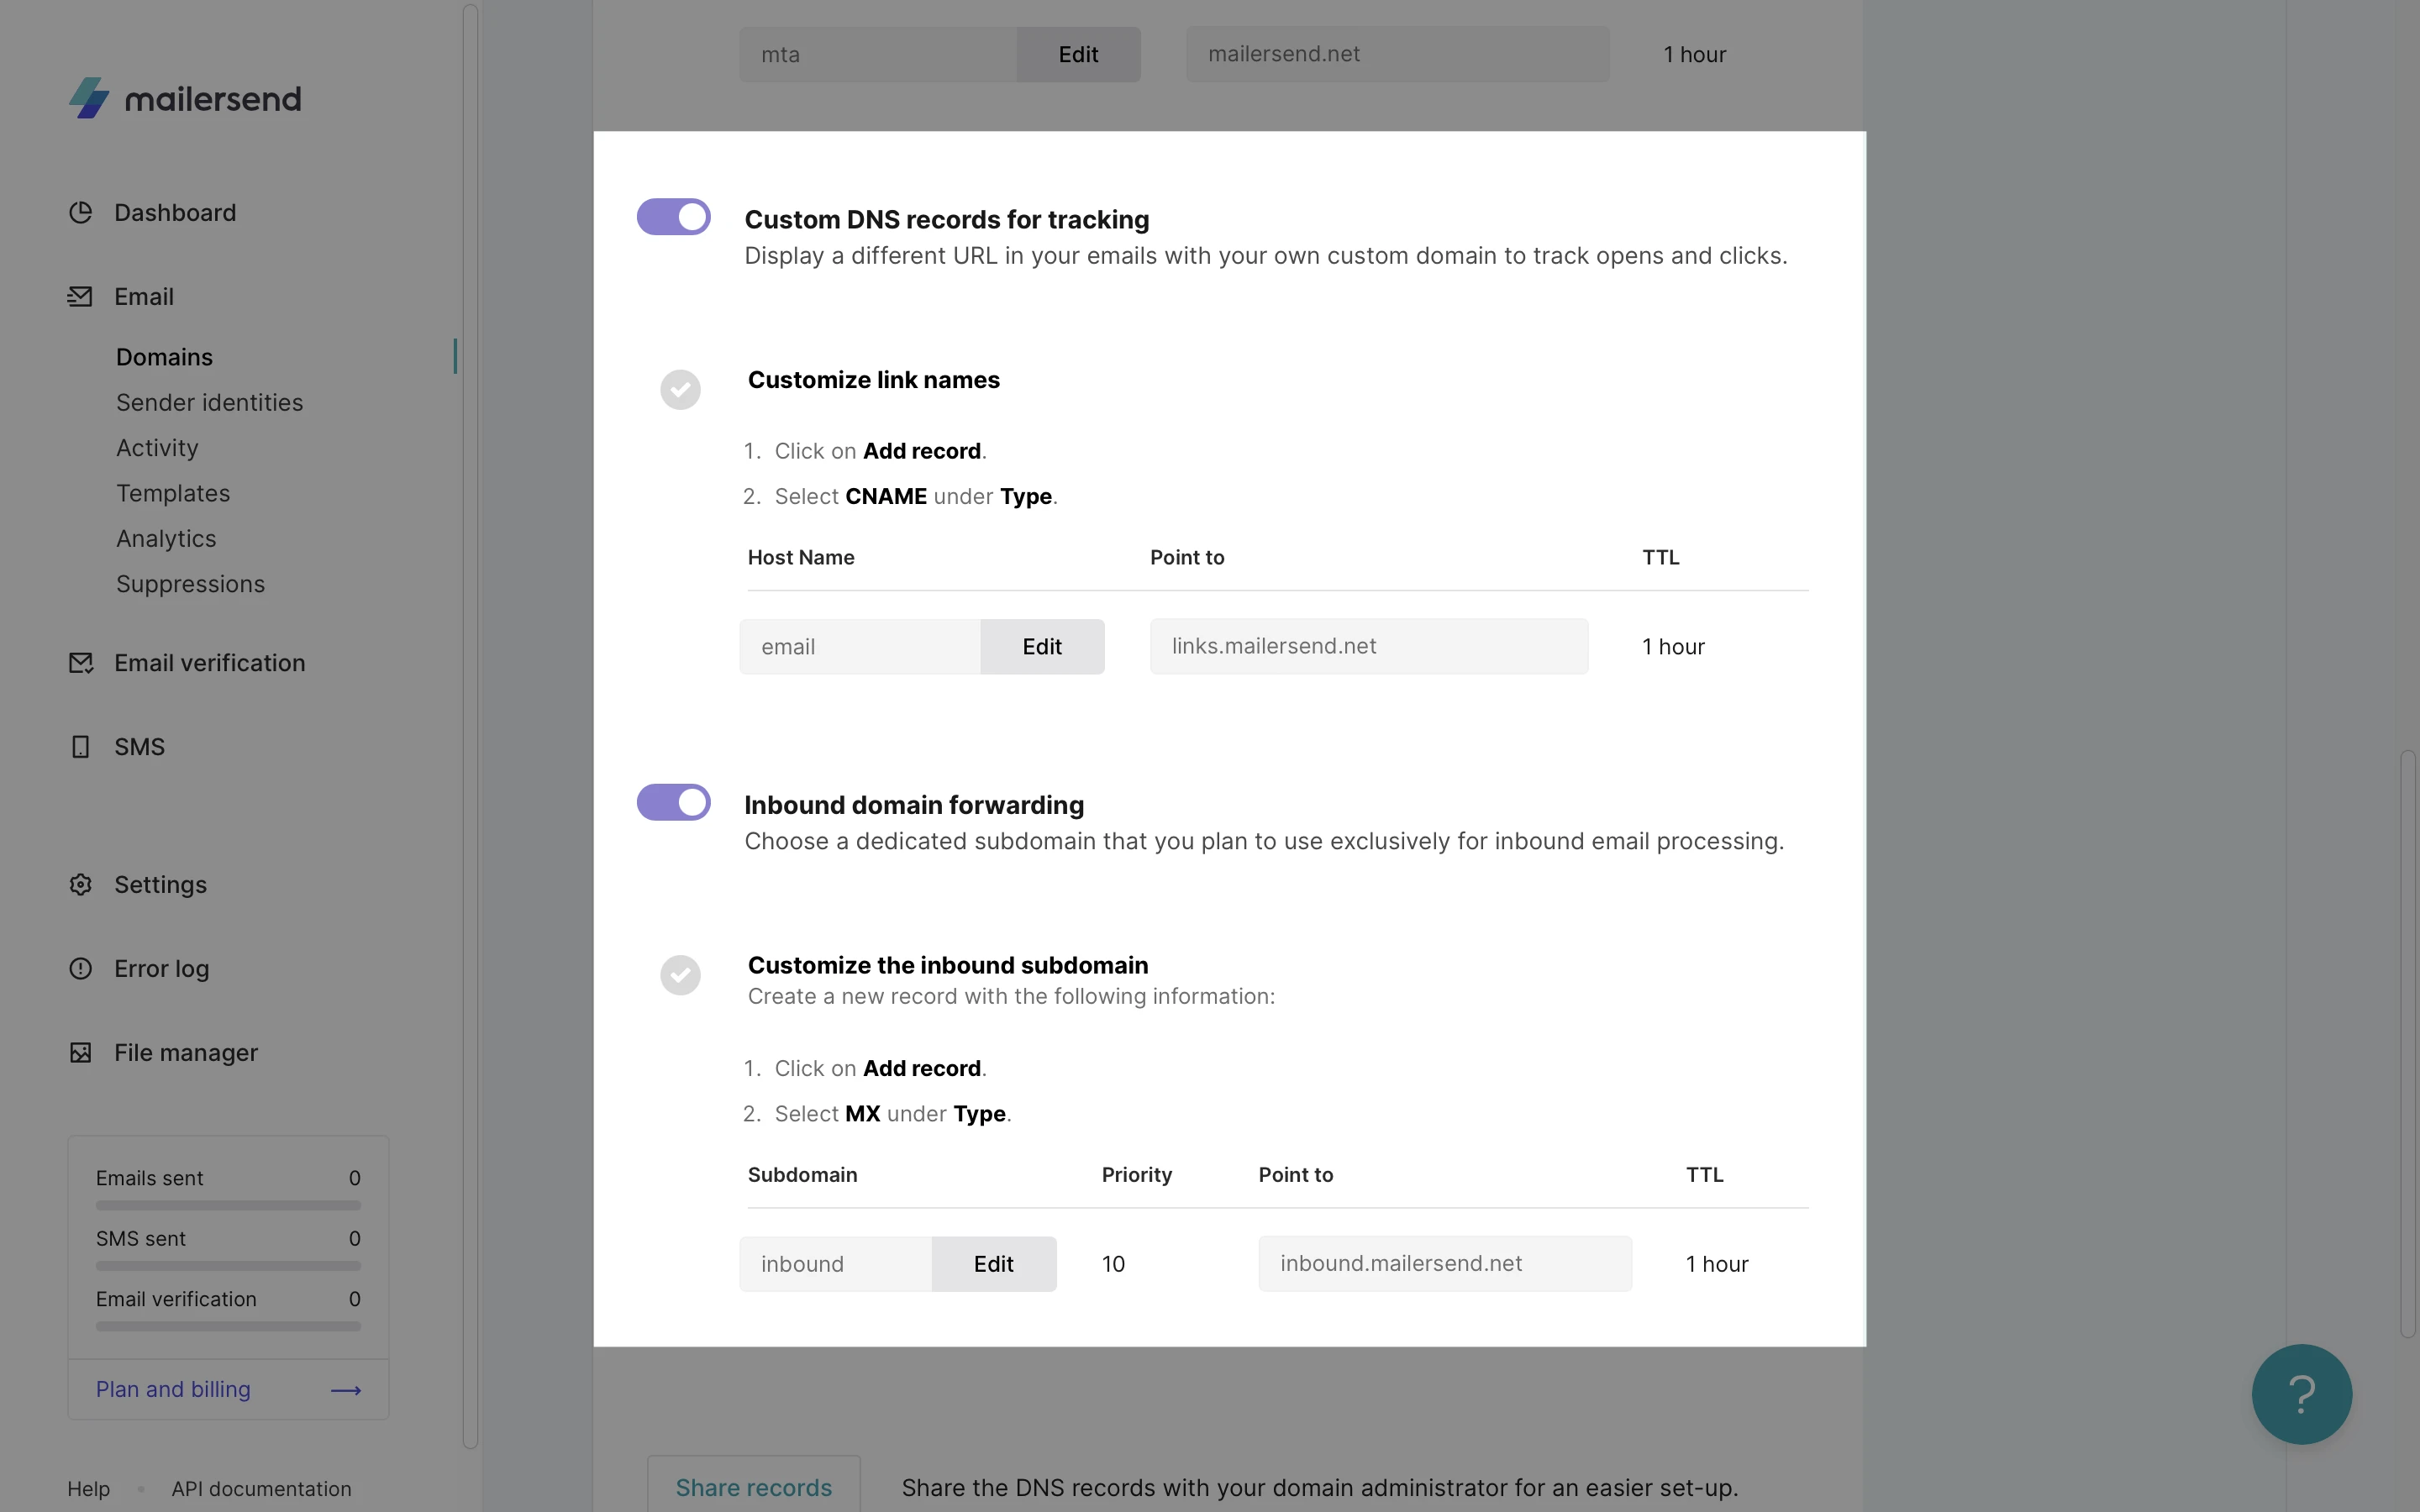
To add Custom DNS records for tracking or enable Inbound domain forwarding, toggle the following options ON.
To manually configure your domain's DNS records:
1. Log in to your domain registrar account and locate the DNS settings for your domain.
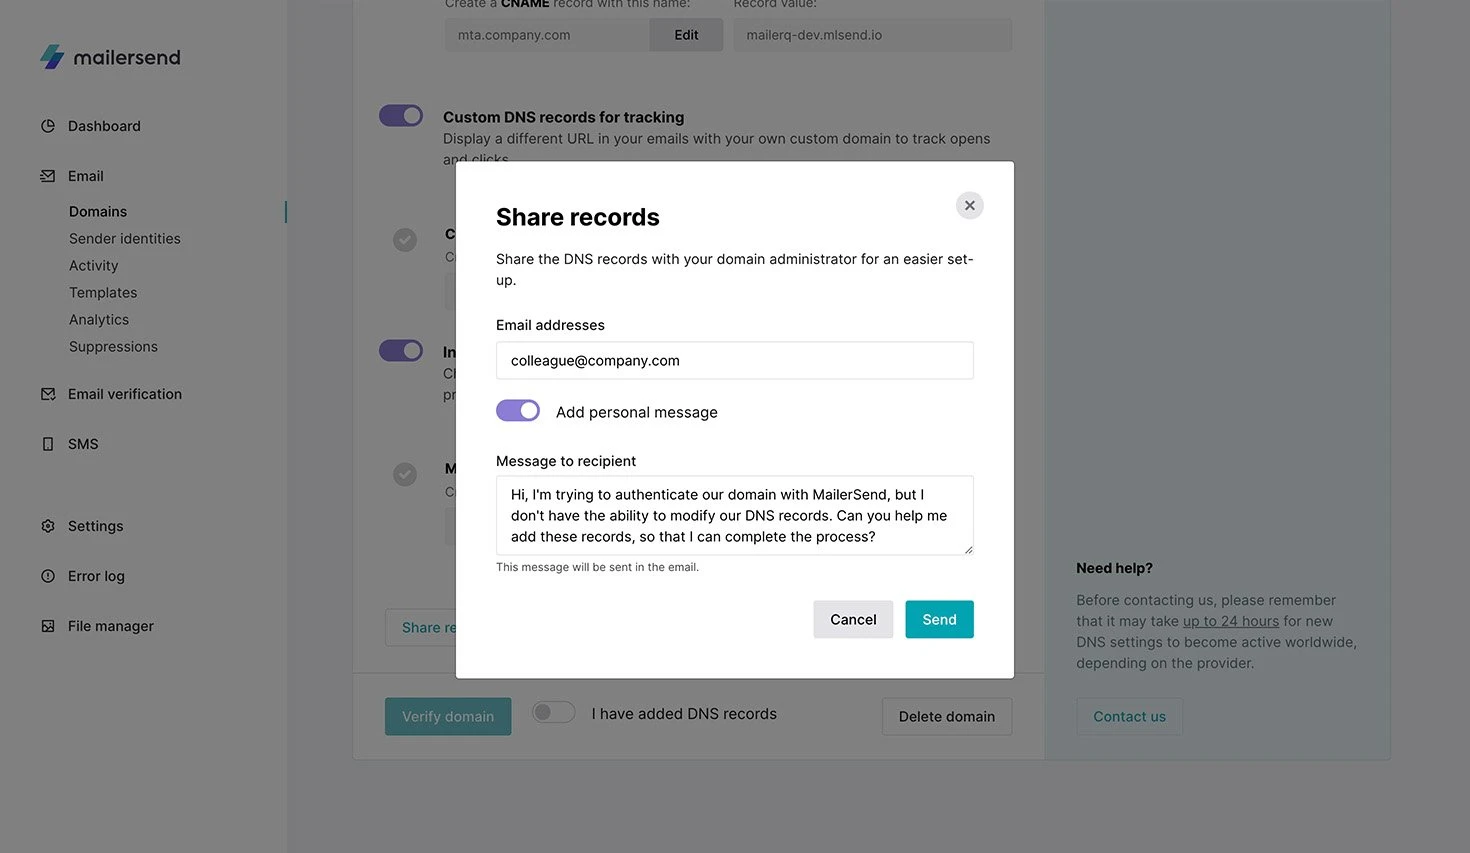
Remember, you can also share the instructions by clicking Forward instructions. Doing so sends an email with instructions about how to set up the DNS records to the email addresses you provide.
2. After adding the records, check the option I have added DNS records and click Finish verification. Once the records have been propagated, your domain will be verified and ready to use.
DMARC
DMARC (Domain-based Message Authentication, Reporting, and Conformance) serves as a key tool in safeguarding your domain against email-related threats like spoofing and phishing, especially for domains that send out transactional emails.
This enhances email security by preventing unauthorized emails from posing as your domain, protecting your domain's reputation. What's more, it helps you to easily identity issues with your authentication, giving you insights to help tighten security and move toward a stricter DMARC policy.
Incorporating a DMARC record, a specific TXT entry in your domain's DNS settings, helps define your DMARC policy and instructs how email servers should handle messages that don't pass SPF or DKIM validations.
Starter plans have 30 days of free access to DMARC monitoring, after which it is available as an add-on, while Professional plans have a number of DMARC monitors included. The DMARC monitoring tool enables you to create a DMARC record for your domain and monitor activity with reports.
How to set up Custom DNS records for tracking
When sending emails with MailerSend, you can track opens and clicks for the emails sent through your domain. If you plan on using tracking options, you can use custom link branding.
To set this up, toggle the Custom DNS records for tracking option in the Domain verification page of the domain.
When this option is enabled, you’ll need to create one more CNAME record for your domain.
By default, we use the subdomain email.yourdomain.tld. That means that your tracking links will be: email.yourdomain.tld/unique-id-for-unique-link
If you want to change the subdomain to anything else:
1. Click Edit and enter any available subdomain under your domain and save it.
2. Head to the domain’s DNS page and create the CNAME record with the fields provided on the Domain verification page.
Once you’ve added the record and it has propagated, all tracking links will use this custom domain name. You can edit this option at any time.
How to troubleshoot the authentication process
If you’ve added all required records in your DNS zone and you’ve waited for a while, but still see that your domain is marked as unverified:
Check that the fields of all records have been entered correctly in the DNS page of your sending domain (they are case-sensitive).
Check if the DNS page has only 1 SPF record. If there’s more than 1 SPF record, the domain won’t be authenticated. Take a look at How to merge SPF records to continue.
Toggle the option I have added DNS records once again and click on Re-check now.
If your records look correct and the domain is still unverified after 48 hours, feel free to contact our Support team at support@mailersend.com.
How to configure the DNS settings for various domain providers
GoDaddy
1. Head over to GoDaddy and log in to your account.
2. Navigate to Domains and select the domain you would like to authenticate to access the Domain Settings page.
3. Scroll down to the Additional Settings section and click on Manage DNS
4. You will access all of your domain’s existing records
How to add the SPF record
1. In the DNS Management page, click Add
2. Select TXT from the Type drop-down
3. In the Host box, enter: @
4. In the TXT Value box, paste the SPF value that is given to you in your MailerSend account - it's already merged with any pre-existing SPF record on your domain.
5. Click Save
How to add the DKIM record
1. In the DNS Management page, click Add.
2. Select CNAME as the Type.
3. In the Host box, paste in the Name that is given to you in your MailerSend account.
4. In the Points to box, paste the Value text that is given to you in your MailerSend account.
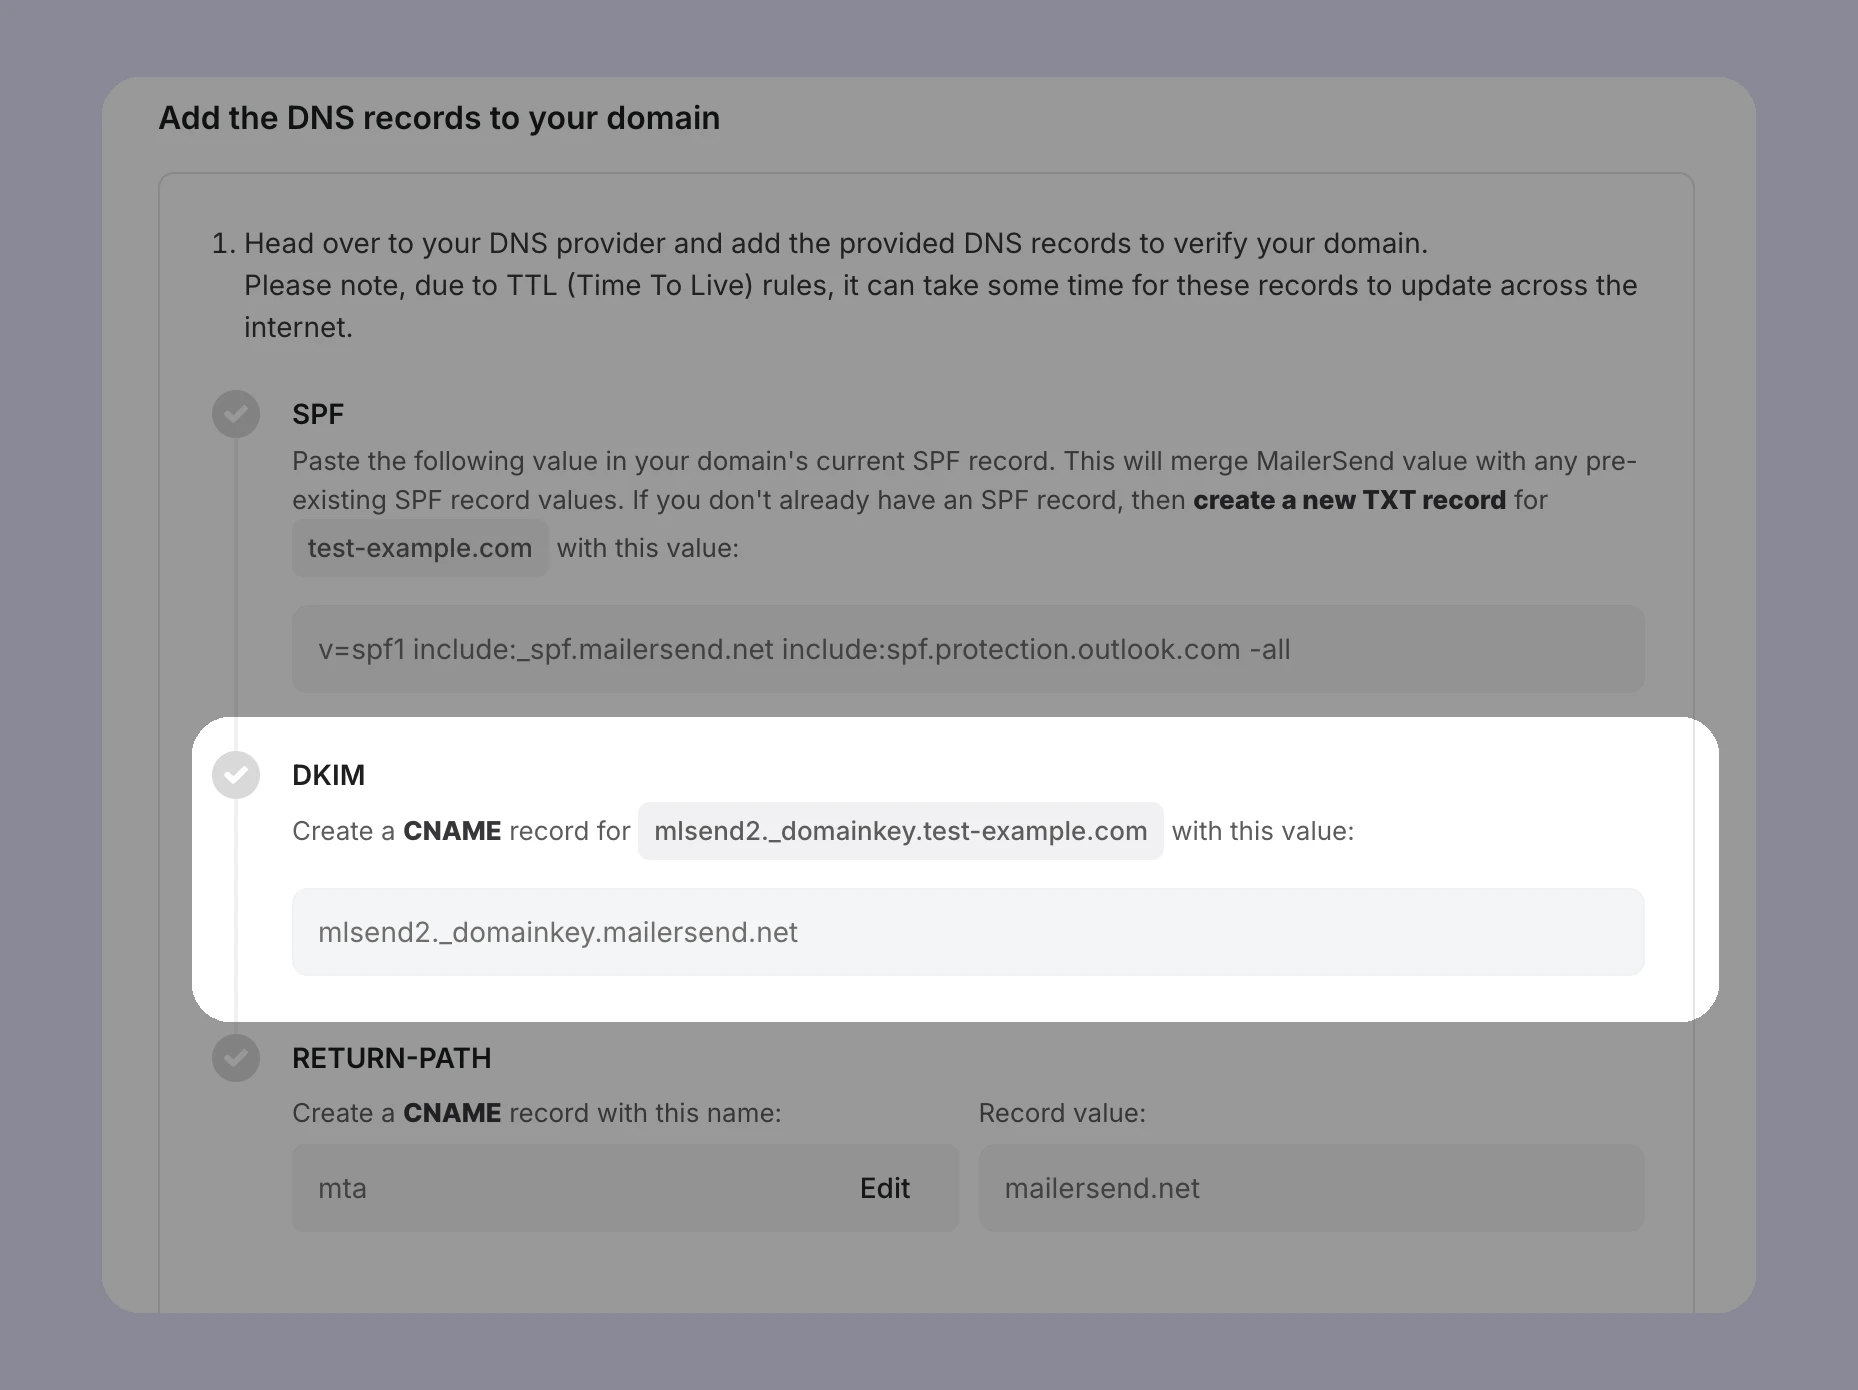
5. Click Save.
How to add the CNAME record for the Return-Path
1. Click Add
2. Select CNAME as the Type
3. In the Host field, paste the Name value provided for you in your MailerSend account, which defaults to mta. However, this can be changed on the MailerSend Domains page by clicking on Edit.
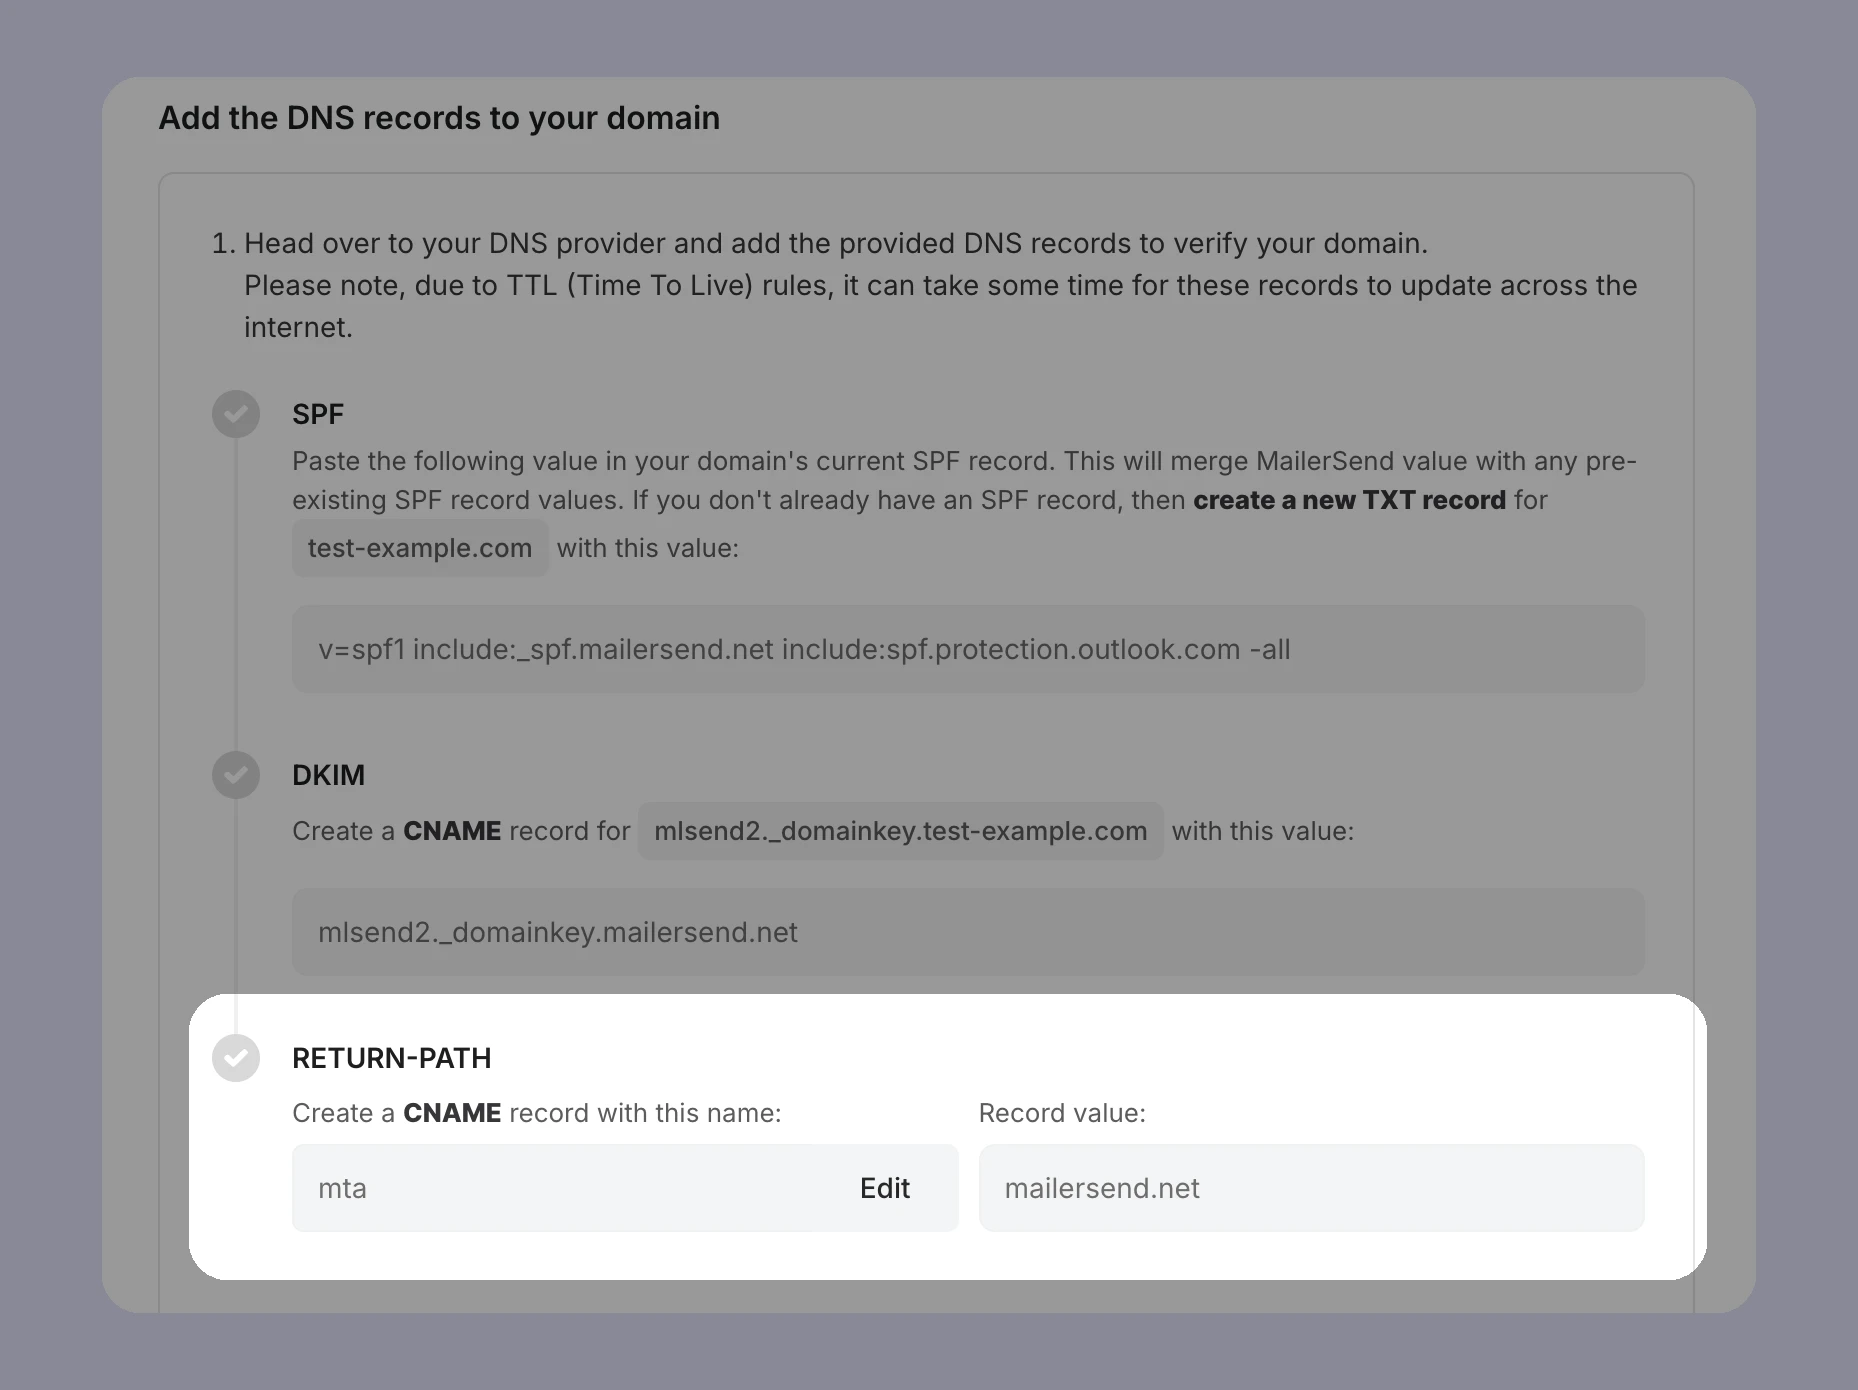
4. In the Points to field, paste the record value: mailersend.net
5. Click Save.
Wix
1. Head to Wix and navigate to your Dashboard page. Make sure you select the website that you would like to authenticate
2. On the left-hand sidebar, click on Settings
3. Click on Manage Domain
How to add the SPF record
1. On the Manage DNS Records page, click on + Add Record under the TXT (Text) section.
2. Leave the Host Name field box empty as the name of your domain is already automatically included in the record (unless you’d like to use a subdomain)
3. In the Value field box, paste the SPF value that is given to you in your MailerSend account - it's already merged with any pre-existing SPF record on your domain.
4. Click Save.
How to add the DKIM record
1. On the Manage DNS Records page, click on + Add Record under the CNAME section
2. In the Host Name field box, add the Name that is given to you in your MailerSend account.
3. In the Points to field, paste the DKIM Value text that is given to you in your MailerSend account.
4. Leave the TTL at 1 Hour.
5. Click Save.
How to add the CNAME record for the Return-Path
1. Under the CNAME (Aliases) section, click + Add record
2. In the Host Name section, paste the Name value provided for you in your MailerSend account, which defaults to: mta. However, this can be changed on the MailerSend Domains page by clicking on Edit.
3. In the Value field, paste the record value mailersend.net
4. Click Save.
Namecheap
1. Head over to Namecheap and log in to your account.
2. Navigate to Domain List and select the domain you’re going to authenticate.
3. Select Advanced DNS to access the DNS page.
How to add the SPF record
1. Under the Mail Settings section, edit the current TXT record for SPF
2. In the Host box, enter: @
3. In the Value box, paste the SPF value that is given to you in your MailerSend account - it's already merged with any pre-existing SPF record on your domain.
How to add the DKIM record
1. Click Add new record under the Host Records section
2. Select CNAME Record as the Type
3. In the Points to field, enter the Name that is given to you in your MailerSend account.
4. In the Value field, paste the unique DKIM value that is given to you in your MailerSend account.
How to add the CNAME record for the Return-Path
1. Click Add new record under the Host Records section
2. Select CNAME Record as the Type
3. In the Host field, paste the Name value provided for you in your MailerSend account, which defaults to mta. However, this can be changed in the MailerSend Domains page by clicking on Edit.
4. In the IP address field, paste the record value: mailersend.net.
Cloudflare
1. Head over to Cloudflare and log in to your account.
2. Navigate to the DNS page of the domain you wish to authenticate.
How to add the SPF record
1. Select the current SPF record in your DNS zone and click on Edit.
2. In the Name field, enter: @
3. In the Content field, paste the SPF value that is given to you in your MailerSend account - it's already merged with any pre-existing SPF record on your domain.
4. Click Save
How to add the DKIM record
1. Click Add record.
2. Select CNAME as the Type.
3. In the Name field, enter the Name that is given to you in your MailerSend account.
4. In the Target field, paste the unique DKIM value that is given to you in your MailerSend account.
5. Click Save.
How to add the CNAME record for the Return-Path
1. Click Add new record.
2. Select CNAME as the Type.
3. In the Name field, paste the Name value provided for you in your MailerSend account, which defaults to mta. However, this can be changed in the MailerSend Domains page if you need to by clicking on Edit.
4. In the IPv4 address field, paste the record value mailersend.net
5. Click Save
Hostinger
1. Head to Hostinger and log in to your account.
2. Navigate to Domains, select the domain you wish to authenticate, and click on DNS zone.
How to add the SPF record
1. Under the TXT (Text) section, edit the current SPF record or add a new record if you don’t have any yet.
2. In the Host field, enter: @
3. In the TXT Value field, paste the SPF value that is given to you in your MailerSend account - it's already merged with any pre-existing SPF record on your domain.
4. Click Save
How to add the DKIM record
1. Under the CNAME section, click Add New +
2. In the Host field, enter the Name that is given to you in your MailerSend account.
3. In the Points to field, paste the unique DKIM value that is given to you in your MailerSend account.
4. Click Save.
How to add the CNAME record for the Return-Path
1. Under the CNAME (Alias) section, click Add new +
2. In the Host field, paste the Name value provided for you in your MailerSend account, which defaults to: mta. However, this can be changed in the MailerSend Domains page if you need to by clicking on Edit.
3. In the Points to field, paste the record value mailersend.net
4. Click Save.
OVH
1. Head to OVH Control Panel and select Web Cloud
2. Click Domains on the left-hand sidebar and select the domain you wish to authenticate
3. Navigate to the DNS Zone tab
How to add the SPF record
1. Click Add an entry and select the TXT record type if you don’t have any SPF records or edit the current SPF record by clicking on the 3 horizontal dots
2. In the Value field paste the SPF value that is given to you in your MailerSend account - it's already merged with any pre-existing SPF record on your domain.
3. Click Next to save the record
How to add the DKIM record
1. Click on Add an entry and select the CNAME record type.
2. In the Points to field, enter the Name that is given to your in your MailerSend account.
3. In the Value field, paste the unique DKIM value that is given to you in your MailerSend account.
4. Click Next to save the record.
How to add the CNAME record for the Return-Path
1. Click on Add an entry and select the CNAME record type
2. In the Sub-domain field, paste the Name value provided for you in your MailerSend account, which defaults to mta. However, this can be changed in the MailerSend Domains page if you need to by clicking on Edit.
3. In the Target field, paste the record value mailersend.net
4. Click Next to save the record
IONOS by 1&1
1. Log in to your IONOS account/
2. For the domain you wish to authenticate, click the gear icon under Actions and select DNS.
How to add the SPF record
1. Click Add record
2. Select TXT under Type
3. In the Host name field, enter @
4. In the Value field, paste the SPF value that is given to you in your MailerSend account - it's already merged with any pre-existing SPF record on your domain.
5. Click Save.
How to add the DKIM record
1. Click Add record.
2. Select CNAME under Type.
3. In the Host field, enter the Name that is given to your in your MailerSend account.
4. In the Points to field, paste the unique DKIM value that is given to you in your MailerSend account.
5. Click Save.
How to add the CNAME record for the Return-Path
1. Click Add record
2. Select CNAME under Type
3. In the Host name field, paste the Name value provided for you in your MailerSend account, which defaults to: mta. However, this can be changed in the MailerSend Domains page if you need to by clicking on Edit.
4. In the Points to field, paste the record value mailersend.net
5. Click Save
Google Cloud
1. In the Google Cloud Console, go to the Cloud DNS zones page
2. Click the name of the managed zone that you want to add the record to
3.On the Zone details page, click Add record set
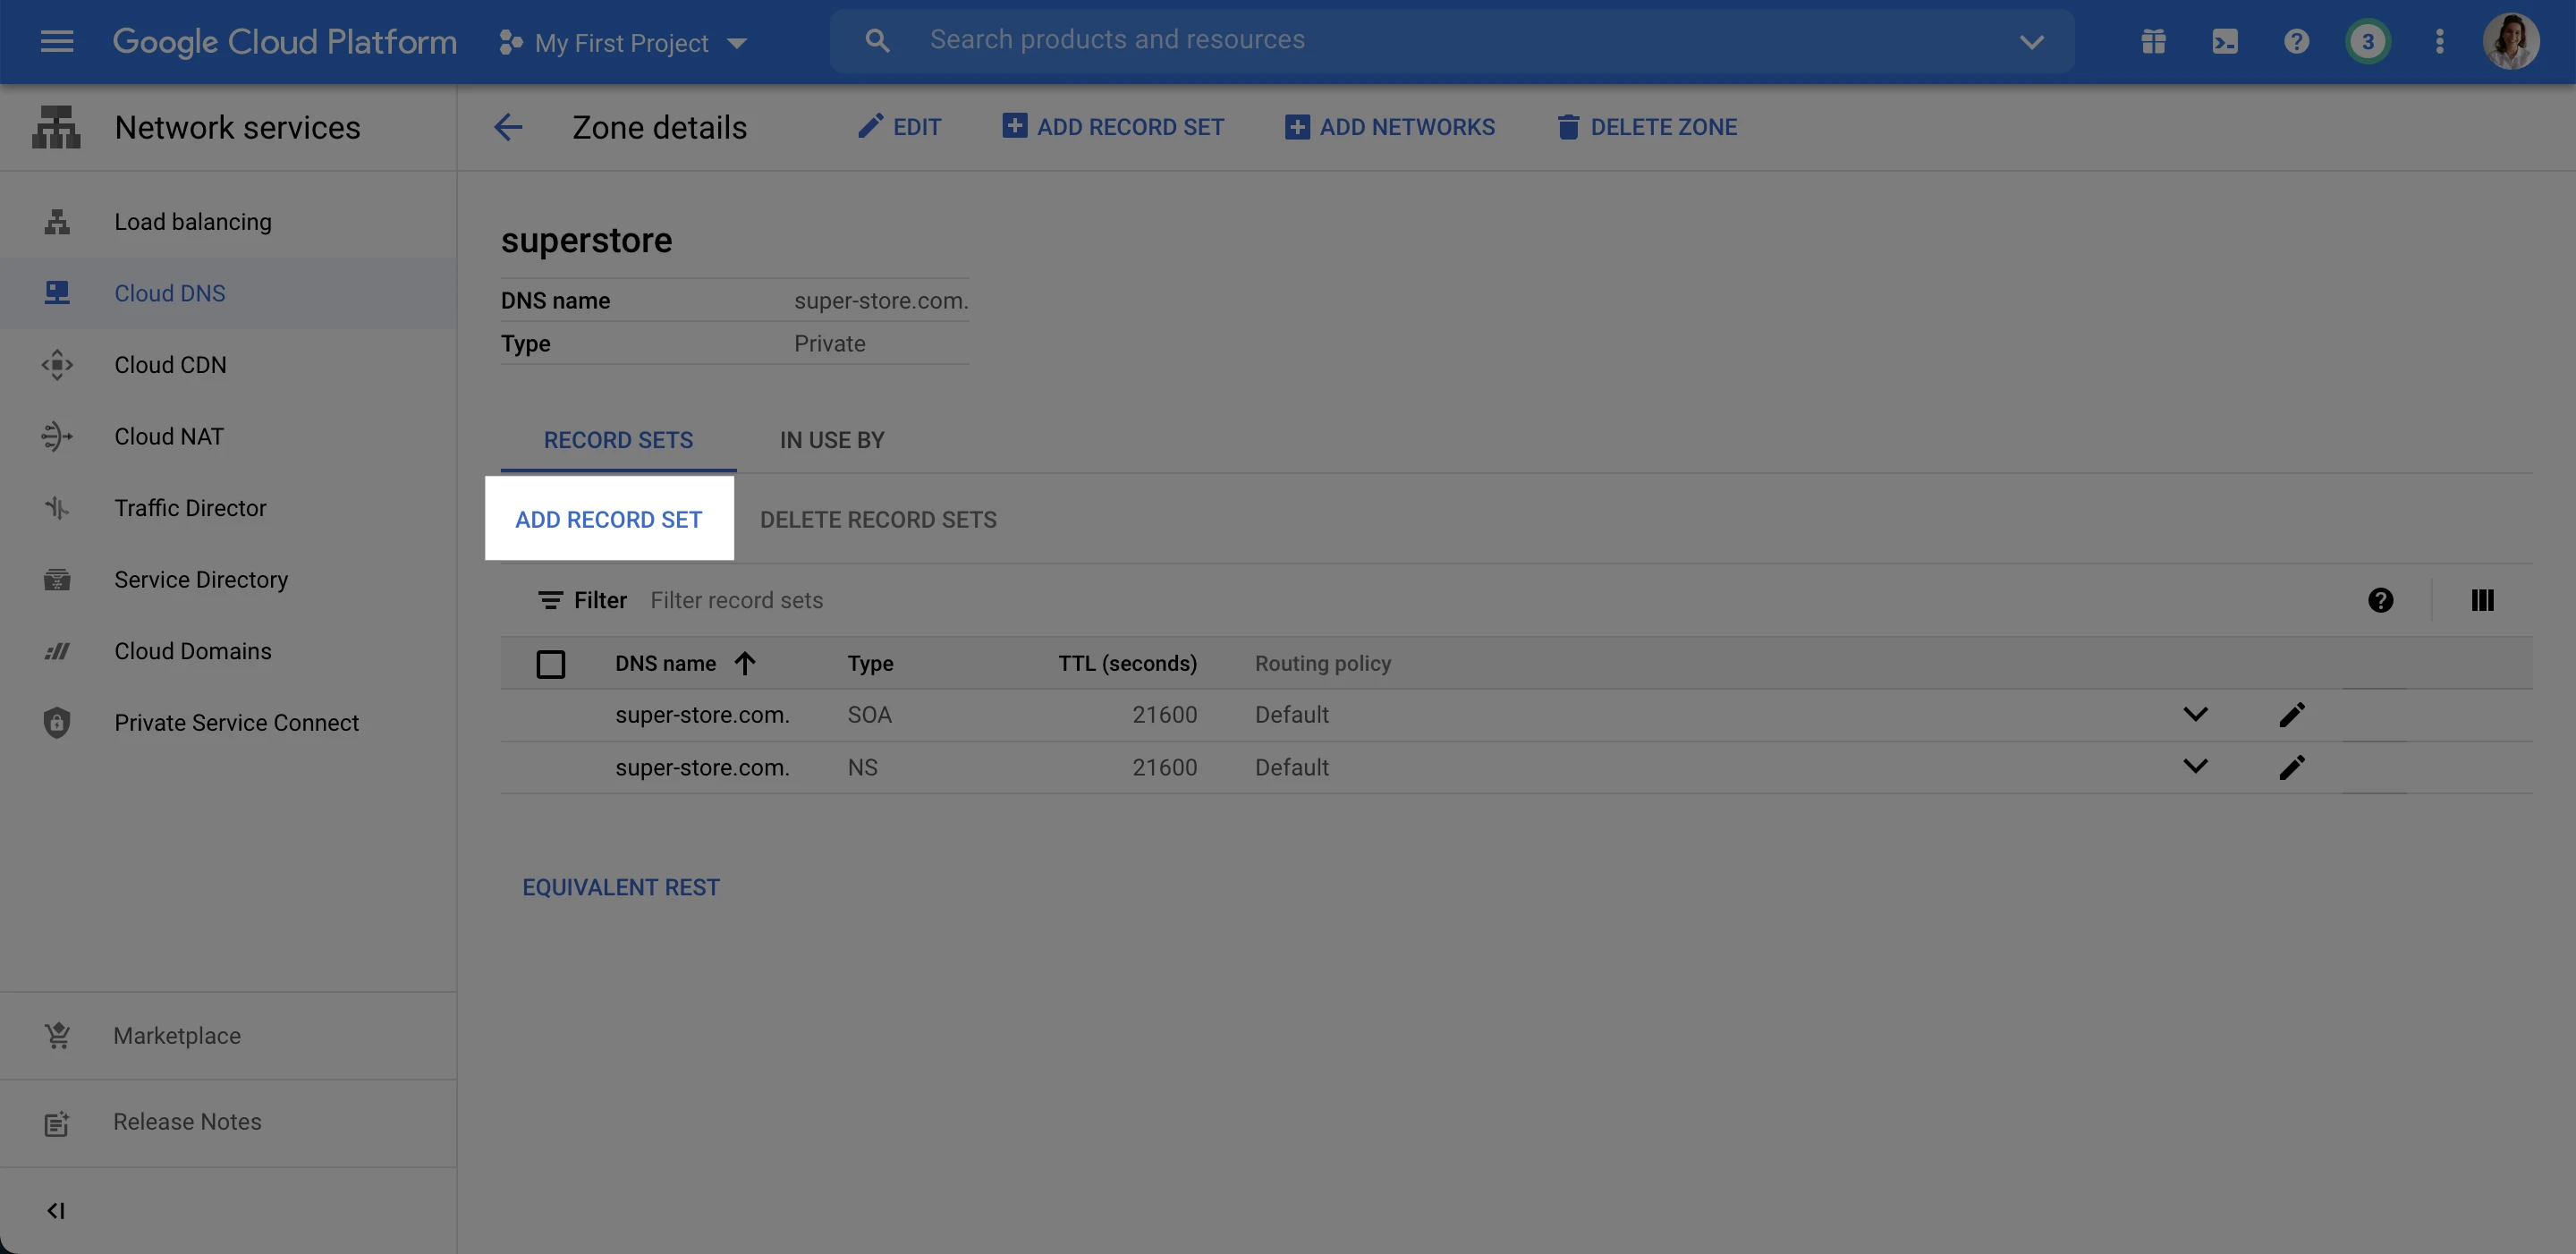
4. On the Create record set page, in the DNS name field, enter the subdomain of the DNS zone
5. Select the Resource record type—for DKIM, select CNAME and SPF records, select TXT. For return-path records select CNAME.
6. In the TTL and TTL units field, enter 5 followed by minutes for a quick setup.
8. Depending on the resource record type that you have selected, populate the remaining field with the record value provided in your MailerSend account.
Google Domains
Head over to Google Domains and log into your account.
Go to My domains.
Click Manage for the desired domain.
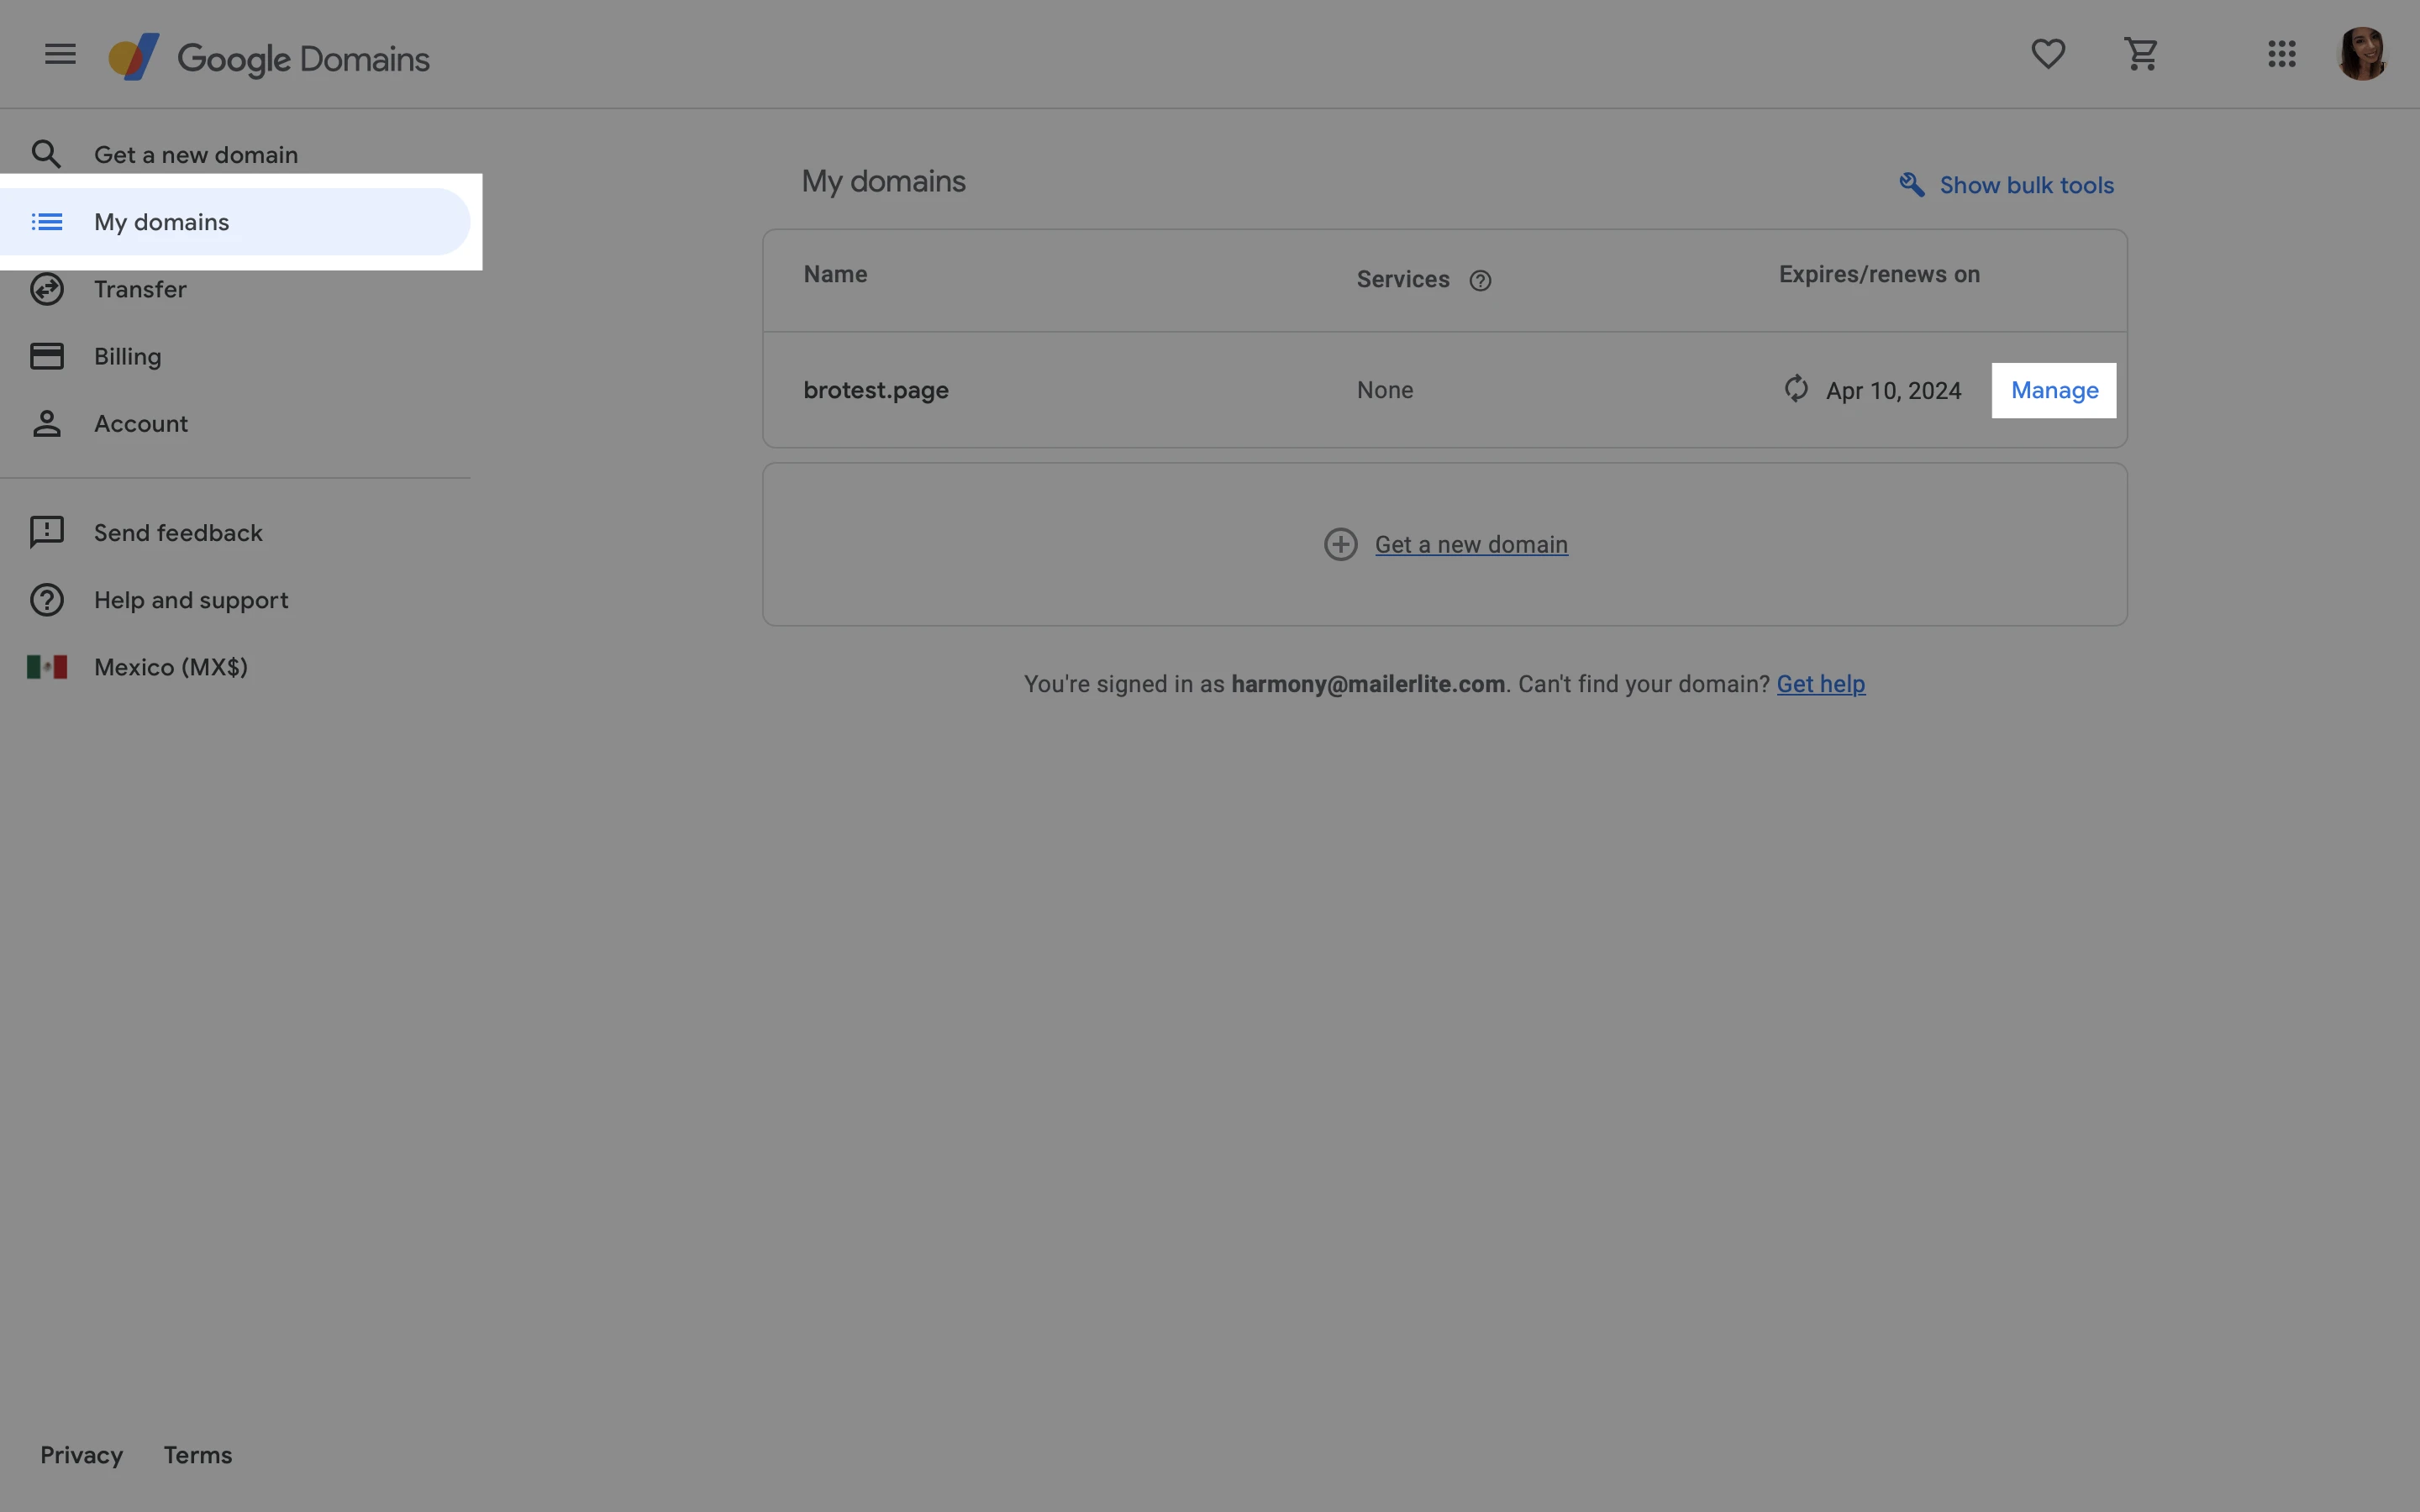
4. Click DNS.
5. Under Resource records, click Manage custom records.
6. Scroll down and click Create new record.
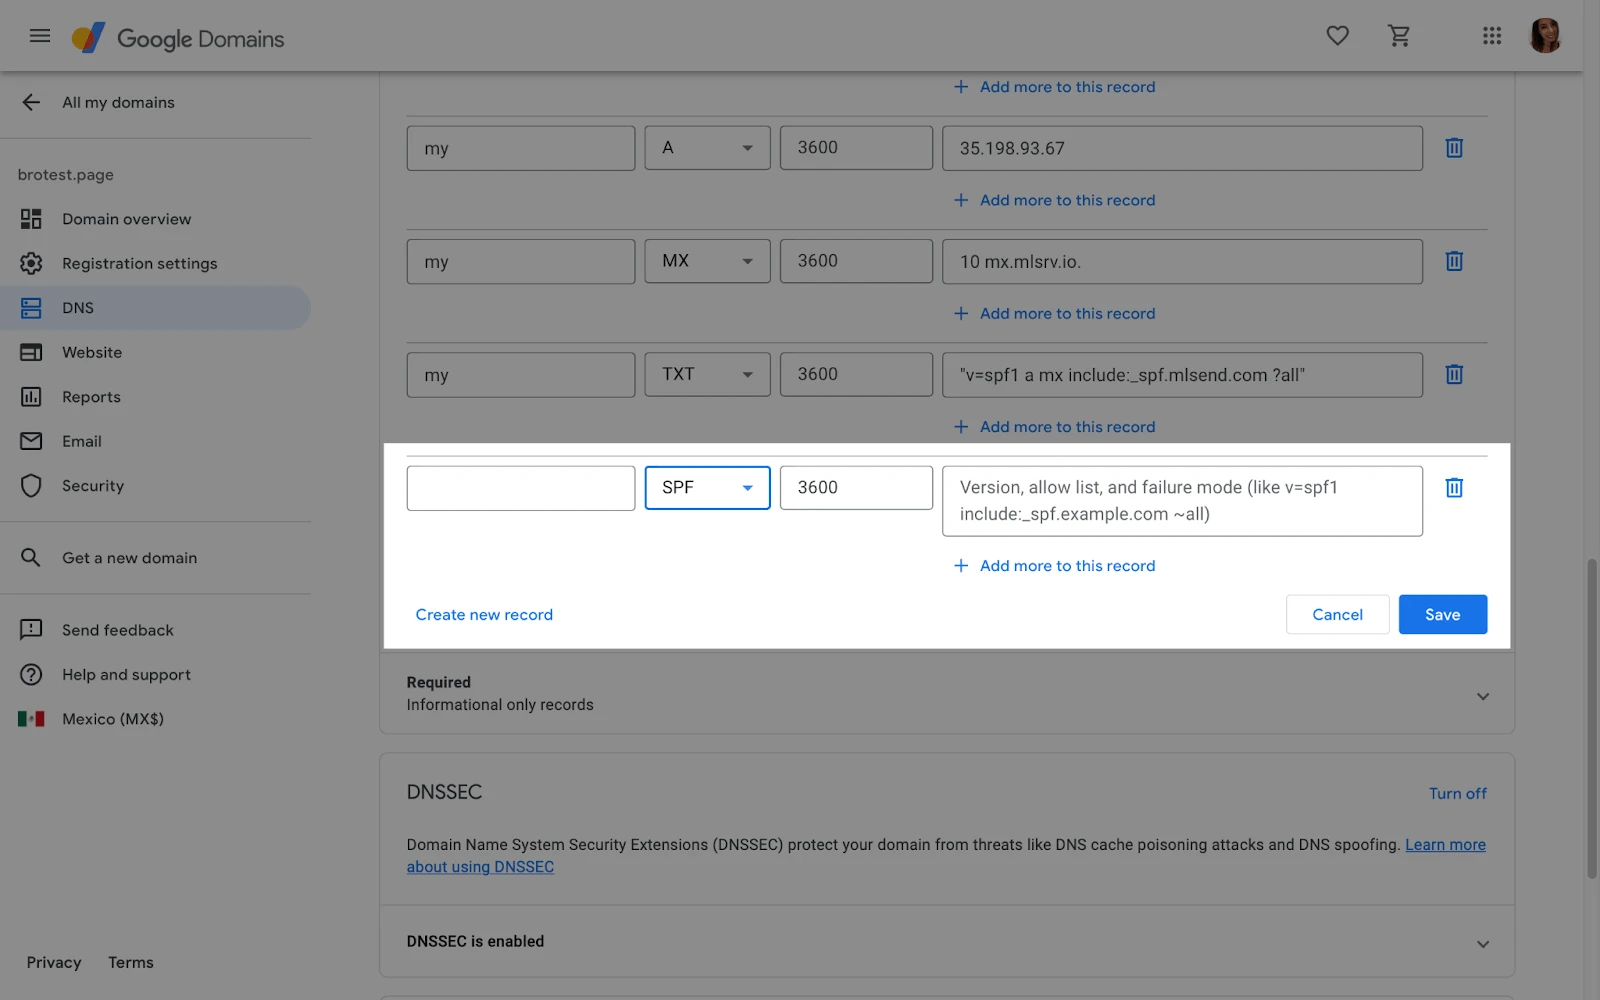
How to add the SPF record
Host name: This should be left empty since your domain is already added automatically
Type: SPF
TTL: 3600
Data: You can find the record value by going to Domains > DNS records in MailerSend. The Value text should be added here.
How to add the DKIM record
Host name: mlsend2._domainkey.mailersend.net
Type: CNAME
TTL: 3600
Data: You can find the record value by going to Domains > DNS records in MailerSend. The Value text should be added here.
How to add the CNAME record for the Return-Path
Host name: This should include only mta
Type: CNAME
TTL: 3600
Data: You can find the record value by going to Domains > DNS records in MailerSend, which defaults to mta. However, this can be changed in the MailerSend Domains page.
Other providers
Not using one of the above providers? Find more instructions on DNS management here: |
Need more info?
While we are very happy to assist you, we recommend contacting your hosting provider’s support team for additional questions and troubleshooting.
For other questions, feel free to talk with us via live chat or contact us at support@mailersend.com