Essential email DNS records and how to set them up

When you send an email, the recipient's mail server doesn't just accept it at face value. It runs a series of checks against your domain's DNS records to verify you are who you say you are. Get those records wrong, or skip them entirely, and your emails risk landing in spam or being rejected outright.
In this article, we’ll explore the different types of email DNS records, how to set them up, and why they’re essential if you want to send emails reliably and securely.
What are DNS records?
DNS records are pieces of information that are stored in the DNS database. They provide important details about a domain name, such as the IP address and mail server information. For example, if a browser is attempting to access a website via the website address, it will send the address to the DNS server, the DNS server will return the corresponding IP address, which the browser will use to access the website.

Why are DNS records important for sending email?
There are several types of DNS records, some of which are crucial for securely and reliably sending emails, as they can affect your deliverability. This is because when you send an email, the recipient’s mail server might perform some extra checks to ensure you’re a legitimate sender and the email isn’t spam. This could involve a DNS lookup of your email address domain to authenticate your identity.
If the domain’s DNS records aren’t properly configured, it could result in your emails going straight to spam or worse, being rejected completely. If you want your emails to reach the inbox, proper DNS configuration is a must!
What’s more, not only does this help you to improve and maintain healthy deliverability, but it also makes sending emails via SMTP (Simple Mail Transfer Protocol) more secure. One way it does this is by protecting you and your recipients from potential phishing and spoofing attacks, where a bad actor may attempt to use your domain to mislead recipients.
Essential DNS records for sending and tracking emails
Now for the technical part: Let’s take a look at which DNS records identify mail servers.
1. SPF record
An SPF record configured as a DNS TXT record will define which IP addresses are allowed to send emails from your domain. In addition to helping your deliverability, it also helps to prevent unauthorized IPs from sending emails through your domain.
How to implement an SPF record
Most Email Service Providers (ESPs) will hand over an SPF record when you set up your account with them. If you’re a MailerSend user, we’ll provide this for you when you go to verify your domain.
Here’s an example of an SPF record:
v=spf1 include:_spf.mailersend.net ~allOnce your SPF record is ready, all you need to do is create a TXT record in your DNS and add it.
2. DKIM record
DKIM makes your emails more secure by adding an encrypted digital signature to your emails. A private encrypted key is used to encode your email headers, and a public DKIM key is needed to decode the message header contents. It's the DKIM record published on the domain's DNS that contains that public key.
How to implement DKIM
Again, the DKIM key is usually provided by your ESP. Keep in mind that you’ll need a separate DKIM key for each domain.
With MailerSend, you'll add DKIM as a CNAME record, here's an example:
Name:
mlsend2._domainkey.test.comValue:
mlsend2._domainkey.mailersend.netInstead of storing the DKIM key directly, a CNAME record points to where the key is stored. This makes it more secure, scalable and flexible. With many other ESPs, you'll need to add DKIM as a TXT record.
Here’s an example of DKIM as a TXT record:
lbc._domainkey IN TXT ( "v=DKIM1; h=sha256; k=rsa; s=email; " "p=MIGfMA0GCSqGSIb3DQEBAQUAA4GNADCBiQKBgQC/LjZpwn6buX4VLTbb6QAGst3qLvKj3C98hj6Mg2C5qGiEs52fNklvtcMdBovacaEuSSxScFm+55P1whqRkPUz8StHP4sxV83hpFQ87NZMemeMmkPsfdOo/N2OpypZtULxzGJlS7E593IbaiQVDkOR4FRA+flMnxFSBkKQdcYXTQIDAQAB" ) ; ----- DKIM key lbc for lefkosiabadmintonclub.comPublish your public DKIM key to your DNS as a TXT record. And save the private key to your SMTP server or MTA—if you’re using an ESP you won’t need to do this.
3. MX record
A DNS MX (Mail Exchange) record directs mail to a mail server by specifying which server is responsible for accepting messages on behalf of a domain. So, when a user sends an email, let’s say to info@mailersend.com, the email client will query the DNS server for the MX record of the domain (mailersend.com) to find which server is responsible for handling mail, and therefore, where the message should be sent to.
How to implement an MX record
An MX record contains information such as the hostname and IP address of the email server, as well as priority values for multiple mail servers, in the case that the primary server is unavailable.
Priority values work on a simple rule: the lower the number, the higher the priority. So if you have two mail servers configured, your email traffic will always go to the one with the lower priority number first. If that server is unavailable, the next server in line takes over automatically.
Here's what a typical MX record setup looks like with two servers:
Record type | Priority | Value | TTL |
MX | 10 | mail1.yourdomain.com | 3600 |
MX | 20 | mail2.yourdomain.com | 3600 |
In this example, mail1 is always tried first. If it goes down, email automatically routes to mail2. Setting both servers to the same priority number will distribute email load equally between them. Useful if you're running two servers in parallel.
Your ESP will provide your MX record value. All you need to do is head to your DNS records and add a new MX record.
4. CNAME record
Canonical name records, more commonly known as CNAME records, map one domain to another. For example, a subdomain to a domain. They aren’t generally used for sending emails, but you can use them if you want to configure a couple of additional options with your ESP. This includes implementing a return-path email address for failed delivery receipts, or for using custom URLs in your emails that can still track opens and clicks.
How to implement a CNAME record
Once again, your ESP will provide you with the CNAME values to add to your DNS records. In MailerSend, you’ll want to toggle on Custom DNS records for tracking to reveal your CNAME record for custom domain tracking. You’ll then add these values in a CNAME record in your domain’s DNS settings.
A CNAME record will comprise of a record name and a record value. These refer to the alias you’re creating the record for and the domain that the alias should point to, respectively.
5. DMARC record
If SPF is peanut butter and DKIM is jelly, DMARC is the bread bringing them both together for an extra special combination. Domain-based Message Authentication, Reporting & Conformance is an optional email authentication protocol that binds together SPF and DKIM. It provides further protection against phishing and spoofing attacks.
It also provides a framework for mailbox providers to send feedback, giving you more control over what happens to your messages if they fail authentication. When you add a DMARC record to your domain's DNS, you choose a policy that instructs receiving servers how to handle emails that don't pass SPF or DKIM checks:
p=none: Monitor-only mode. Emails are delivered as normal, but you receive reports about authentication results. This is the best starting point if you're new to DMARC.
p=quarantine: Emails that fail authentication are sent to the recipient's spam folder. Use this once you've reviewed your reports and you're confident your legitimate emails are authenticating correctly.
p=reject: Emails that fail authentication are blocked completely and never delivered. This is the strictest setting and offers the strongest protection against spoofing. You should only implement p=reject once you’ve carried out significant monitoring and adjustments to ensure all of your emails are authenticating correctly.
It's worth knowing that as of February 2024, DMARC implementation is a mandatory requirement for senders of more than 5,000 emails per day to Gmail and Yahoo addresses. Even if you send at lower volumes, having DMARC in place is strongly recommended as it's one of the best things you can do for your domain's security and reputation, and it helps significantly with deliverability and inbox placement.
How to implement a DMARC record
DMARC records are configured as TXT records with a name of _dmarc.yourdomain.com. A basic DMARC record value looks like this:
v=DMARC1; p=none; rua=mailto:dmarc@yourdomain.com;v=DMARC1 defines the protocol
p=none (or quarantine or reject) defines the policy for unauthenticated emails
rua=mailto:dmarc@yourdomain.com defines where mailbox providers should send DMARC reports
There are additional parameters you can apply to customize the DMARC record further. If you're using MailerSend, you can easily generate your DMARC record by selecting the preferred options.
DMARC monitoring
With DMARC reports, you can track your domain's sending activity, troubleshoot potential issues and prevent fraudulent use of your domain.
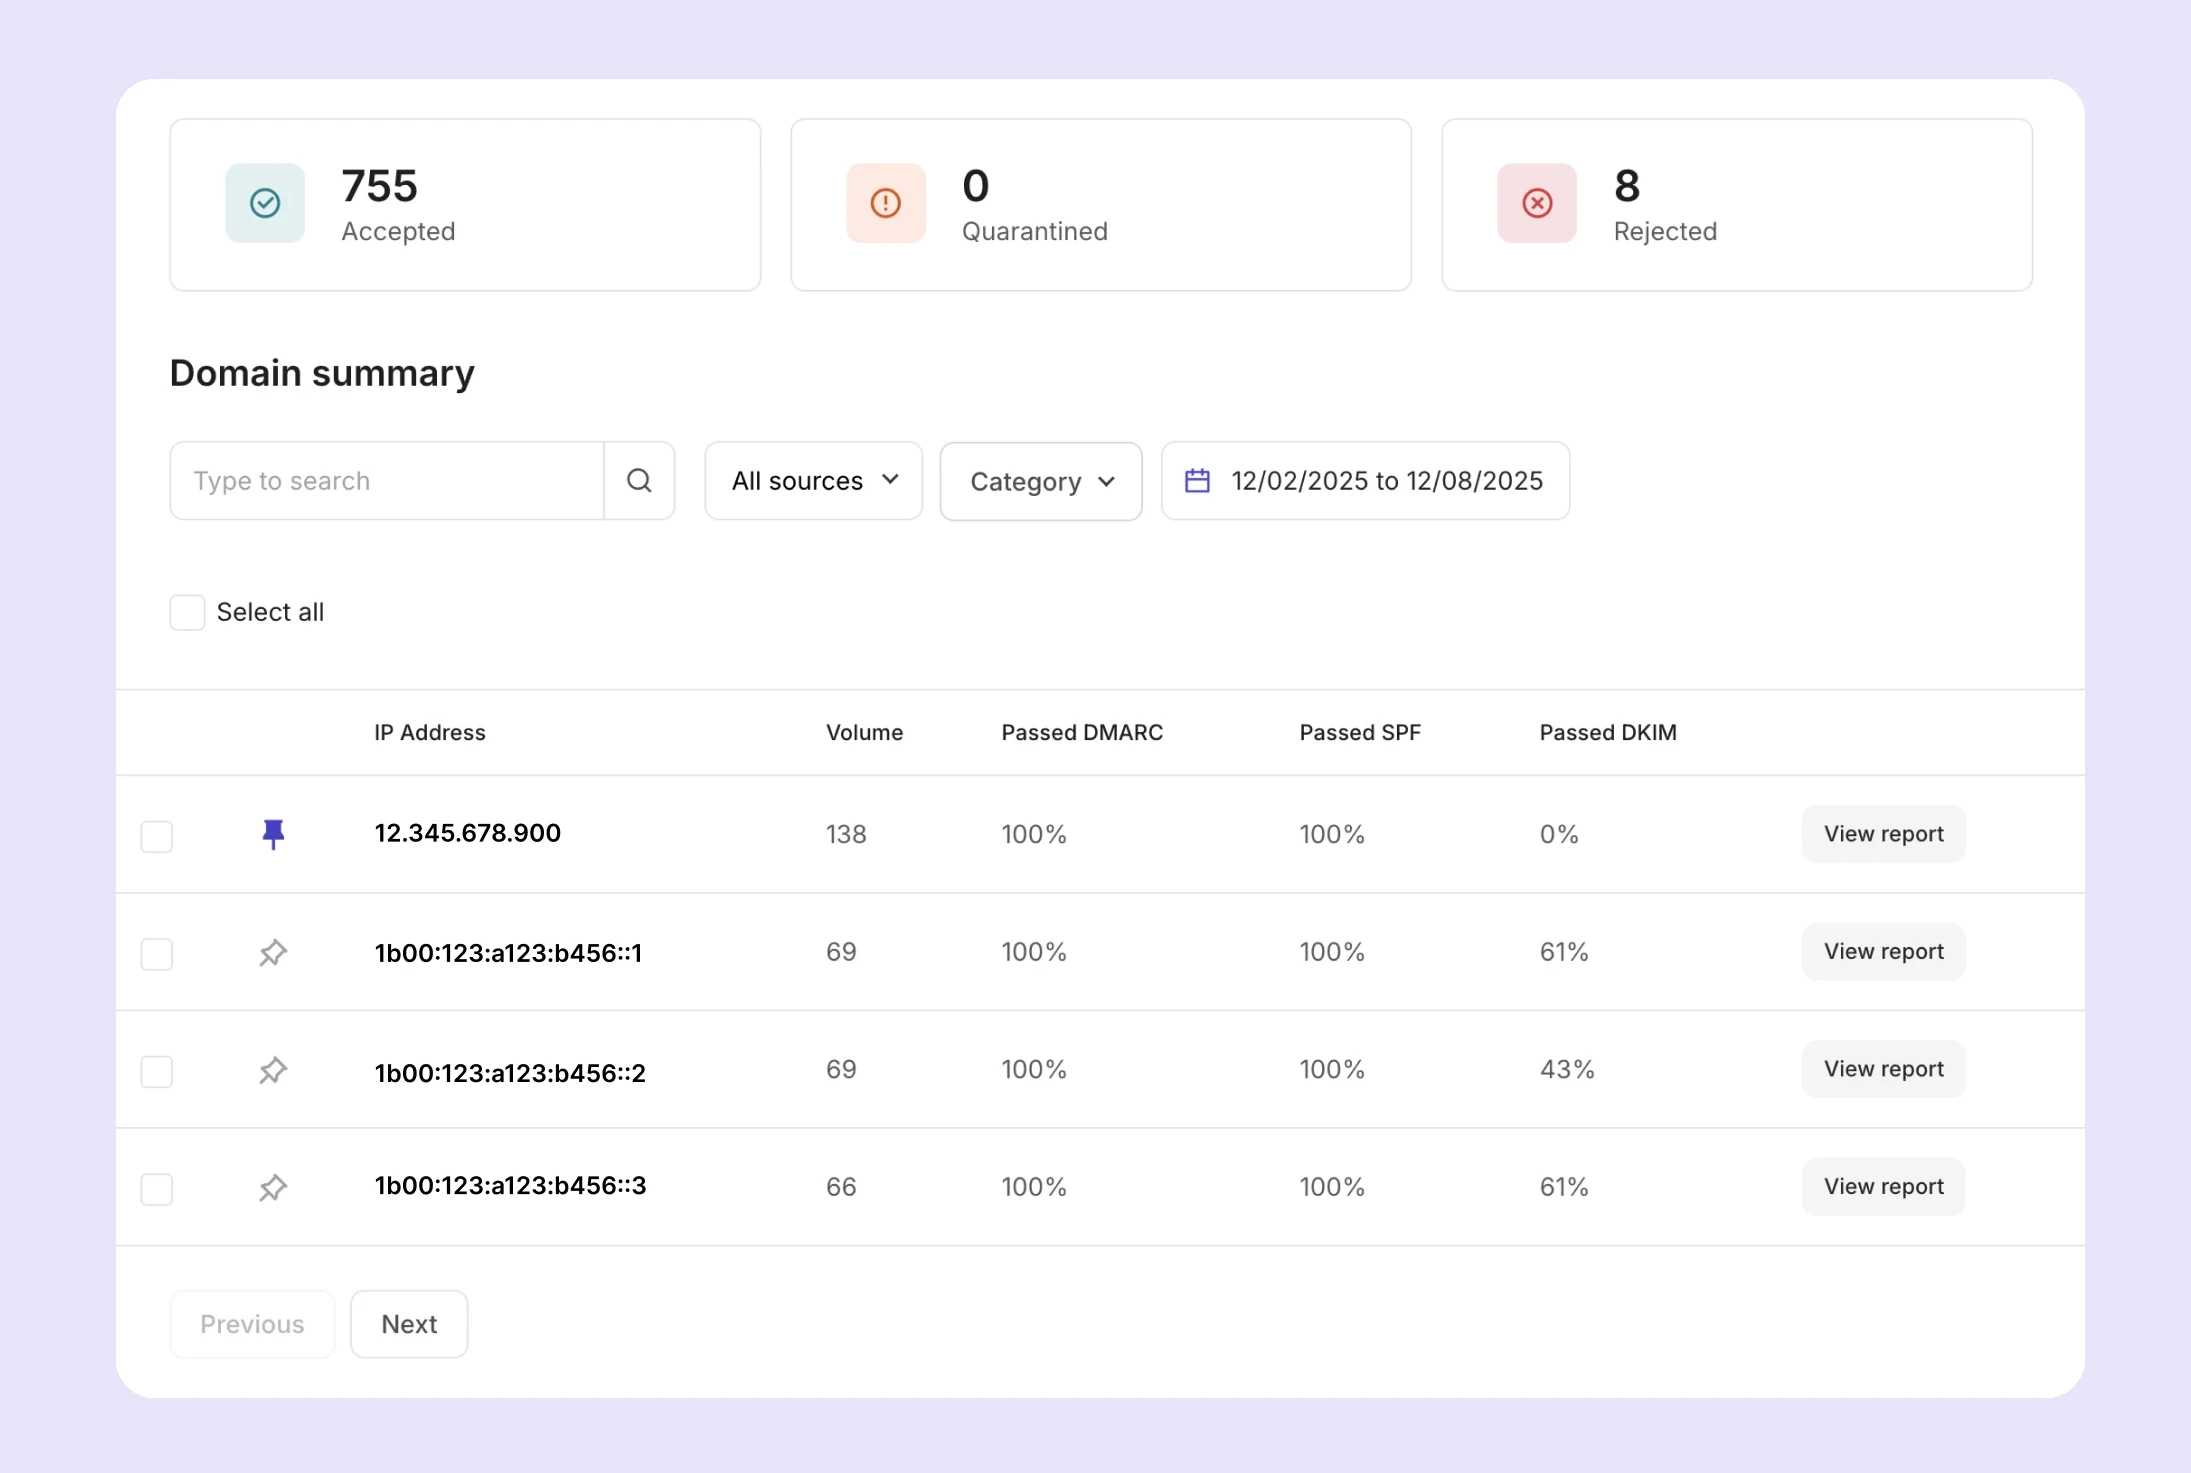
MailerSend has a built-in DMARC monitoring feature that takes the raw XML reports sent by mailbox providers and turns them into readable, actionable insights. From the DMARC monitoring dashboard, you can quickly see authentication and alignment results, report sources, sending IP addresses and the applied policy all in one place. This makes it much easier to spot authentication issues, identify unauthorized senders using your domain, and move toward a stricter DMARC policy with confidence.
DMARC monitoring is available on Professional plans, with a 30-day free trial on Starter plans. Check out the DMARC monitoring guide to get started.
Setting up your DNS records with MailerSend
MailerSend provides the values for your SPF, DKIM, MX and CNAME records when you go to verify a domain. All you need to do then is head to your sending domain’s DNS page and create the corresponding records and enter these values. You can also easily share your records and the instructions for implementing them with a colleague by clicking the Share records button. For DMARC records, you can generate the record in the DMARC monitoring feature.
Check out our guide on how to add and verify a sending domain for a more detailed, step-by-step process. The guide also contains information on how to configure DNS settings for several popular domain providers including GoDaddy, NameCheap, Cloudflare, and Google Cloud.
If you'd rather get started later, no worries! When you add your domain in MailerSend, your domain registrar will be automatically detected and the specific steps on how to set up your DNS records will be provided.
Managing domain verification with the API
You can add domains, fetch DNS records, check verification status, and more with the MailerSend email API and CLI, allowing you to manage your entire domain setup programmatically, or build this functionality directly into your app so your users can send emails from their own domains, without ever touching the dashboard.
You can also use the MailerSend hosted MCP server to connect your account with Claude, ChatGPT, Gemini, VSCode, and Cursor to manage domains and access your DNS records with natural language prompts.
6 additional DNS records that can affect email sending
These are the other DNS records that can make a difference to your email. However, they are optional (except for the A and AAAA records) and not necessary for email delivery.
1. A and AAAA records
Both of these records hold the IP address of the domain, the difference being that the A record holds the IPv4 address, and the AAAA record the IPv6 address. They don’t really have any effect on your email, but they are two of the most important records, as they link your domain and IP.
2. PTR record
Similar to the A record, a PTR record maps an IP address to a domain, just in reverse. So instead of looking up the IP address of a given domain, the DNS query will be looking up the domain of a given IP address. This is known as reverse DNS lookup. This can affect email delivery because it’s used to verify the authenticity of the sender’s domain name.
Email servers do this by using PTR records to perform a reverse DNS lookup to verify that the corresponding domain name matches the domain name used in the email message’s “From” address. This kind of check is sometimes a part of spam filtering, meaning that if a sender's PTR record is missing or contains values that don’t match, the email may be rejected.
3. SRV record
The SRV (Service) record defines the host and port for specific communications protocols, such as email (SMTP, IMAP and POP) and voice (SIP). When the DNS server is queried by an email client, the SRV record provides the hostname and port number of the email server, which allows the client to establish a connection.
Using SRV records for email delivery is particularly useful for domains that use multiple email servers or email servers located on different networks.
4. SOA record
A DNS SOA (Start Of Authority) record is used to identify the authoritative name server for a domain. It also provides details about the domain’s zone file. SOA is not directly used for email delivery, but it does belong to the DNS infrastructure that underlies it! It helps to ensure that messages are delivered to the correct mail server and ensures consistent DNS information across all of the name servers for a domain.
5. NS record
NS (Name Server) records help identify the DNS server name that is authoritative for a particular domain. In layman’s terms, it identifies the server that contains the domain’s DNS records so that the browser, or whatever is querying the DNS, can find the domain’s IP address. Once again, the NS record is another mechanism that ensures email messages are delivered to the correct server.
6. BIMI record
BIMI (Brand Indicators for Message Identification) is another optional protocol. BIMI doesn’t do anything to your email infrastructure to improve your email deliverability, but it does help to make you more identifiable and trustworthy as a sender.
It does this by tying your brand logo to your domain so that when your email messages appear in a recipient’s inbox, the logo appears right alongside it. Here’s an example:
To implement BIMI, you also need to have a DMARC record published. You’ll then need to publish your BIMI record as a TXT file in your DNS.
Check out this article to learn more about BIMI and how to set it up.
Common DNS configuration mistakes (and how to avoid them)
DNS records have a reputation for being tricky to get right the first time. Here are the most common mistakes and how to sidestep them.
1. Having more than one SPF record
Your domain can only have one SPF record. If you publish two, receiving mail servers will return a permanent error and your emails won't authenticate. If you need to authorize multiple sending services, combine them into a single SPF record. Check out our guide on how to merge multiple SPF records.
2. Exceeding 10 DNS lookups in your SPF record
SPF records have a hard limit of 10 DNS lookups. Going over this limit causes authentication failures, even if your record syntax is otherwise correct. Use an SPF flattening tool to keep your record under the limit.
3. Mismatched DKIM domains
DKIM verification fails if the domain in the DKIM signature doesn't align with the From domain. Double-check that your DKIM selector and signing domain match what your ESP has configured.
4. Setting a DMARC policy too strict, too soon
Jumping straight to p=reject without first reviewing your DMARC reports is a fast track to blocking your own legitimate emails. Always start with p=none, review the reports, and gradually step up to p=quarantine and then p=reject once you're confident everything is authenticating correctly.
5. Forgetting to update DNS records when switching ESPs
If you change your email service provider, your SPF, DKIM and sometimes MX records will need to be updated to reflect the new sending infrastructure. Forgetting to do this is one of the most common causes of sudden deliverability issues.
6. Missing PTR record
Some receiving mail servers perform a reverse DNS check and will reject email from IPs that don't have a corresponding PTR record. If you're on a shared infrastructure like MailerSend, this is handled for you. But if you're running your own mail server, make sure your PTR record is configured.
Tip: Use deferred email data and DMARC monitoring to diagnose DNS issues
If you're a MailerSend customer, the Deferred status in your Activity dashboard is a useful diagnostic tool when tracking down DNS or authentication problems. When an email is deferred, you can click through to see the exact SMTP error message, including whether the deferral is linked to an authentication failure. Most deferrals resolve on their own, but the error details can quickly tell you if there's a configuration issue on your end that needs fixing.
DMARC monitoring gives you full visibility into your domain's sending activity, allowing you to quickly identify authentication issues for your SPF, DKIM and DMARC records.
You’re ready to send!
Email infrastructure and deliverability are a whole can of worms that most developers would rather not open. But with an understanding of the DNS records that are important and relevant for email, and a platform that prioritizes deliverability and ease of setup, you’ll be up and running and landing in inboxes faster than you’d expect. Remember that most DNS records will be provided to you by your ESP; all you need to do is add them to your domain’s DNS page. Simple!
Sign up now for free!
Start with MailerSend's Free plan and get access to our email API, SMTP relay, webhooks and more.