How to connect MailerSend's MCP with your AI tools
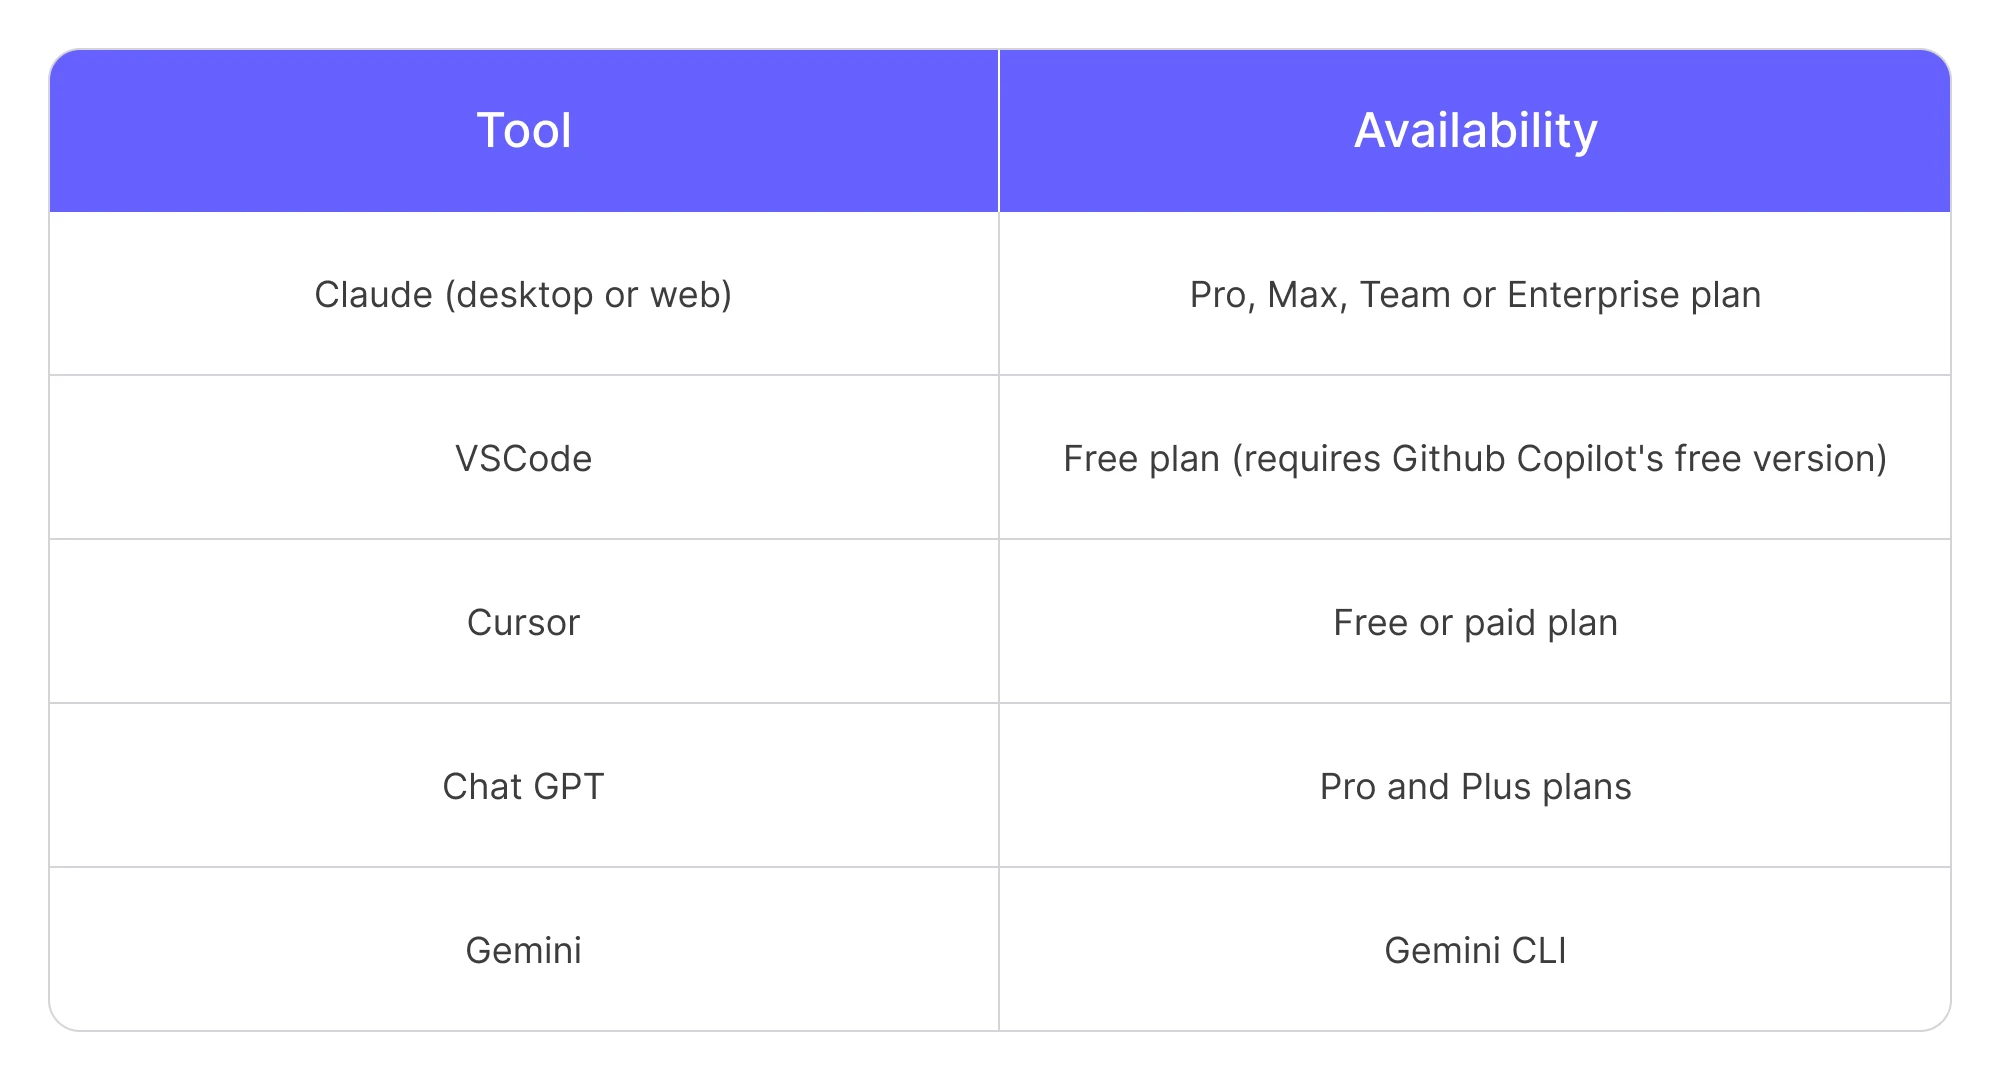
Currently supported AI tools
The MailerSend MCP server is designed to work with any MCP-compatible client. The following tools currently support MCPs, and have been tested with MailerSend:
A note on data privacy and authorization
Before you connect, it's important to understand what this means for your data.
By connecting your AI tool to the MailerSend MCP server, you are granting the AI tool permission to access and manage your MailerSend data (like email activity, API tokens, recipient data, and domain settings) on your behalf.
MailerSend does not send any of your data to an AI tool. You are in full control. This connection simply enables the AI tool you choose to communicate with your MailerSend account when you give it a command.
The connection URL
To connect your chosen AI tool with the MailerSend MCP server, you simply need to add the connection URL in the settings of the tool. You'll find instructions for specific AI tools below.
MailerSend MCP Server URL: https://mcp.mailersend.com/mcp
Claude (Desktop or Web)
These steps work for both the desktop and web app.
1. Make sure you have the latest version of Claude installed.
2. In the Claude chat interface, click the 'Search and tools' icon directly under the text input field.
3. Select Add connectors.
4. On the modal that appears, click the Manage connectors button. Then click Add custom connectors.
5. A form will appear. Add the following details:
Name: e.g. MailerSend (This is for your own reference)
Remote MCP server URL: https://mcp.mailersend.com/mcp
6. Click Add to save the new connector.
7. You will now see 'MailerSend' in your list of available connectors. Click the Connect button next to it.
8. You will be automatically redirected to the MailerSend app in your browser. Choose the account you wish to connect to.
9. Review the permissions screen and click Authorize. Once authorized, you'll be redirected to the Claude app. The connection is now active and you can use the MailerSend MCP.
VSCode
You can integrate the MCP with VSCode via a simple one-click installation.
What you'll need before you start
The Visual Studio Code app installed on your computer
The GitHub Copilot extension installed and enabled in VSCode.
How to connect
To connect MailerSend, simply click the link below to begin the installation process in VSCode.
A pop-up will appear asking for permission to open VSCode. Click Allow.
In VSCode, click the Install button to complete the setup. You can start, stop and restart the server by clicking the settings icon next to the Uninstall button.
That’s it! The MailerSend MCP is active and ready to use in VSCode. In the Copilot chat view, just below the text input field, select Agent mode from the dropdown. You can view and select the tools you want to use by clicking the 'Configure tools' icon.
You can enter a prompt in the chat box, and the relevant tools will be invoked. By default, you'll need to confirm each action before it runs. Simply click Continue, or click the arrow to always allow actions to run without confirmation, or allow for the session or workspace.
Before confirming the action, you can also check and edit the input parameters.
Cursor
You can add the MailerSend MCP to Cursor via one-click installation.
First, make sure you have the Cursor application installed on your computer.
To add the MCP, click the link below to begin the connection process.
Add to CursorA security prompt will appear asking for permission to open Cursor. Click Allow.
Click the Install button to start the setup.
The MailerSend connector will show a status message. Click the link that says Needs login to start the authorization.
Review the permissions and click Authorize.
In the last pop-up window that appears, click Open to finalize the connection.
Tool limits for Cursor's Free plan
If you are using Cursor's Free plan, you might see an “Exceeding total tools limit” warning. This is because the free plan currently supports a maximum of 40 active tools from a single connector.
How to manage this: You have full control over which tools are active. To stay within the limit, you can go to the MailerSend MCP connector settings within Cursor and click on individual tools (e.g., delete_recipient, get_sender_identity) to enable or disable them as needed. This allows you to customize the toolset for your current task.
ChatGPT
With OpenAI's recently released beta feature, you can connect MCPs for Pro and Plus plans. So to connect the MailerSend MCP to ChatGPT, you'll need one of these plans (team plans aren't yet supported).
How to connect our MCP to ChatGPT:
In ChatGPT, click on your profile in the bottom left-hand corner and select Settings.
Go to Connectors > Advanced Settings and toggle Developer Mode.
Go Back and hit Create in the top right-hand corner.
In the New Connector modal, fill out the details as follows:
a. Name: MailerSend (This is for your own reference)
b. MCP server URL: https://mcp.mailersend.com/mcp
Tick the “I trust this application” checkbox at the bottom and click Create.
You will be automatically redirected to the MailerSend website in your browser. Choose the account you want to connect to.
Review the permissions and click the Authorize button.
You're now connected! To start using the MCP in ChatGPT:
In a new chat, click the + icon, then More, and select Developer Mode.
Click Add Sources and toggle MailerSend. You can now start asking.
Gemini CLI
You can integrate Gemini CLI with the MailerSend MCP. Check out our developer guide to learn more.
Full list of available tools
The MCP gives your AI tool access to MailerSend tools it can use to manage your account and perform tasks. Here are the available tools:
Domain management | Activity and Analytics |
|
|
Webhook management | Template management |
|
|
Email sending | Email verification |
|
|
Example prompts
To give you a better idea of how you could use the MCP, here are a few example prompts:
“Tell me the top 3 user agents for opens for all of my domains.”
“Create a webhook for the domain test.com. Use the webhook URL https://webhook.site/example and configure it to receive events for Opened and Clicked. Name the webhook ‘Test opens and clicks’.”
“Identify the 3 emails that got the most spam complaints in the last quarter. Tell me what they have in common.”
"Schedule an email with the Scheduled Maintenance template to go out at 10:00 AM tomorrow. The {{maintenance_period}} variable should be set as 10:00 PM - 11:00 PM and the {{date}} variable as August 8."
For more information and examples of how to use the MCP, check out our developer guide.
Need more info?
Feel free to reach out to mcp@mailersend.com. A member of our support team will gladly assist you.