Plan add-ons
Each MailerSend plan includes various resources and limits for the use of its features. There is a series of add-ons available that you can purchase in addition to your monthly or annual subscription.
The following add-ons are available to purchase through the Plan & billing page in the app.
Email verification credits
Each plan (excluding the Trial plan) includes a number of free verification credits upon subscription, so that you can test out the email verification feature.
Free | 10 credits |
Hobby | 100 credits |
Starter | 100 credits |
Professional | 400 credits |
Enterprise | 400 credits |
1 credit allows for the verification of 1 email address. If you have a Hobby plan or above, you can purchase additional credits at the following rates, with a minimum purchase of 1,000 credits:
Number of credits | Cost per credit |
1K - 5K | $0.01 |
5K - 10K | $0.009 |
10K - 25K | $0.008 |
25K - 50K | $0.007 |
50K - 100K | $0.006 |
100K - 250K | $0.005 |
250K - 500K | $0.004 |
500K - 1M | $0.003 |
1M - 2M | $0.002 |
2M + | $0.001 |
How to purchase email verification credits
1. In the app, navigate to Plan & billing and click on the Add-ons tab.
2. In the Email verification credits add-on, enter the number of credits you would like to purchase. The price will be updated to show you the cost of the number of credits you've entered.

3. Click Buy credits and you'll be directed to the checkout page. Enter your billing information and click Checkout.
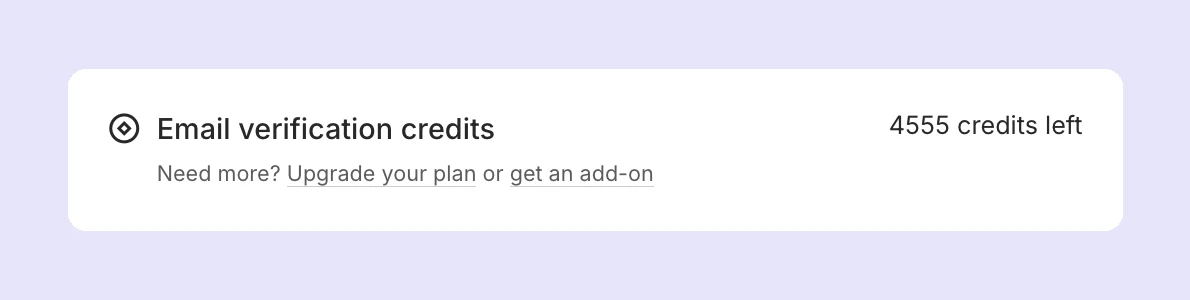
You can view the number of credits you have left in the usage panel in the bottom-left of the app:

Or by going to Plan & billing and scrolling down in the Your plan tab:
How to set up Autopay for credits
If you use the API to validate emails automatically, or you frequently use up your credits, you can set up Autopay to repurchase credits automatically when you fall below a specific limit.
To set up Autopay, you'll need to enable the option when you purchase credits:
1. Go to Plan & billing and select the Add-ons tab.
2. In the Email verification credits add-on, enter the number of credits you want to purchase and enable the Autopay option.
3. Set the credit limit at which you would like the autopay to be triggered. For example, if you purchase 5,000 credits and set the autopay limit at 1,000, when your available credits fall below 1,000, 5,000 credits will be automatically purchased.
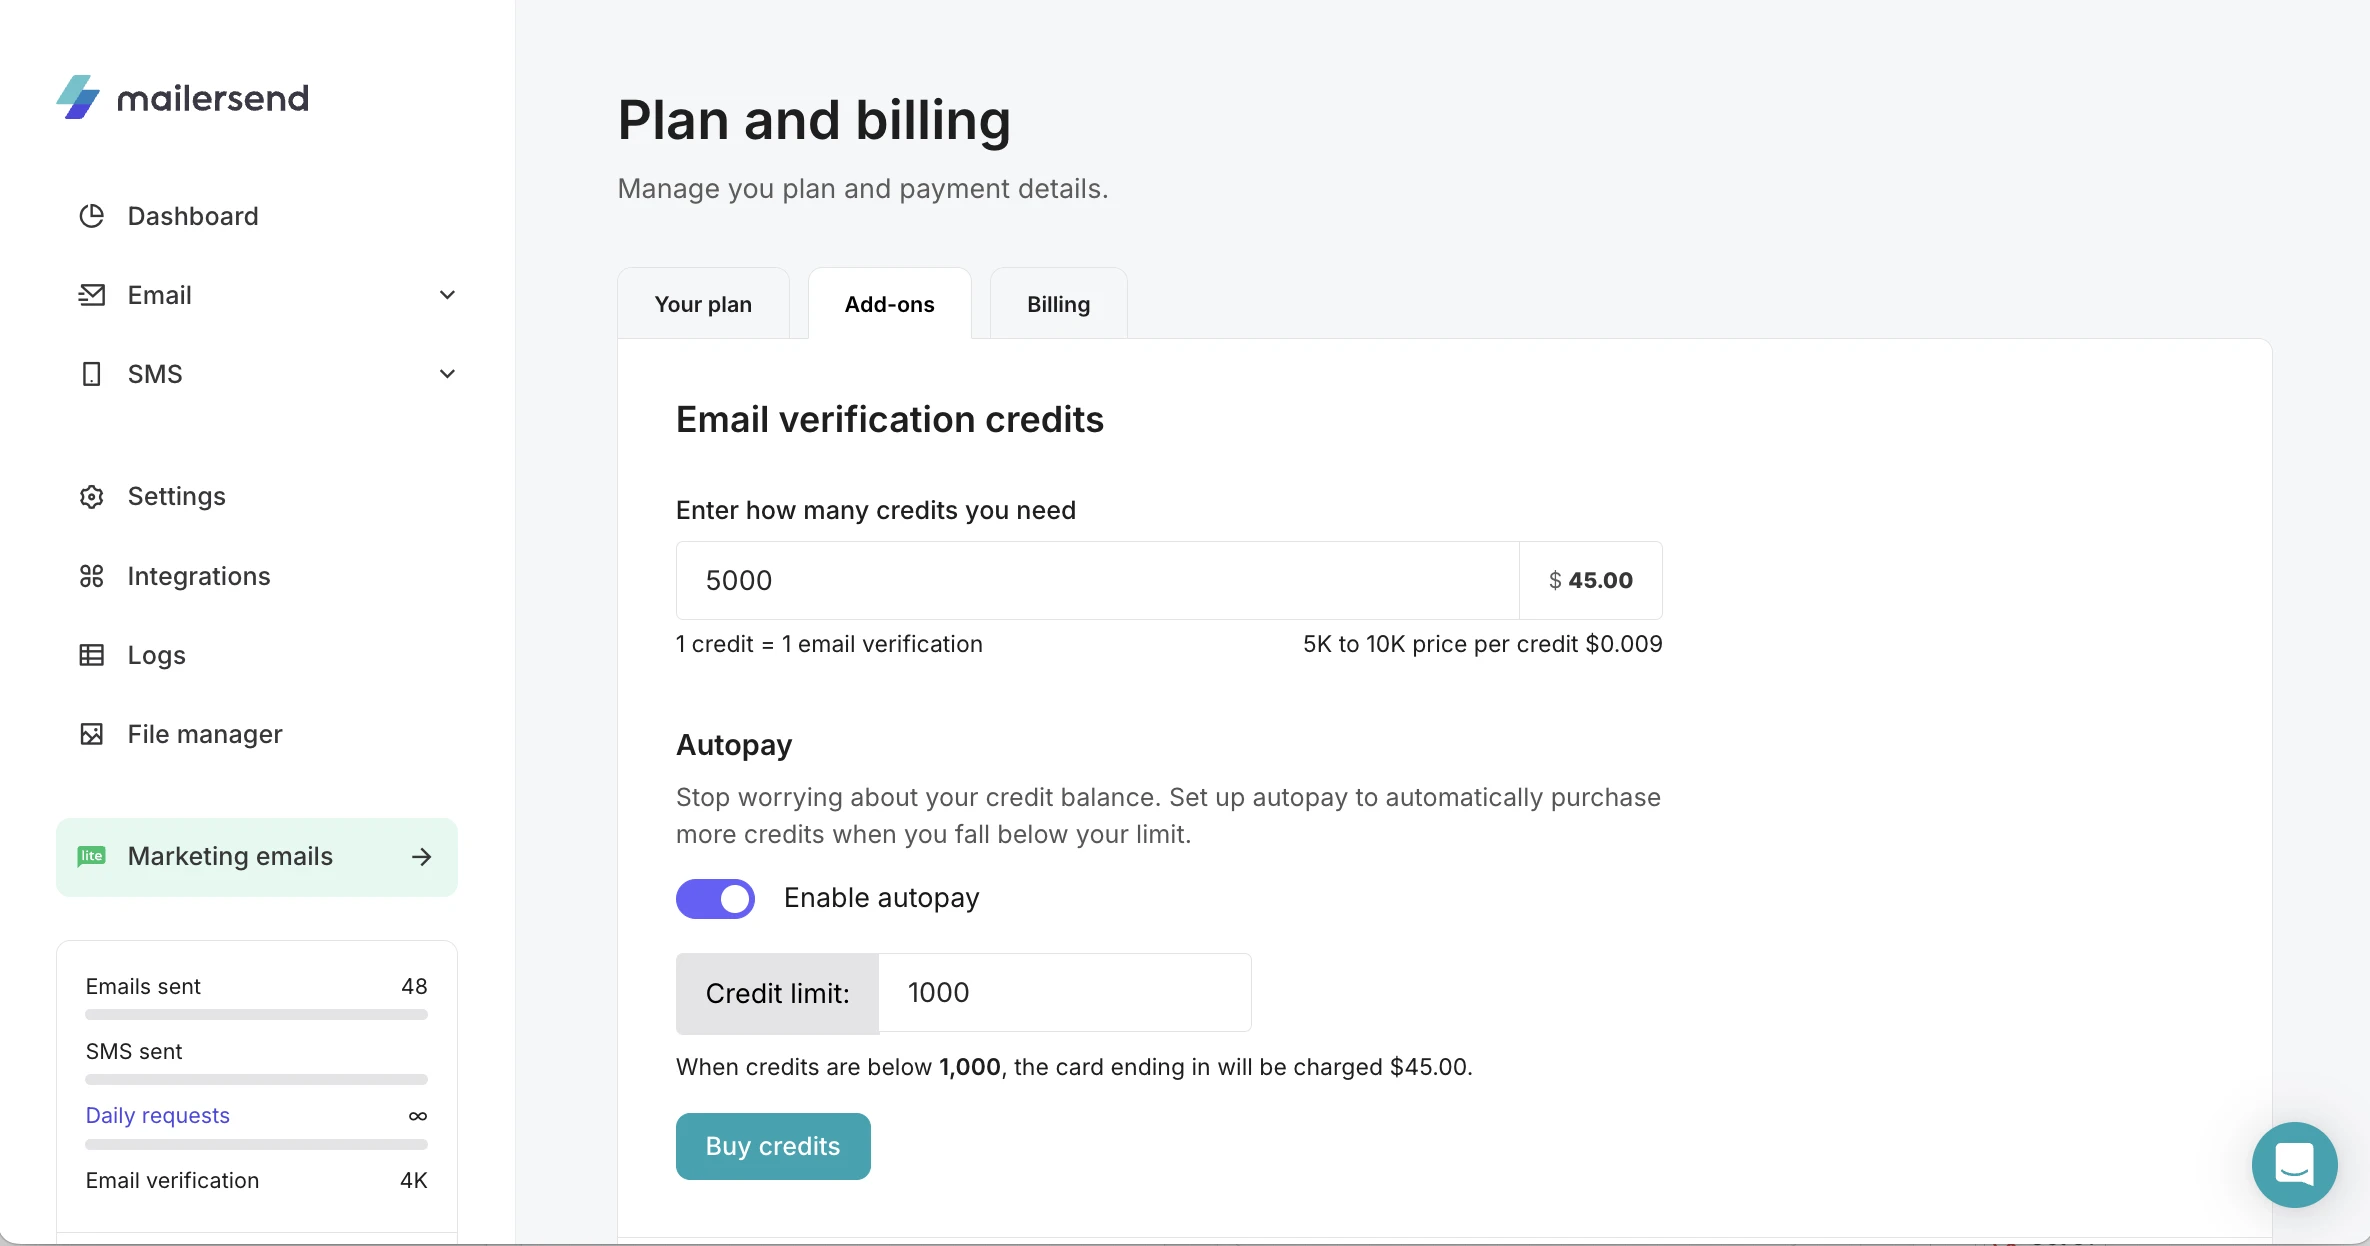
4. Click Buy credits and you'll be directed to the checkout page. Enter your billing information and click Checkout. When your payment is authorized, the credits will be added to your account and the autopay option will be enabled.
The auto-purchasing of credits will continue to happen when you fall below 1,000 credits as long as the option is enabled.
To cancel autopay, simply disable the option.
Phone numbers
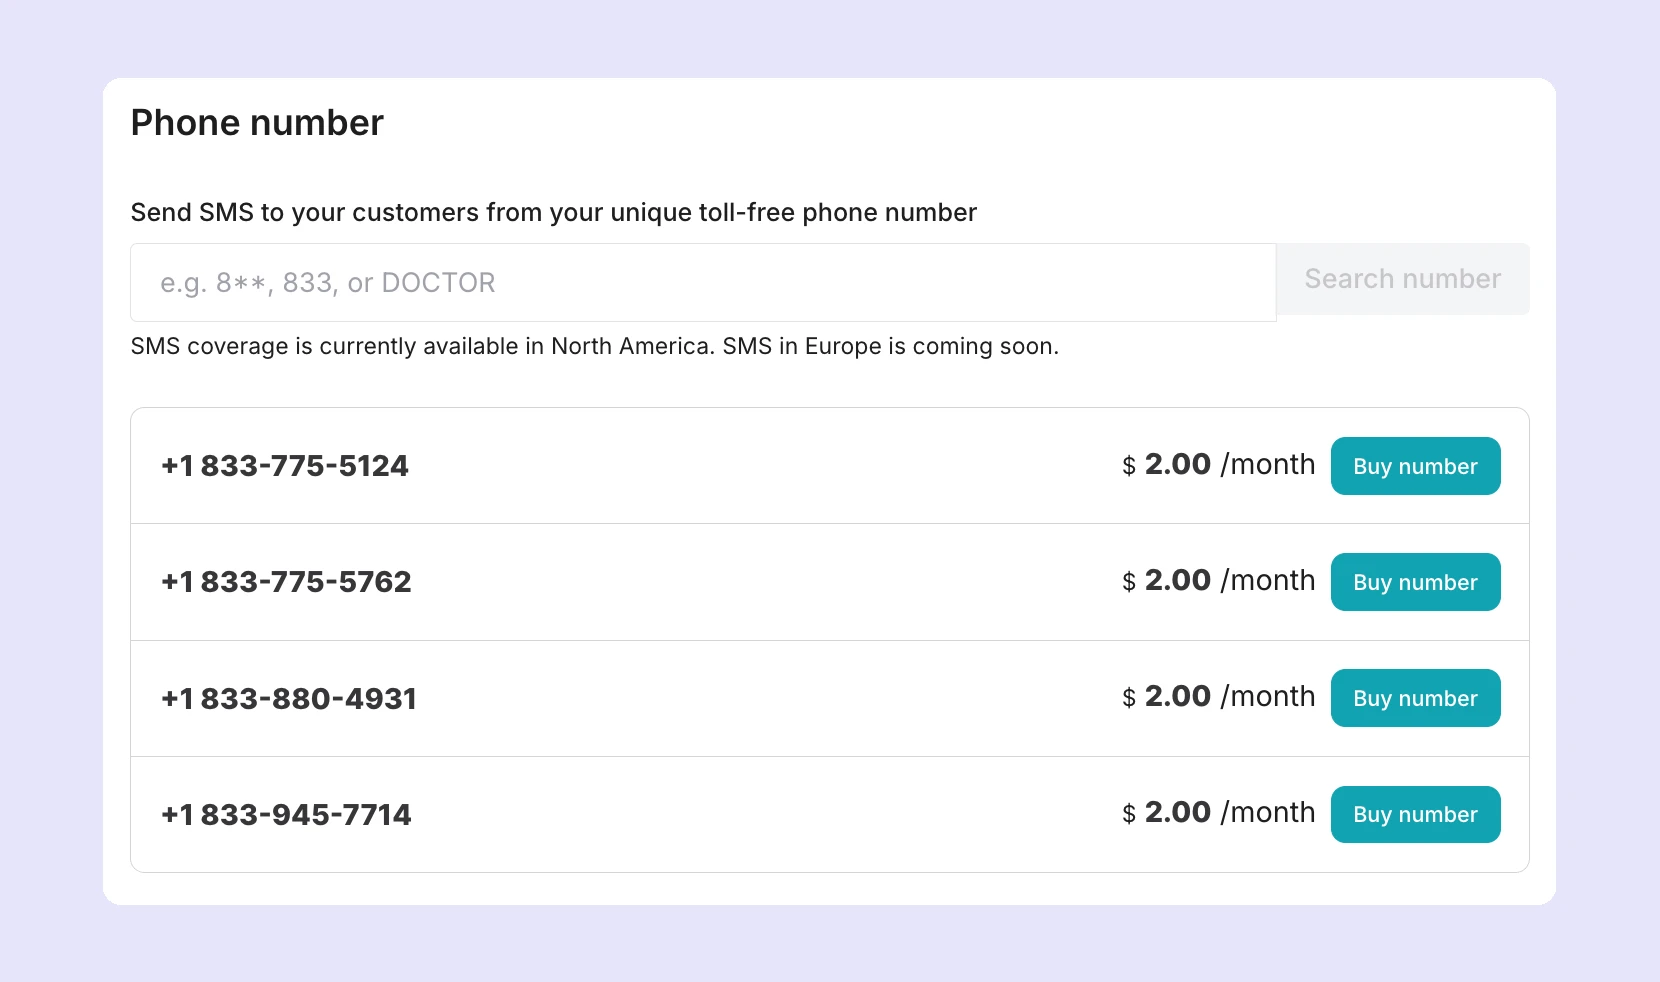
If you are in the U.S. or Canada, you can purchase a phone number to send toll-free text messages to your customers. Phone numbers cost $2/month per number.
How to purchase a phone number
To purchase a phone number:
1. Go to Plan & billing and select the Add-ons tab.
2. Scroll to the Phone numbers section, choose the number you want to buy and click Buy number. You can also search for a vanity phone number or specific area code. Available area codes are: 8**, 833, 844, 855, 866, 877, and 888.
3. When you click buy number, you'll be directed to the checkout page. Enter your billing information and click Checkout.
You can view your phone numbers by heading to SMS in the left-hand menu of the app and clicking Phone numbers.
How to remove a phone number
If you no longer need your phone number and wish to remove it from your account, follow these steps:
1. In the app, go to SMS, then Phone numbers.
2. Click the Manage button for the phone number you wish to remove.
3. Scroll to the Danger zone at the bottom of the page. In the Delete phone number section, click the Disconnect button.
4. In the confirmation pop-up, type DELETE and click Yes, disconnect to confirm. The number will be disconnected from your account.
Domain spaces
Each plan (except the Trial plan) includes a number of domains that you can add and verify for sending with your account.
Free | 1 |
Hobby | 1 |
Starter | 10 |
Professional | 1,000 |
Enterprise | 5,000 |
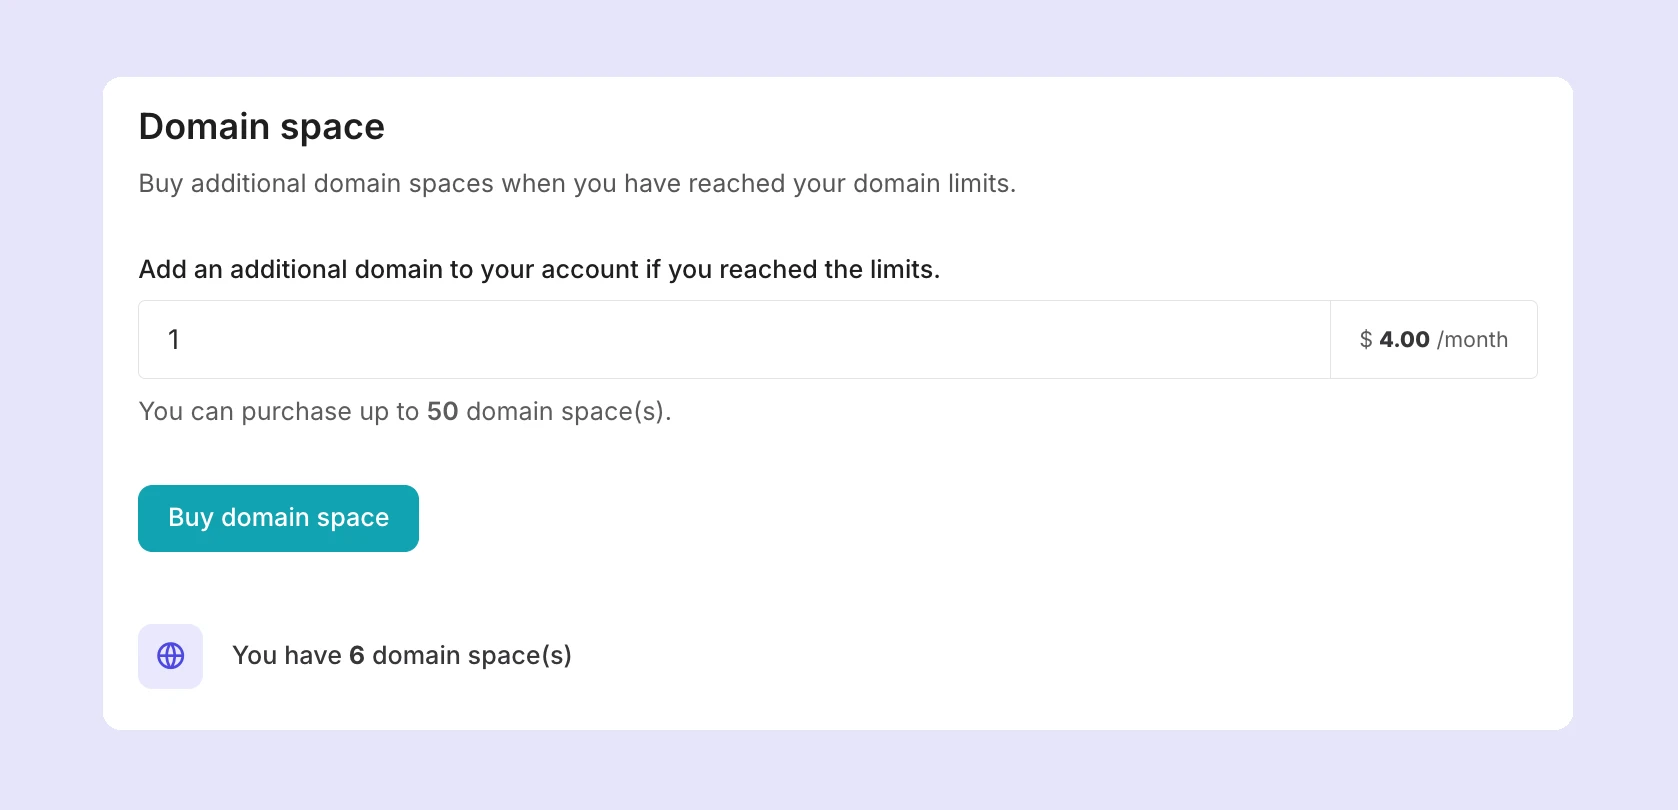
Starter plans and above can purchase up to 50 additional domains through the Domain spaces add-on. Each additional domain costs $4/month.
How to purchase a domain space
To purchase a domain space:
1. Go to Plan & billing and select the Add-ons tab.
2. Scroll to the Domain space section and enter the number of additional domain spaces you would like to purchase.
3. Click Buy domain space, and you'll be directed to the checkout page. Enter your billing information and click Checkout.
You'll be able to add and verify your additional domains on the Domains page in the app. You can view how many domain spaces you have purchased in the Domain spaces section of the Add-ons tab.
How to remove a domain space
If you have purchased additional domain spaces and no longer need them, follow these steps to remove them:
1. In the app, go to Plan and billing and select the Add-ons tab.
2. In the Domain space section, it will show you how many additional domain spaces you have purchased for your account. Below this, you will see an option to remove domain spaces.
3. Enter the number of domain spaces you wish to remove and click Remove.
Dedicated IPs
Dedicated IPs are best suited to high-volume senders, sending at least 100,000 emails per week. The dedicated IP add-on is available to Professional and Enterprise plans (Enterprise plans also have 1 dedicated IP included) for $50/month per IP.
If you are a high-volume sender with at least 1 authenticated domain, you can request a dedicated IP by contacting our customer support team. We'll assess your use case, and if we find that a dedicated IP would be beneficial for your account, we'll begin the process of enabling and warming up the IP for you. This process takes approximately 1 to 8 weeks.
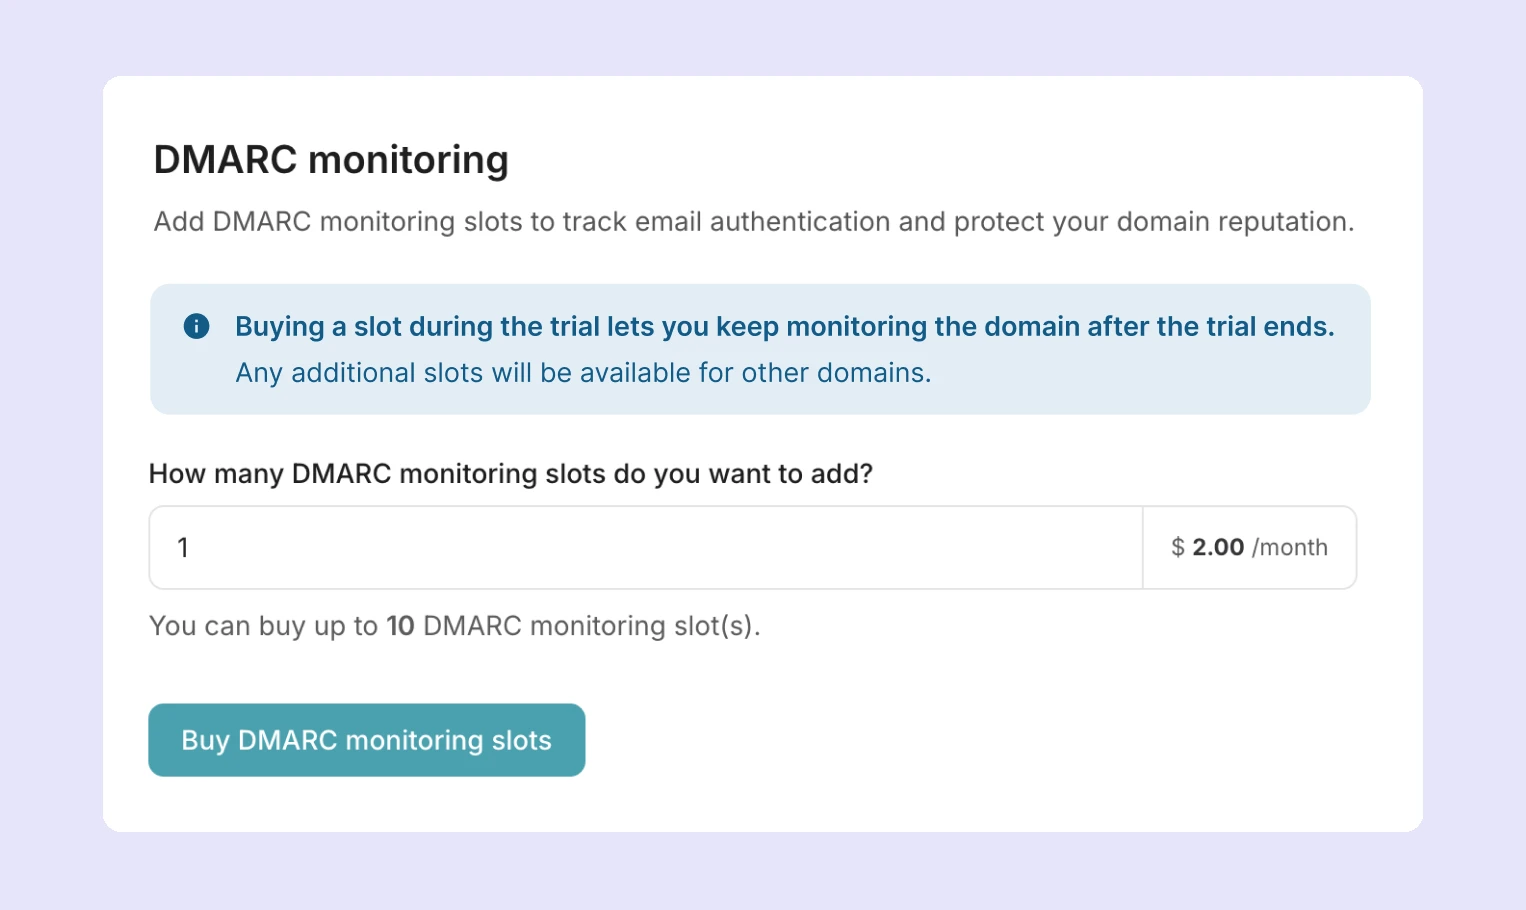
DMARC monitoring
The DMARC monitoring feature is available to Starter and Professional plans.
Starter plans can try the feature for free for 1 domain for 30 days. At any time before, during or after the trial, you can also purchase additional DMARC monitors, for a maximum of 10, with the DMARC add-on.
Professional plans can add up to 10 domains to the DMARC monitoring tool as part of their plan. You can also purchase up to 10 additional DMARC monitors, for a maximum of 20.
The price of each additional DMARC monitoring slot is $2/month.
How to purchase a domain monitoring slot
To purchase an additional domain monitor:
1. In the app, go to Plan and billing and select the Add-ons tab.
2. In the DMARC monitoring section, enter the number of additional slots you would like to purchase.
3. Click Buy DMARC monitoring slots and you'll be directed to the checkout page. Enter your billing information and click Checkout.
How to remove a DMARC monitoring slot
If you have purchased additional DMARC monitors and no longer need them, follow these steps to remove them:
1. In the app, go to Plan and billing and select the Add-ons tab.
2. In the DMARC monitoring section, enter the number of domain spaces you wish to remove and click Remove.
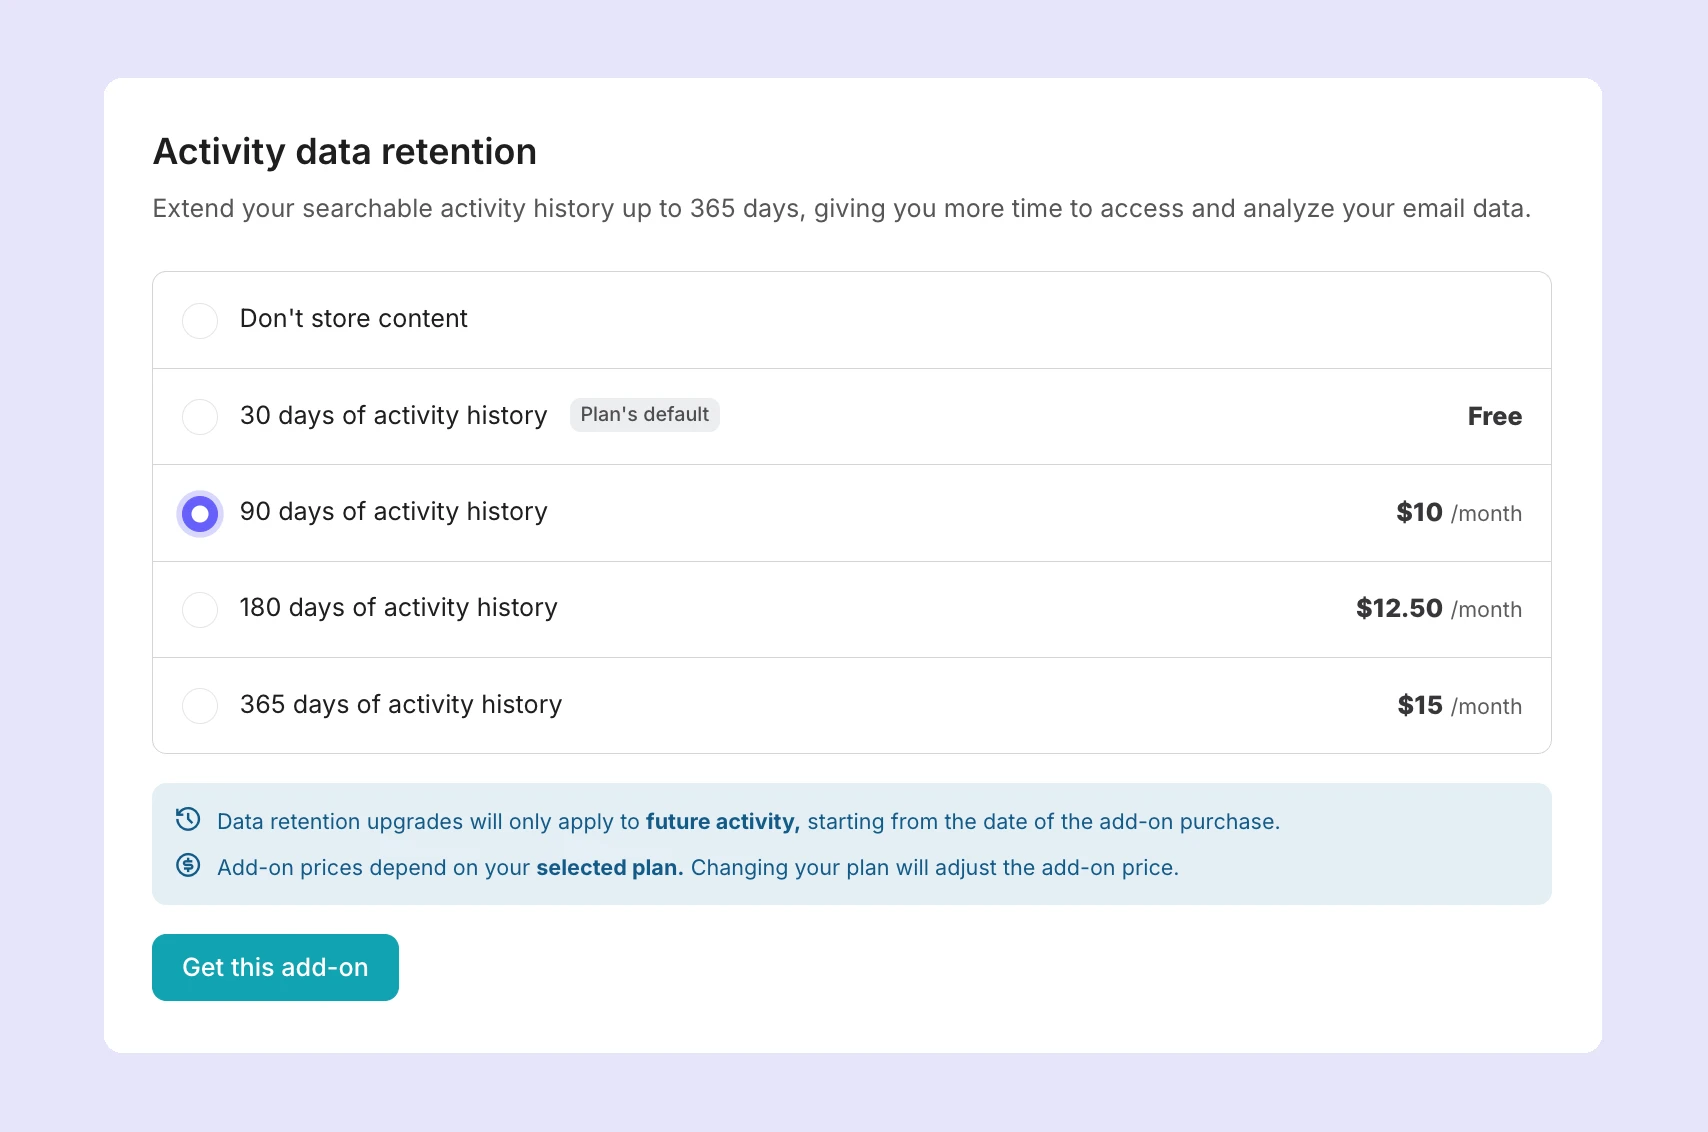
Activity data retention
Activity data retention is the period for which your activity data is stored and accessible in MailerSend. Each plan includes an activity data retention limit.
Trial | 1 day |
Free | 1 day |
Hobby | 1 day |
Starter | 7 days |
Professional | 30 days |
Enterprise | 30 days |
Starter, Professional, and Enterprise plans can extend their activity data retention period up to 365 days with the add-on. Pricing is on a per-month basis and depends on your email volume. The correct price for your plan size will be automatically reflected in the Add-on section when you go to purchase.
30 days | 90 days | 180 days | 365 days | |
50,000 | $5 | $10 | $12.50 | $15 |
100,000 | $10 | $20 | $25 | $30 |
250,000 | $25 | $50 | $62.50 | $75 |
500,000 | $50 | $100 | $125 | $150 |
1,000,000 | $100 | $150 | $200 | $250 |
1,500,000 | $150 | $225 | $300 | $375 |
2,000,000 | $200 | $300 | $400 | $500 |
2,500,000 | $250 | $375 | $500 | $625 |
How to purchase the data retention add-on
To purchase additional data retention:
1. Go to Plan & billing and select the Add-ons tab.
2. Scroll to Activity data retention and select the data retention you'd like to purchase.
3. Click Get this add-on, and you'll be directed to the checkout page. Enter your billing information and click Checkout.
How to disable activity retention or cancel the add-on
If you have purchased the data retention add-on and no longer need it, you can revert to your plan's default by going to Plan & billing, Add-ons, and scrolling to Activity data retention. Select your plan's default and click Revert to basic retention.
If you do not wish for your data to be stored in MailerSend for any period of time for compliance reasons, contact our customer support team.
Need more info?
Feel free to reach out to support@mailersend.com. A member of our support team will gladly assist you.