Personalization in emails
MailerSend includes the ability to add personalization to email templates with variables. This enables you to customize and personalize the content to be unique for each recipient, increasing engagement and building stronger customer relationships. You can add personalization variables to the subject, HTML and text fields.
Personalization
Personalization allows you to use variables to generate dynamic content when sending emails using a limited version of Twig v3.x as the template language.
This gives you the added flexibility of using filters, conditional statements, and iterating over arrays with for loops. Especially if you're dealing with a variety of dynamic data.
Rules for naming
Personalization variables start with double curly brackets {{ followed by the variable name, then ending with double curly brackets }}. For example, {{var}}.
There are a number of rules you must follow to avoid errors when sending:
Variables must be surrounded by double curly brackets: `{{ }}`
They may contain alphanumeric characters and underscores: '_' but not hyphens: '-'
Variables must not start with a number or underscore
They are case sensitive, meaning that `{{VAR}}` is different from `{{var}}`
Allowed tags and attributes
The following HTML tags and attributes are allowed in personalization:
HTML tags | p, b, i, strong, em, a, li, ul, q, blockquote, abbr, address, cite, bdo, strike, u, br, img |
HTML attributes | id, class, style, href, src, width, height, alt, lang, title |
How to use personalization
You can add personalization variables to the subject, HTML and text fields. Here's an example of an email template using personalization variables:
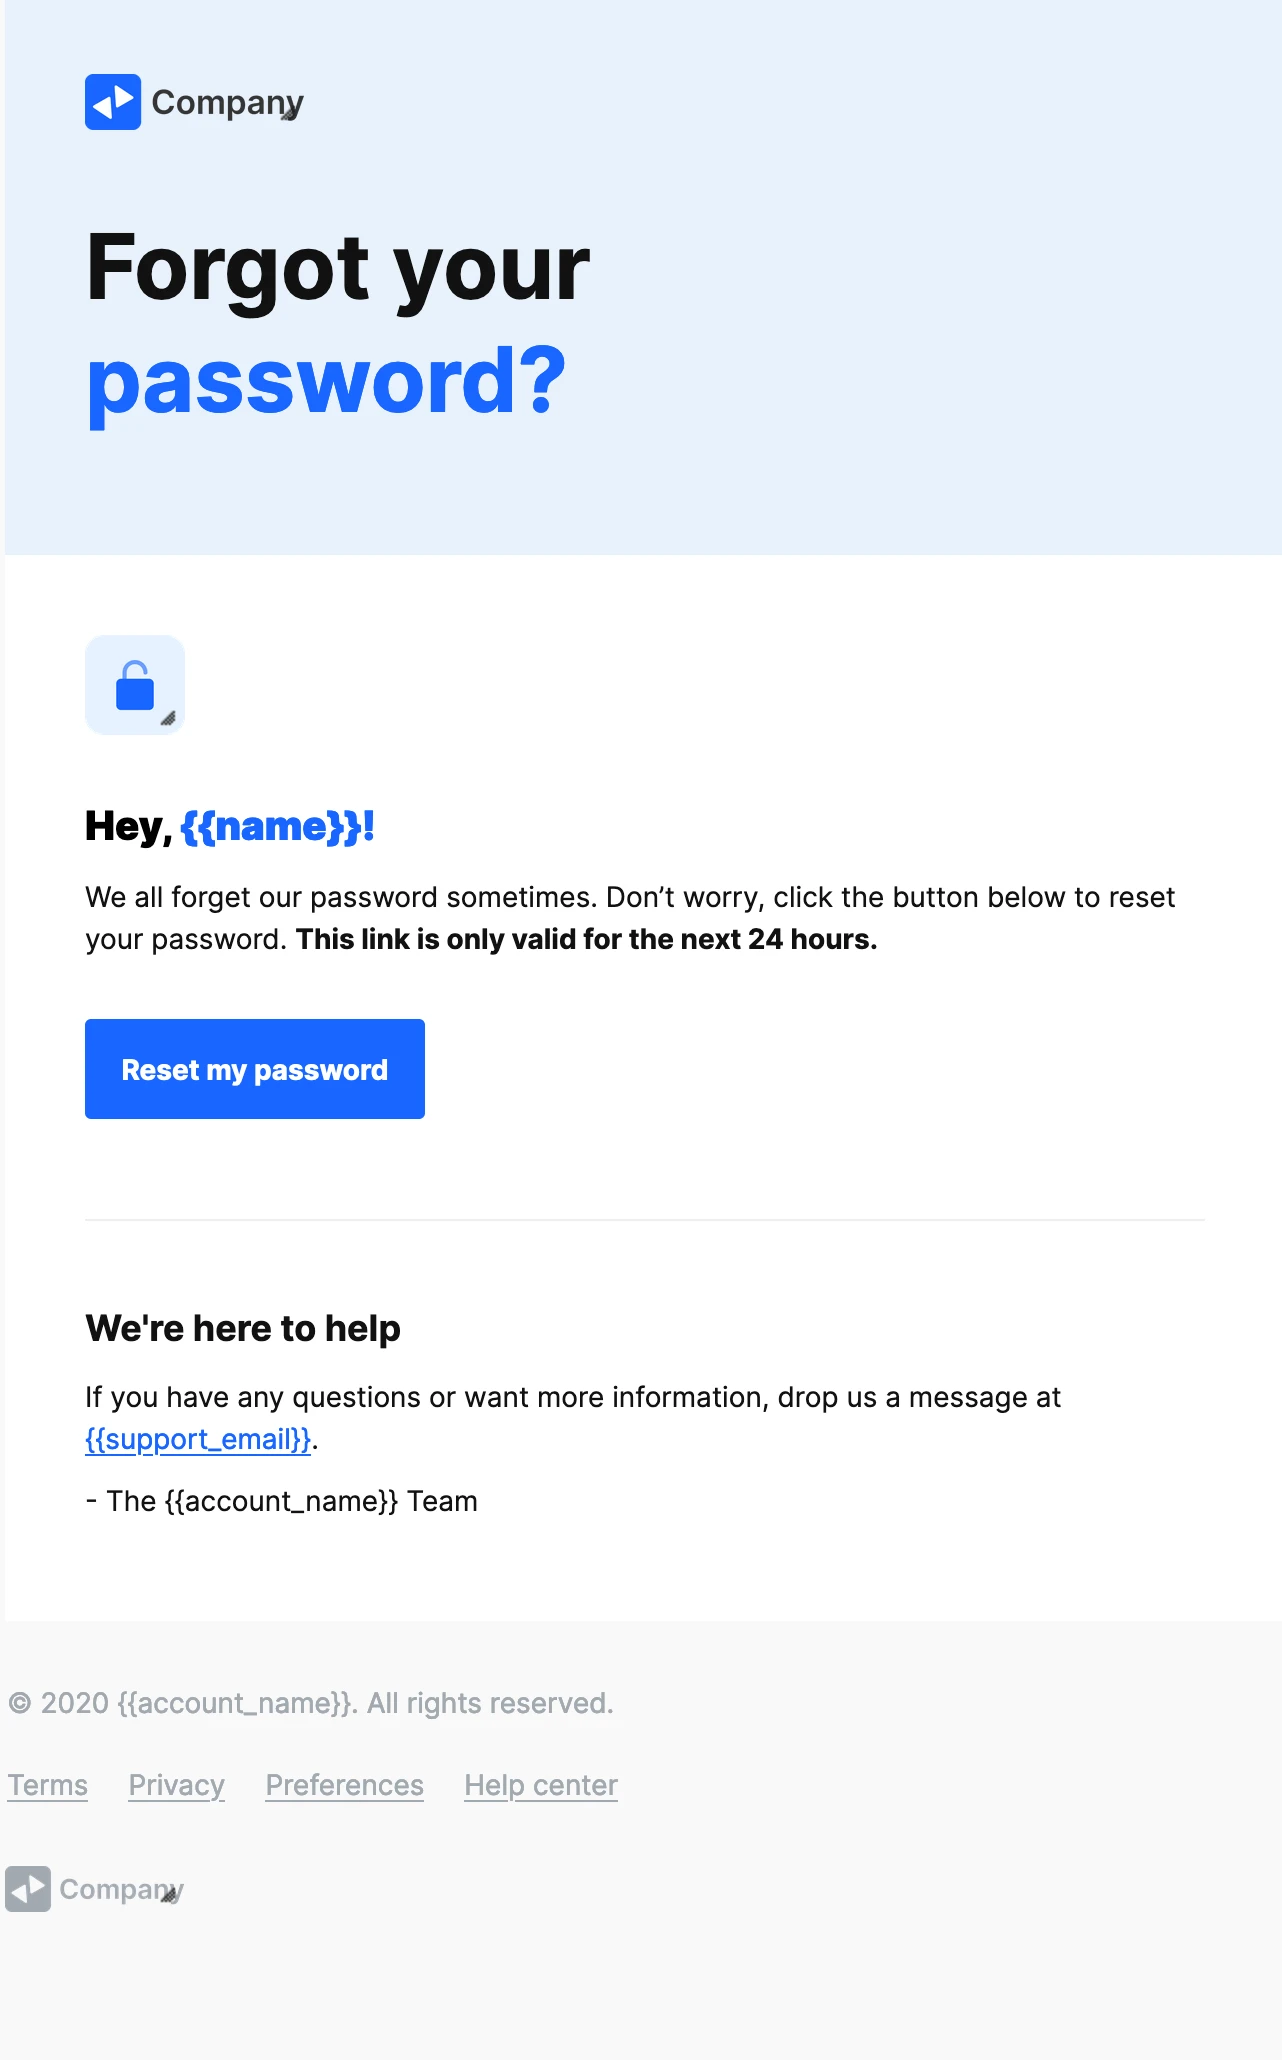
We can see that in this template, there are 3 variables that data needs to be added for in the body of our API call. These are name, support_email and account_name. Here's how that POST request would look when including all of the variables:
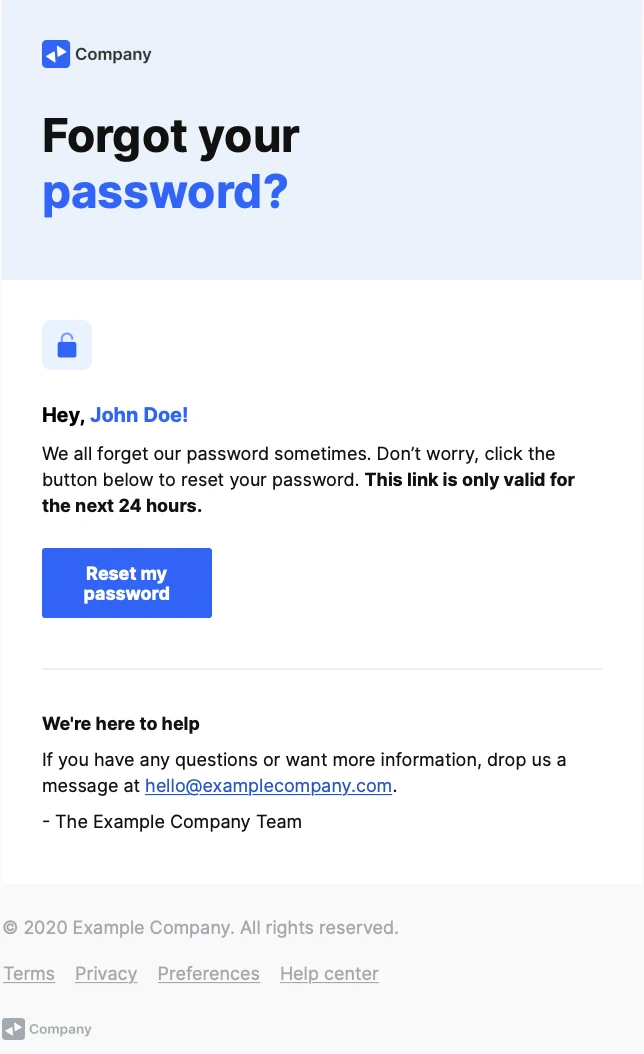
{
	"to": [
		{
			"email": "info@mailersend.com"
		}
	],
	"template_id": "z3m5jgrjm04dpyo6",
	"personalization": [
		{
			"email": "info@mailersend.com",
			"data": {
				"name": "John Doe",
				"support_email": "hello@examplecompany.com",
				"account_name": "Example Company"

			}
		}
	]
}
And this would be the resulting email:
How to use filters
You can use Twig filters to modify variables with the following rules:
Filters are separated from the variable by a pipe symbol: '|'
They may have optional arguments in parentheses
Multiple filters can be chained, meaning that the output of one filter is applied to the next
As an example, let's take a look at Twig's default filter. The default filter returns the default value you have assigned if the variable value is undefined or empty.
This can be used to set a fallback value for variables that have been left undefined. For example, if the "name" variable is left empty, the default filter can be used so that an email template reads "Hi there" instead of "Hi {{name}}". In this instance, the variable would look like this: {{name|default('there')}}.
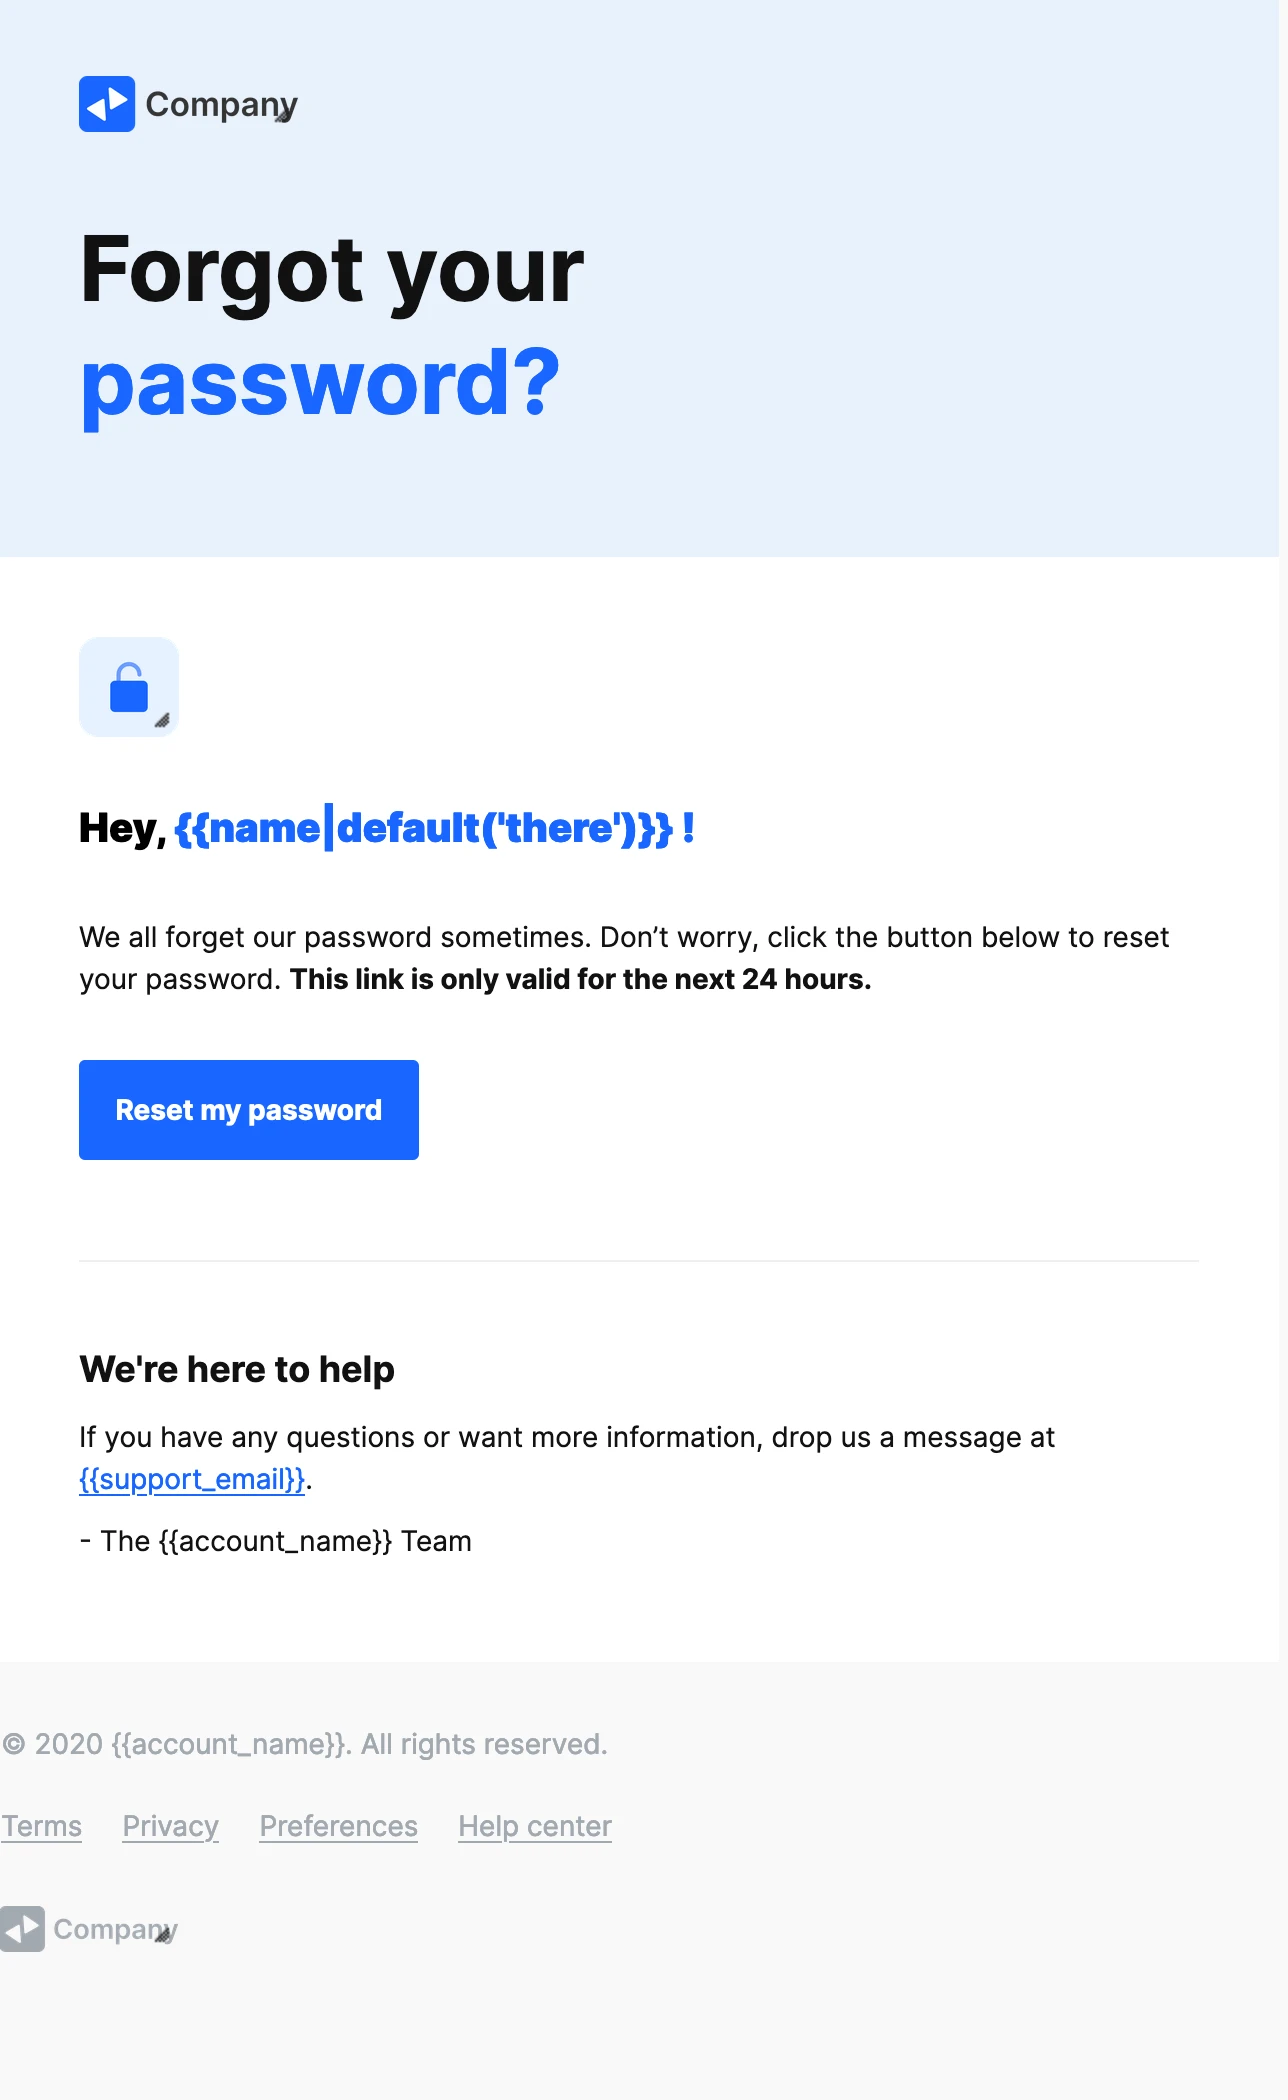
When using the default filter in this way, the name variable can be left empty or omitted entirely from the body of the API call, and the default value or fallback will be shown.

How to use dynamic tables
Dynamic tables allow you to add rows of data dynamically to a table via an API call. This is especially useful in transactional emails that contain billing information or invoices or other types of emails where the end result of the table can vary depending on the selections of the customer.
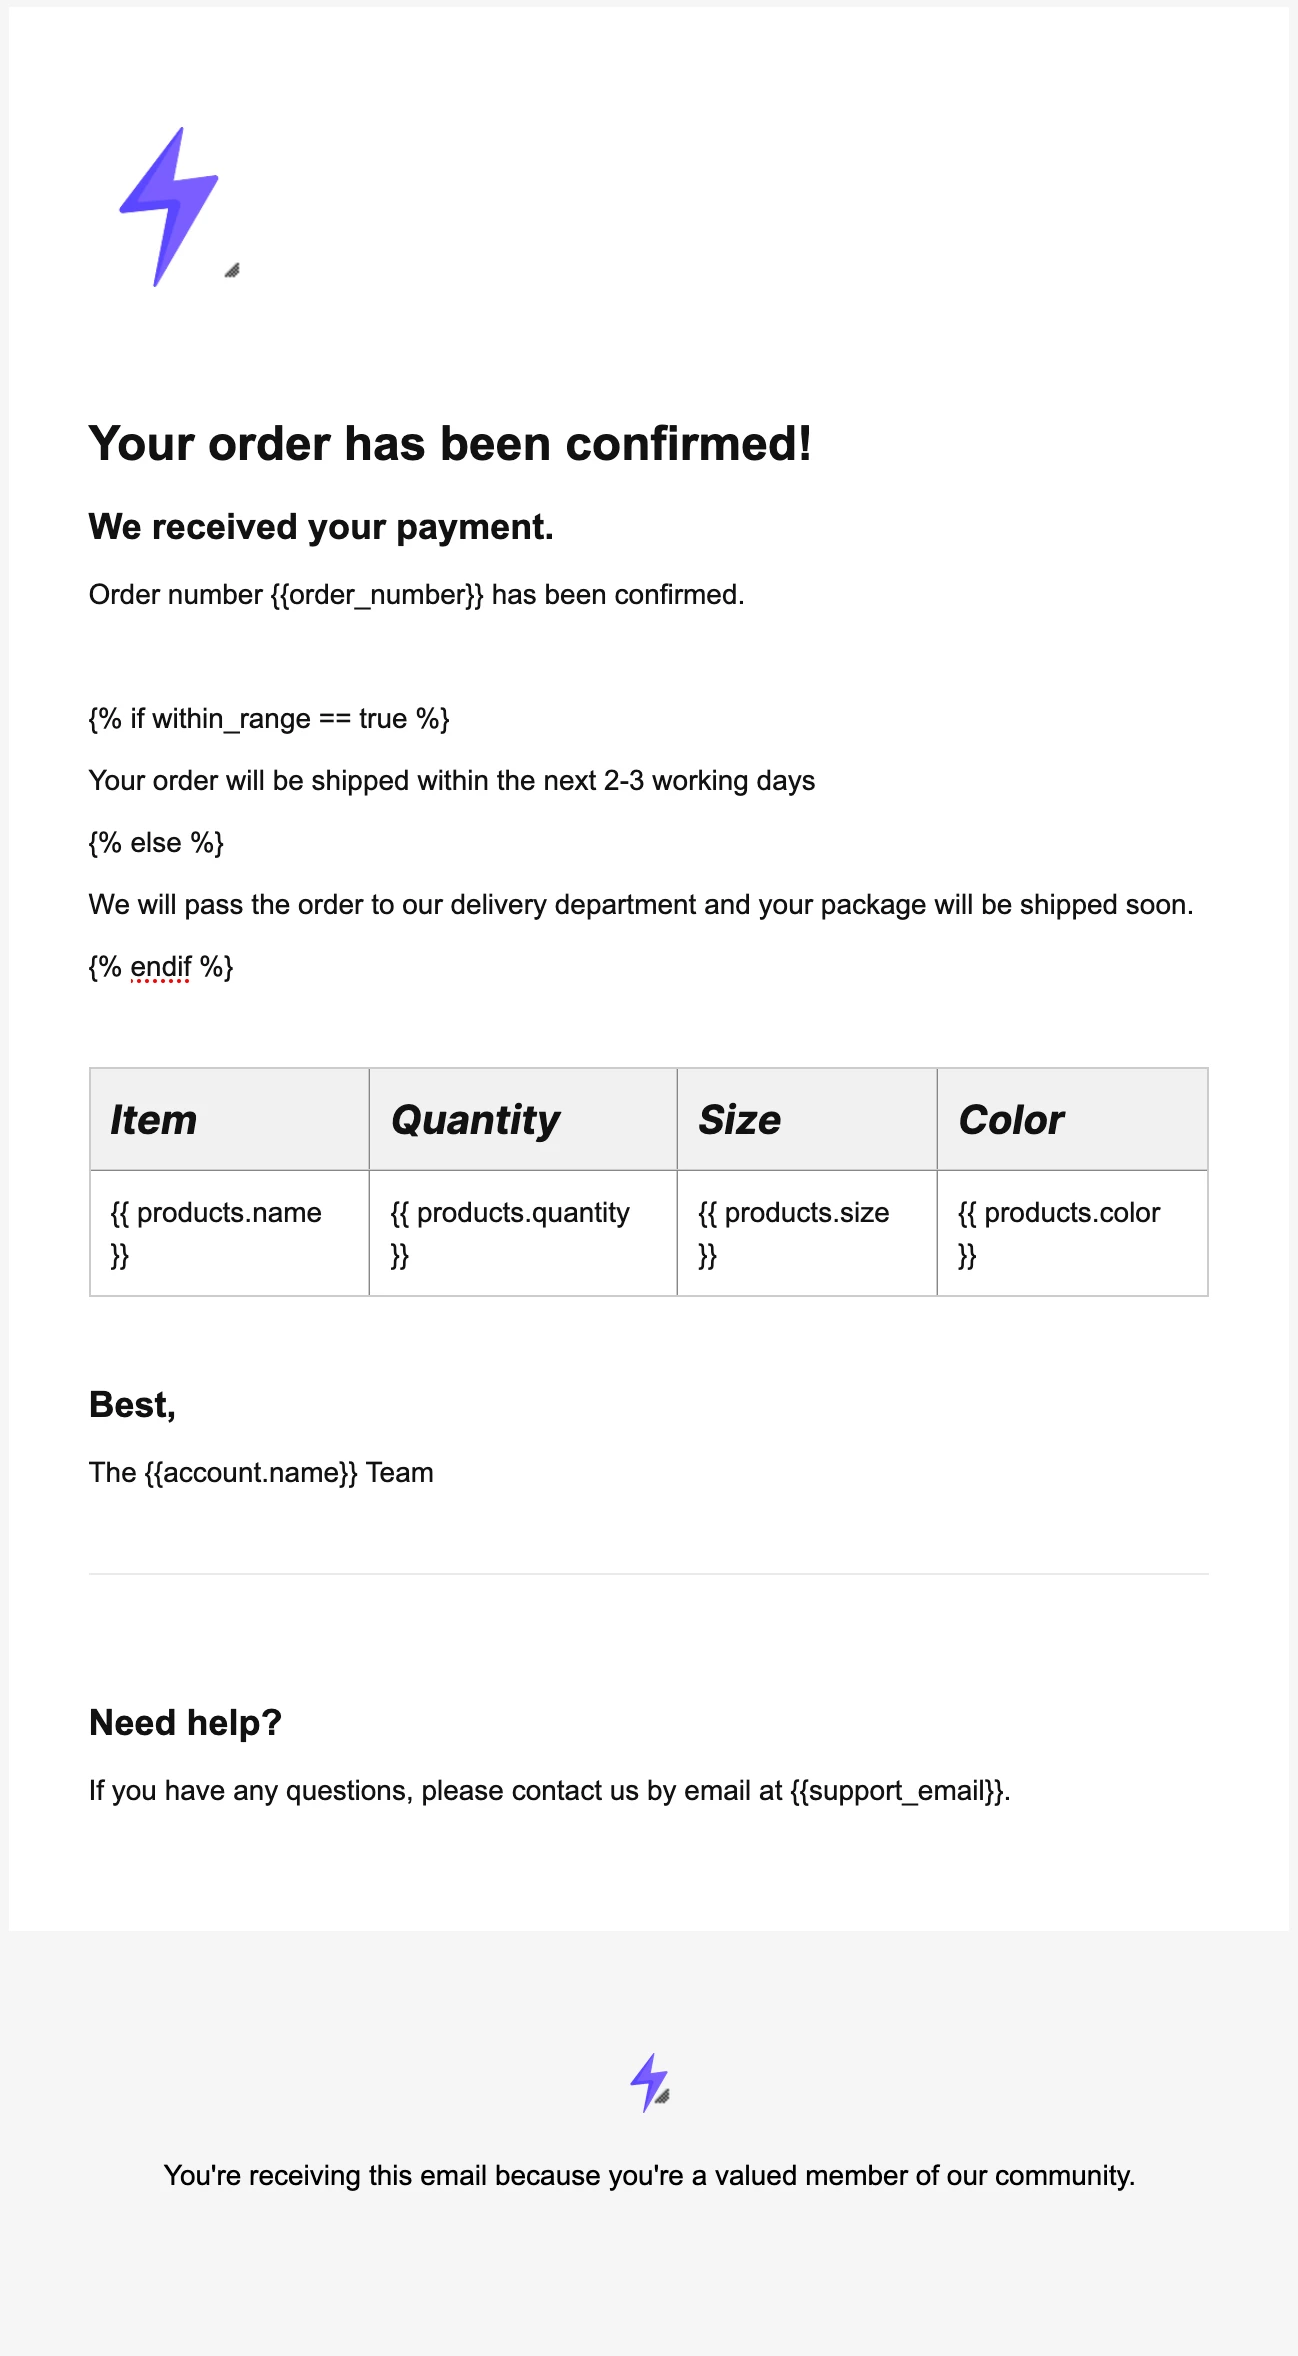
As an example, let's take a look at an order confirmation email template that uses a dynamic table.

We've set the dynamic table's array key as 'products' which means we'll have an array of objects (products) in the table. Each row will represent a separate object (product) under the 'products' array. Here's how the POST request for the API call would look:
{
	"to": [
		{
			"email": "info@mailersend.com"
		}
	],
	"template_id": "k68zxl2563lj9057",
	"personalization": [
		{
			"email": "info@mailersend.com",
			"data": {
				"order_number": 1234567890,
				"account_name": "Example Company",
				"support_email": "hello@examplecompany.com",
				"products": [
					{
						"name": "Nike Airforce Ones",
						"quantity": 2,
						"size": 43,
						"color": "Beetroot"
					},
					{
						"name": "Vans Retro",
						"quantity": 1,
						"size": 44,
						"color": "Black"
					},
					{
						"name": "Yeezys",
						"quantity": 3,
						"size": 45,
						"color": "Chrome"
					}
				]
			}
		}
	]
}
And here is how the resulting email would look:
How to use conditional statements
A conditional statement is a command that tells a computer or system what action to take based on the conditions you set. A common way to do this is with If/Else statements. If the condition is true, do this. Else, if the condition is false, do another thing instead.
Rules for using conditional statements
Conditional statements (i.e. if/elseif/else) must appear inside the following block: `{% %}`
A conditional block always starts with the `if` keyword followed by the statement that is being tested and ends with the `endif` keyword
Conditional statements are only available in the HTML and text fields
Here's an example of a simple if statement:
{% if online == false %}
<p>Our website is in maintenance mode. Please, come back later.</p>
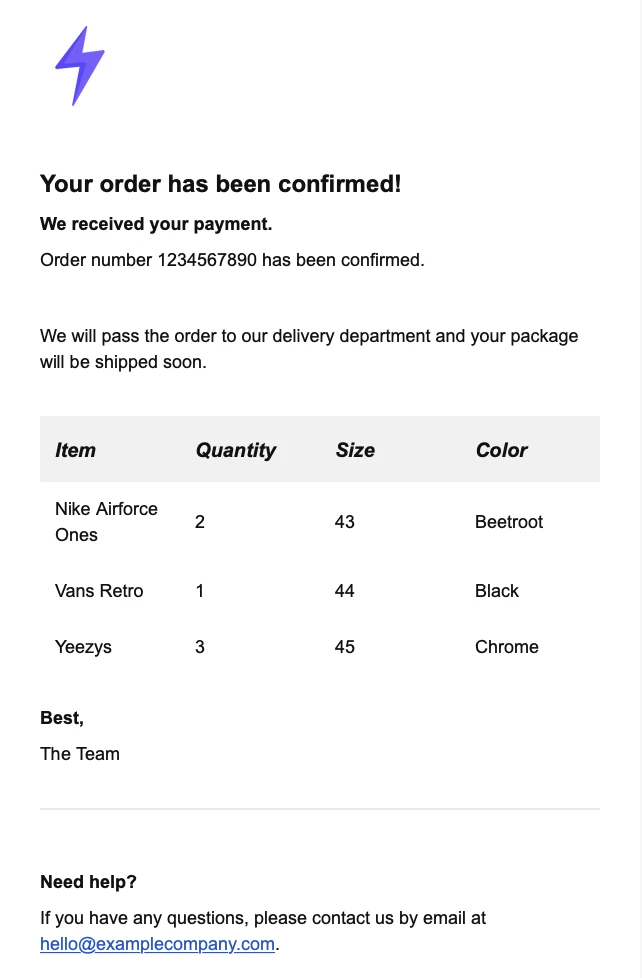
{% endif %}Now let's look at how you could use conditional statements in our order confirmation email example to make decision-making logic easier within templates.
In the below example, we've added a conditional statement that will change the delivery messaging in the template depending on whether the customer is/isn't within a delivery range.
And this is how the POST request body of our API call would look, taking into account the 'within_range' variable.
{
	"to": [
		{
			"email": "info@mailersend.com"
		}
	],
	"template_id": "k68zxl2563lj9057",
	"personalization": [
		{
			"email": "info@mailersend.com",
			"data": {
				"order_number": 1234567890,
				"account_name": "Example Company",
				"support_email": "hello@examplecompany.com",
				"within_range": false,
				"products": [
					{
						"name": "Nike Airforce Ones",
						"quantity": 2,
						"size": 43,
						"color": "Beetroot"
					},
					{
						"name": "Vans Retro",
						"quantity": 1,
						"size": 44,
						"color": "Black"
					},
					{
						"name": "Yeezys",
						"quantity": 3,
						"size": 45,
						"color": "Chrome"
					}
				]
			}
		}
	]
}
The 'within_range' variable is set to false so the resulting email will contain the else part of our messaging.
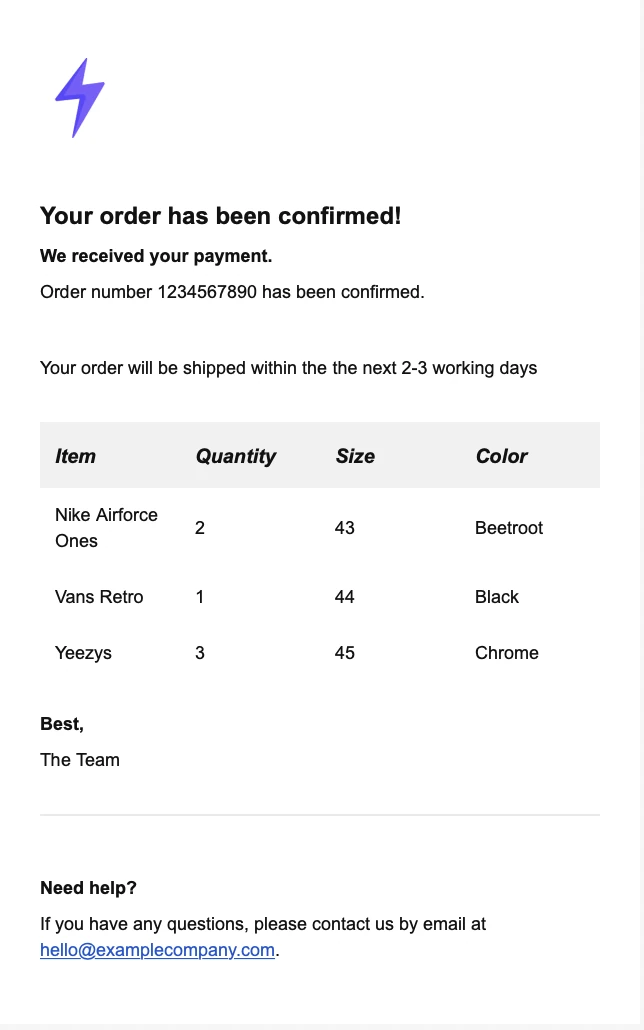
If we set the 'within-range' variable to true, the resulting email would be as follows:
How to use for loops
You can use for loops to loop over each item in a collection of data in a sequence: for example, looping over arrays to display a list of items in your email.
Rules for using for loops
Loops must appear inside the following block: `{% %}`
A loops block always starts with the `for` keyword and ends with the `endfor` keyword
For loops are only available in the HTML and text fields
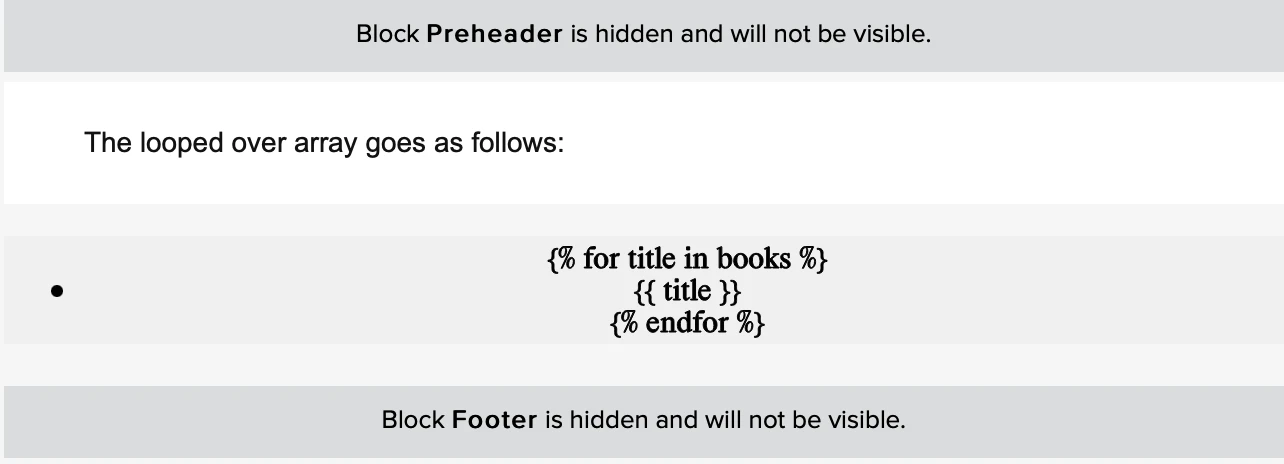
For example, to display a list of titles provided in an array called `books`, you can add the following code to a code block in your template:
<ul>
    {% for title in books %}
        <li>{{title}}</li>
    {% endfor %}
</ul>
Here's how you would add this to a template to include the for loop in a code block.
Now all you need to do is include your books array within the personalization object of your request body. Here's how that would look.
{
"to": [
{
"email": "info@mailersend.com"
}
],
"template_id": "k68zxl25velj9057",
"personalization": [
{
"email": "info@mailersend.com",
"data": {
"books": [
"The Institute",
"Killers of the Flower Moon",
"Cosmos",
"100 Years of Solitude"
]
}
}
]
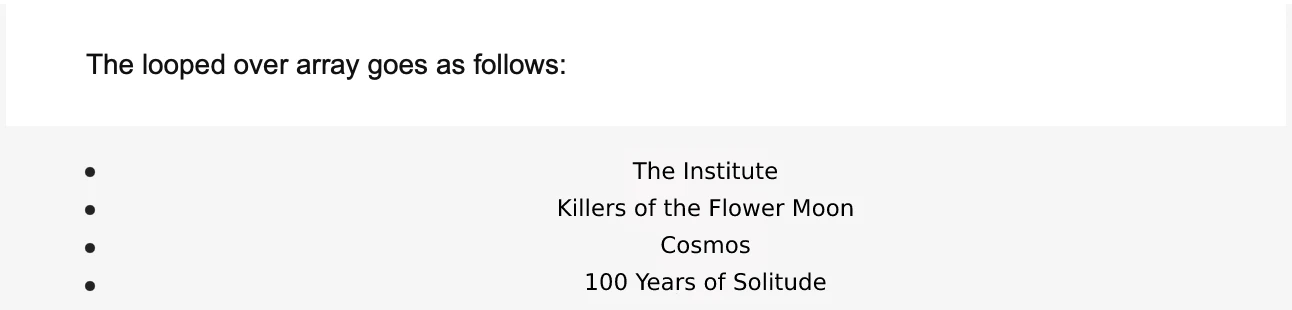
}And this is how it would appear in the email:
Need more info?
For other questions, feel free to talk with us via live chat or at support@mailersend.com.