How to send emails with Supabase via custom SMTP and email API

The first one is using a custom SMTP to send the authentication and security email templates provided by Supabase. This is the easiest method and it can have you up and running in minutes.
If you want more control, you can use an email API to send emails triggered by actions in your Supabase project. There are several ways to set this up; each one gives more flexibility than custom SMTP, though they take more time to set up.
This article will first highlight how to set up email sending via custom SMTP. We’ll then look at how you can start sending via an email API too.
Can Supabase send emails natively?
Supabase has built-in email sending that you can use to send the 13 types of authentication and security emails provided by the platform. But this sending tool can only be used for testing since it’s rate-limited to 2 emails per hour and will only deliver to addresses on your project’s team.
To send production emails to real users, you need to connect an email sending service like MailerSend via SMTP or API.
When you add a custom SMTP, you still use the Supabase templates, but they are sent via your service and appear to come from your domain.
How to send emails on Supabase via custom SMTP
Here are all the steps you need to take to go from zero to sending emails with Supabase and MailerSend. The process starts with signing up for MailerSend, which you can do for free, and ends with customizing the templates and the email rate limits.
Start your free trial
Start a 14-day free trial to add email sending to your Supabase database. You can add your domain and try out all MailerSend’s features at zero risk. And if you like the platform, paid plans start at just $7 per month.
1. Sign up for MailerSend and add your domain
The first step to send email via Supabase is to sign up for MailerSend and then add your domain.
Signing up to MailerSend is easy and free, click here to follow the steps. Once you create your account, you need to add MailerSend records to your domain’s DNS editor. We have an automated domain authentication tool that will do this for you.
Just click on Domains in the Emails tab, click Add domain, follow the steps in the pop-up, and then wait for the records to propagate.
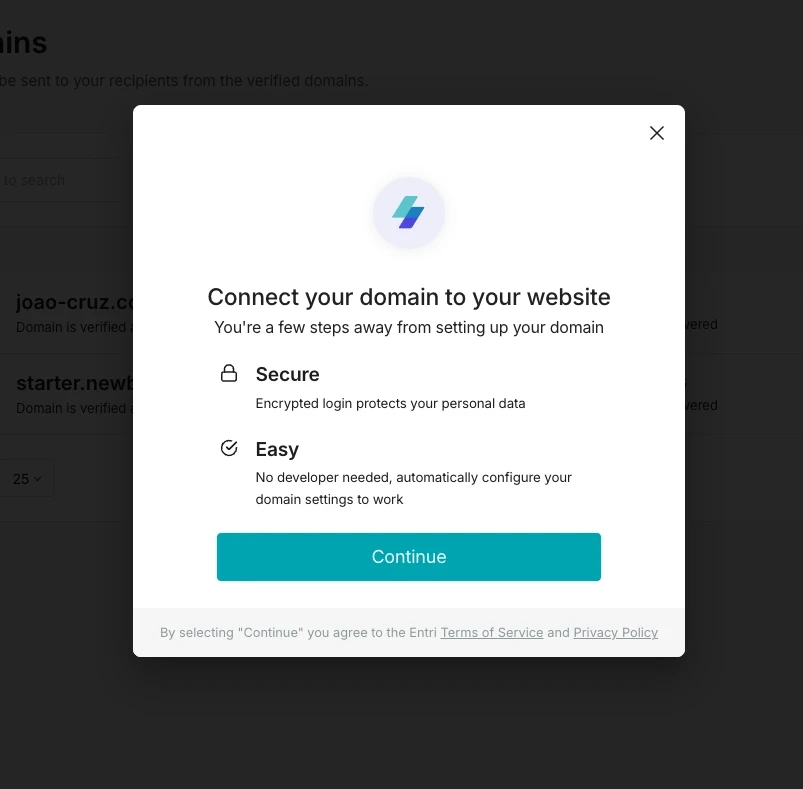
If you use a domain provider that isn’t supported, or if you want to add these records manually, just close the window when it appears and then follow the instructions to add the records to your DNS zone.
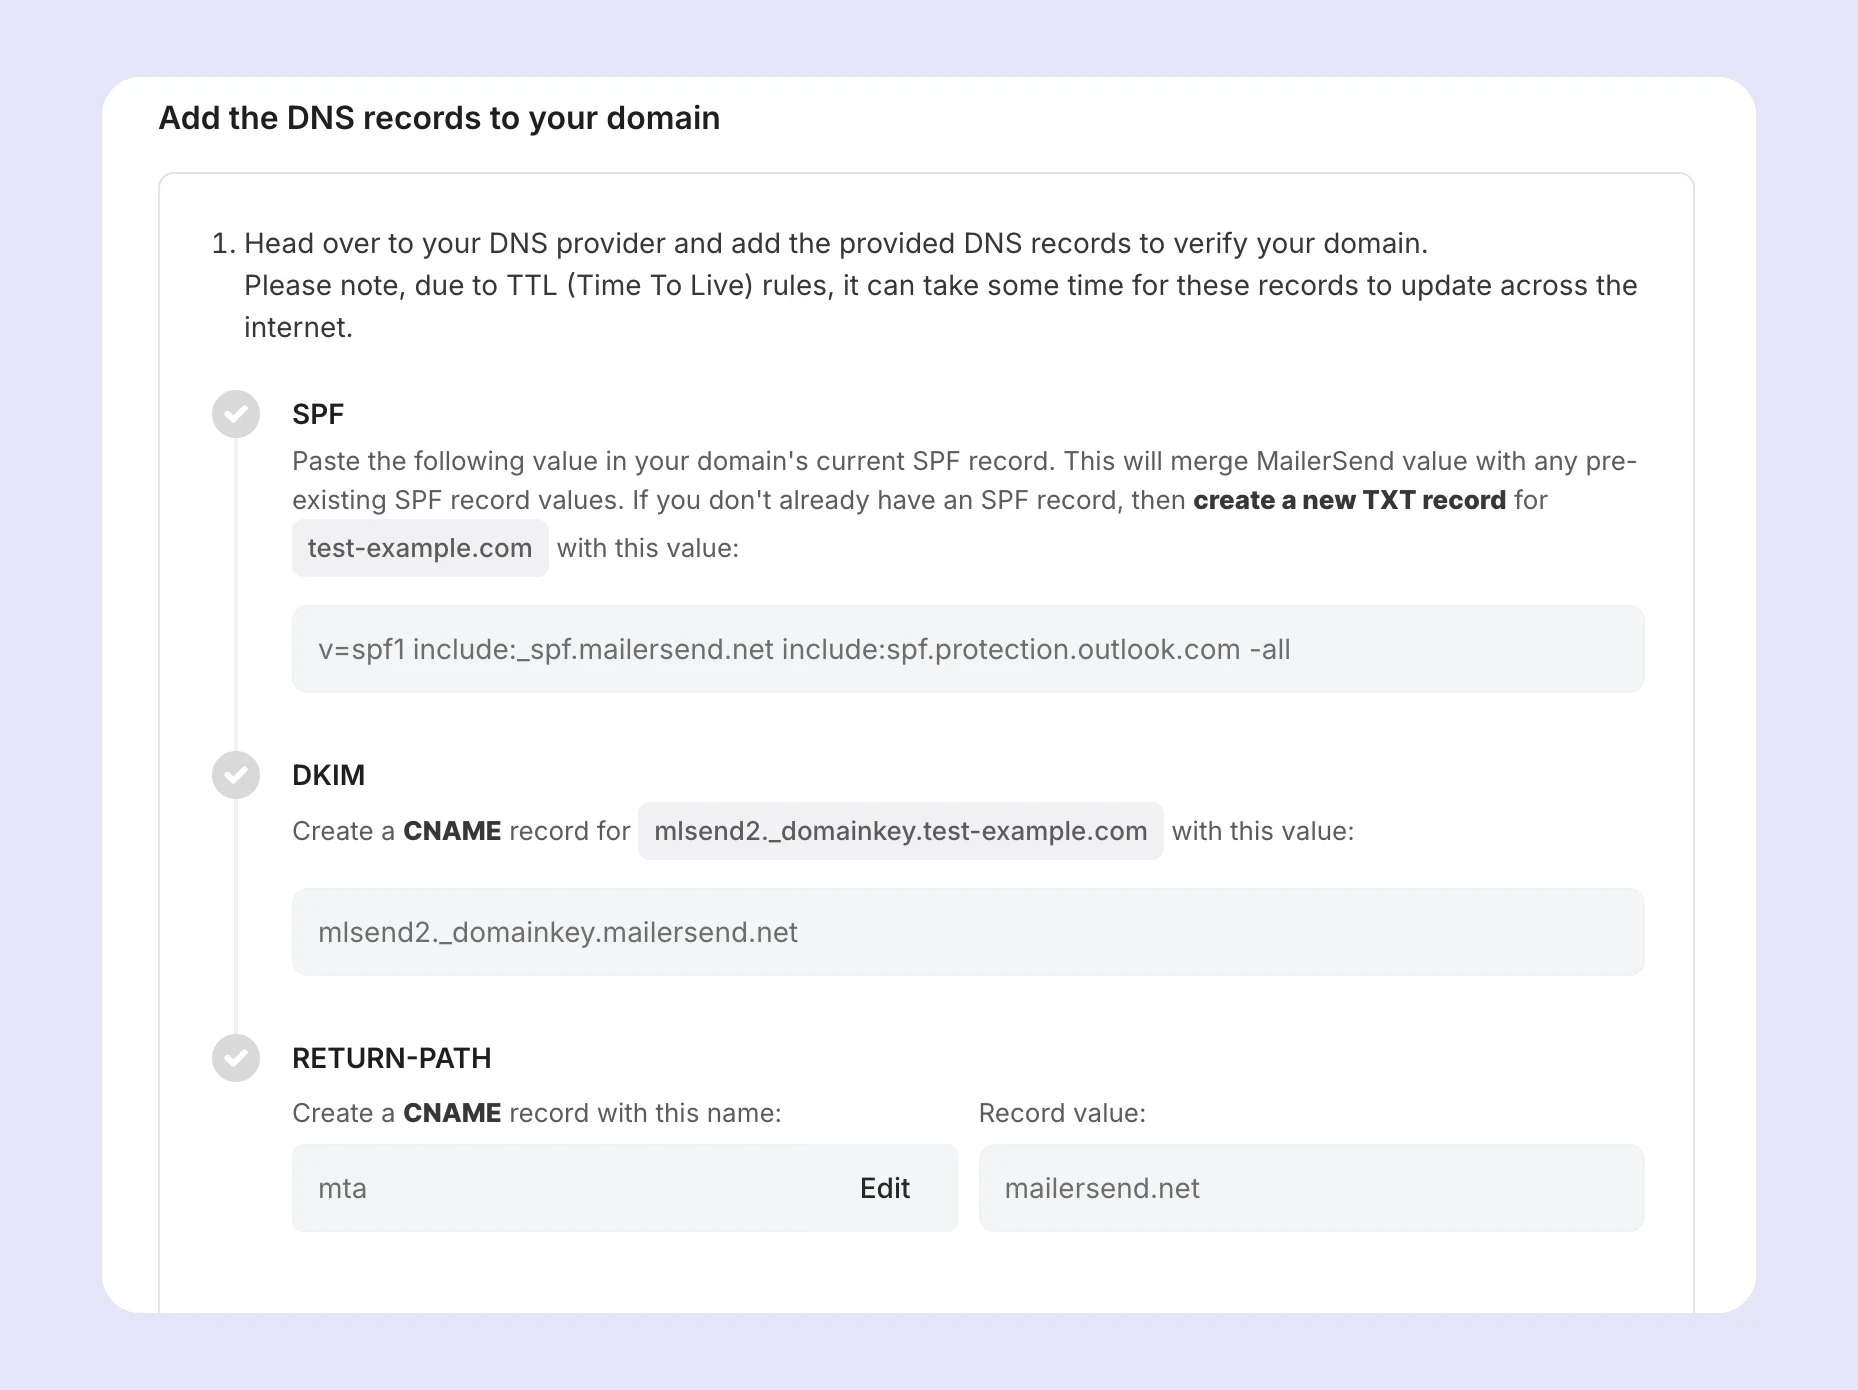
Get full instructions for adding a domain to MailerSend here.
2. Create an SMTP user in MailerSend
The next step is to create an SMTP user in MailerSend. This will generate the details that you need to add to Supabase in the next step.
Head to the domain you added, click Manage, scroll down to SMTP, hit Generate new user, give the user a name, and then confirm the details. You’ll then see a pop-up with all your SMTP details.
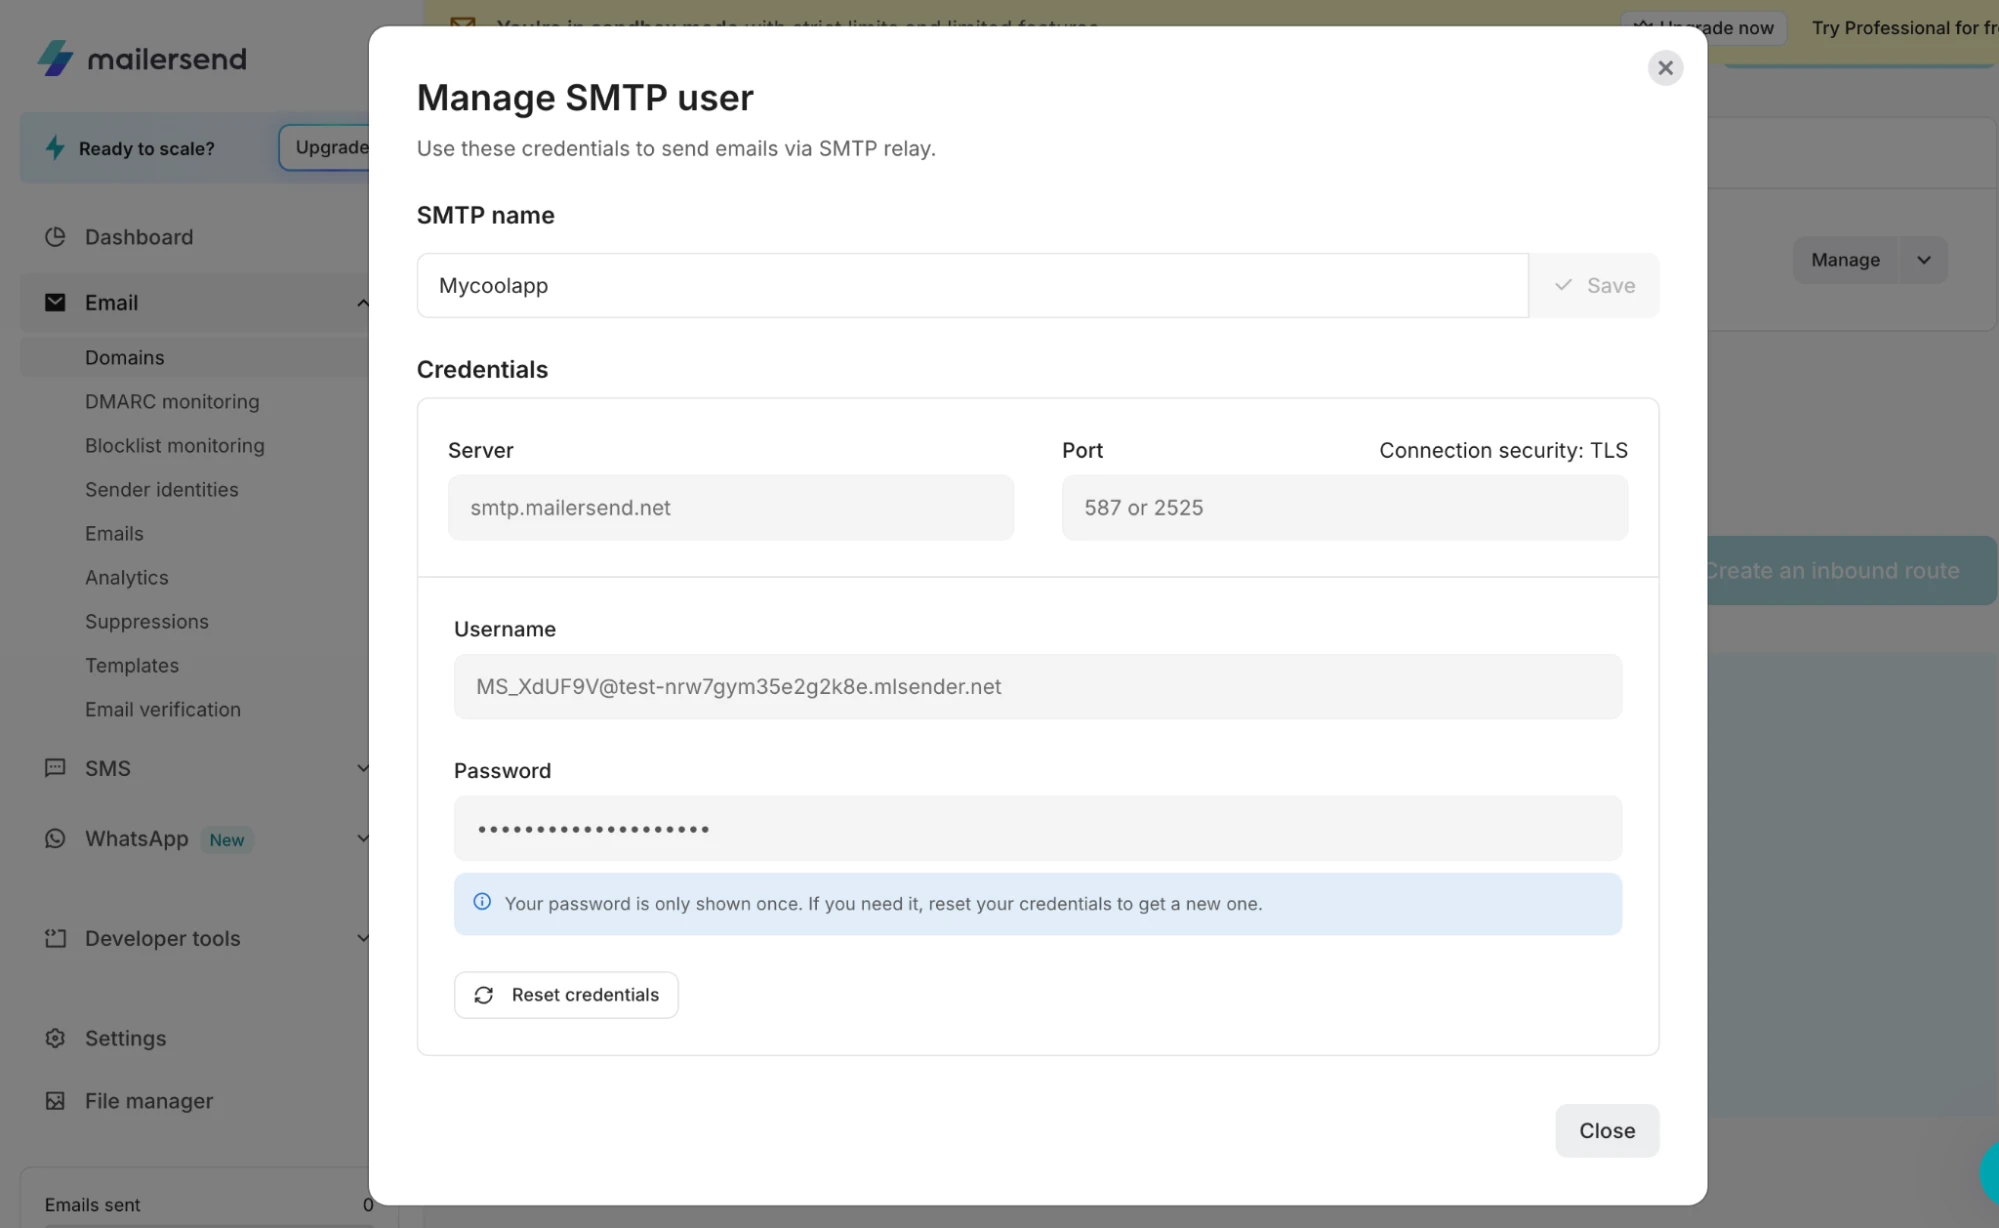
At this point, your password will be shown. Copy it so that you can add it to the Supabase settings in the step below, as once you close the window, the password won’t be shown again (although you can easily reset the credentials to get a new password).
3. Connect MailerSend to Supabase via custom SMTP
Now you’ve set up the domain in MailerSend, connect it to Supabase via the custom SMTP settings.
Just go to the Authentication tab, hit Emails and then hit Set up custom SMTP to edit templates.
You then need to fill out the required details:
Sender email address: The address your emails will be sent from. Must be an address from the domain you connected
Sender name: The name that appears in the sender field
Host: The “Server” field in your MailerSend credentials
Port number: One of the SMTP Port numbers shown in your credentials
Minimum interval per user: The minimum time between emails sent to a single user. This defaults to 60 seconds
Username: As shown in your MailerSend credentials
Password: As shown in your MailerSend credentials
Once you’ve filled out the details, hit Save changes and you’re ready to go.
4. Customize your emails
Now you’re set up, you can customize any of the emails offered by Supabase. Supabase currently offers 6 authentication emails, which are all on by default, as well as an additional 7 security emails that you can toggle on and off.
Authentication emails | Security notification emails |
Confirm sign-up Invite user Magic link or OTP Change email address Reset password Reauthentication | Password changed Email address changed Phone number changed Sign-in method linked Sign-in method removed Verification method added Verification method removed |
When you click on any of the emails, you will see the email’s subject line and the body HTML. You can easily edit the text in the email, or even add entirely new HTML email code with your branding. Hit the Preview tab to see how the email looks.
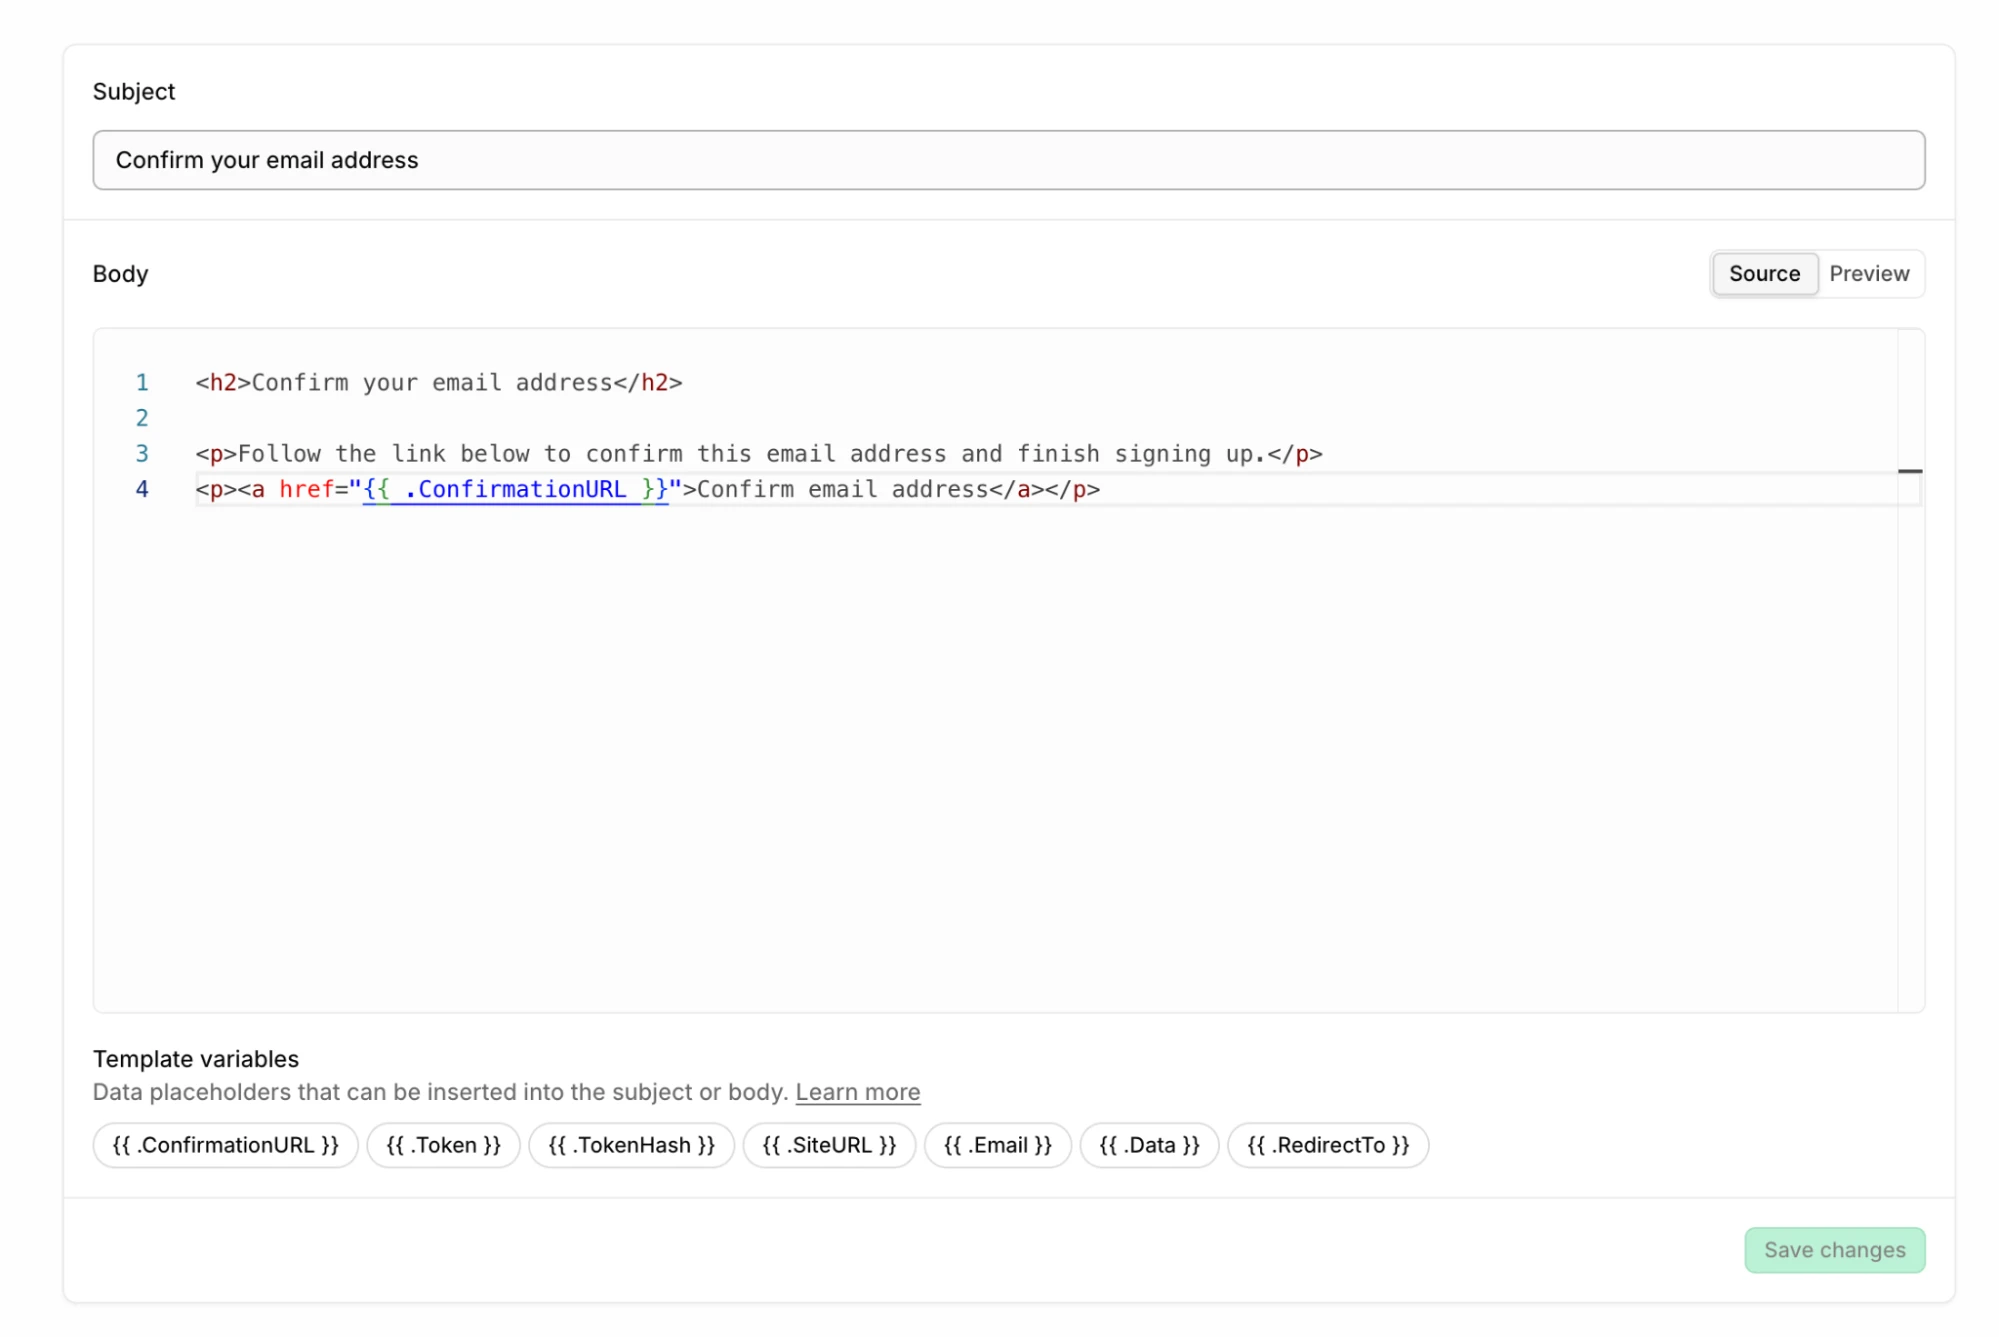
If you change anything, make sure that all the variables are still set up correctly. Variables personalize the email by adding dynamic information into the content. For example, adding {{ .Email }} will dynamically add the email address of the recipient to the email.
5. Customize rate limits
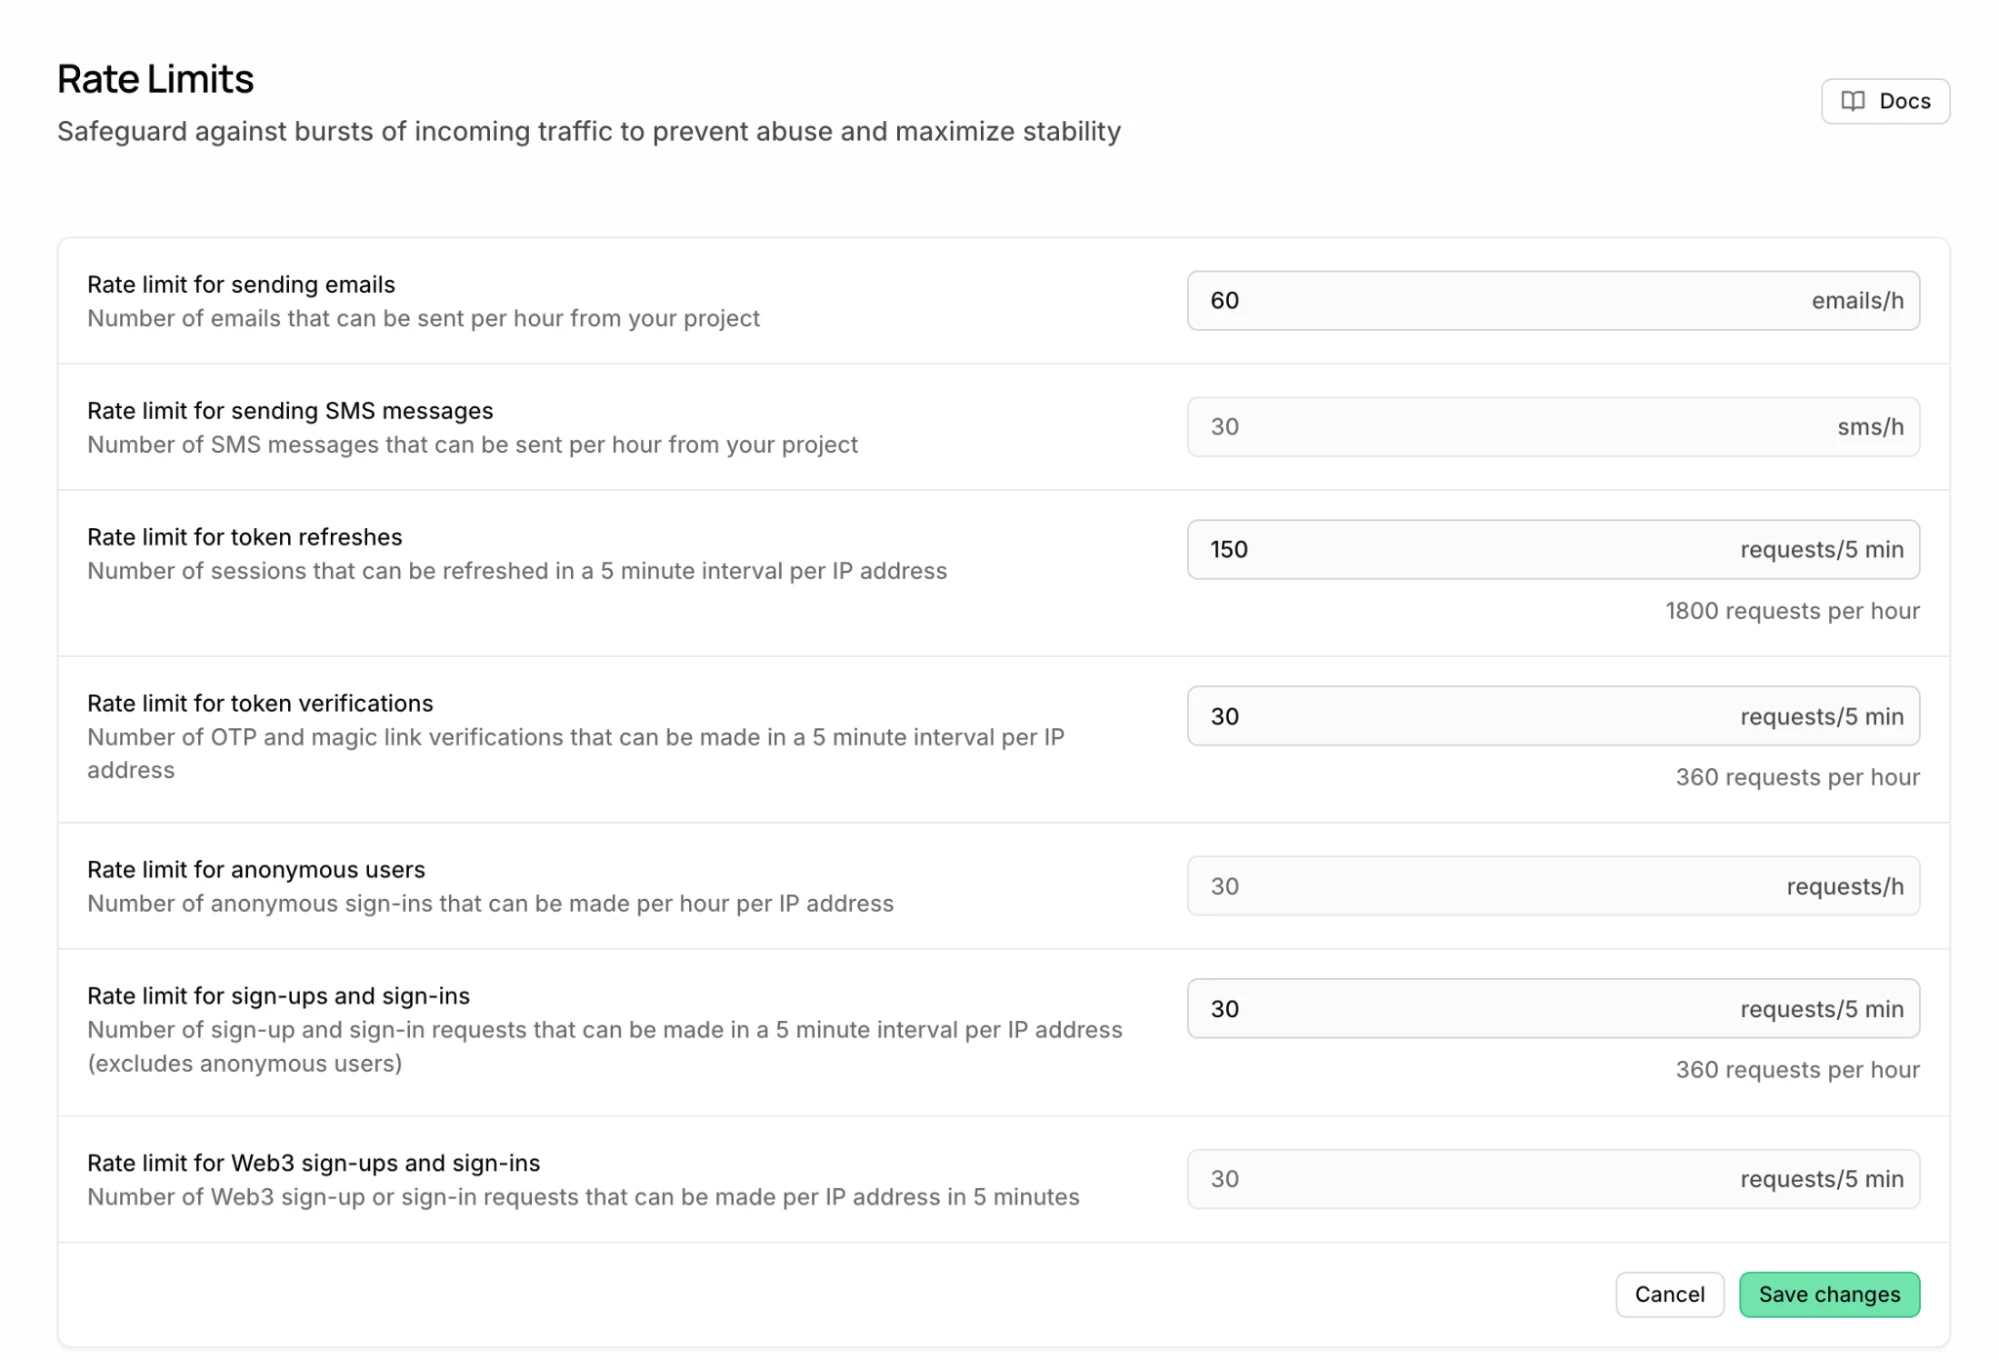
At this point, ensure that the email rate limit is suitable for your sending needs. When you add a custom SMTP to Supabase, your rate limit is set to 30 emails per hour.
If you think you’ll need more than this, you can easily increase this number by heading to Rate Limits in the Configurations tab and then adjusting the limit to your chosen figure.
How to send emails from your Supabase database
At this point, you're fully set up to send authentication and security emails with Supabase. But if you want to send other types of emails, like order confirmations or product notifications, you can call the MailerSend API directly from your Supabase database.
Before you start, you’ll need to follow the steps above for adding a domain to MailerSend and then create a MailerSend API key, which you can do by heading to Integrations, locating the MailerSend API, clicking Manage, and then clicking Create new token. Give the token a name, choose the relevant domain, and set the expiration date and permissions.
Here’s how the setup works. First, you store your MailerSend API key securely in your Supabase database.
Then you create a Postgres function that takes the details of your email (the sender, recipient, subject and content) and sends them to the MailerSend API.
Once the function is in place, you can send an email with a simple select statement, either from the SQL editor or from anywhere else in your project that can run SQL, like a trigger or a scheduled job.
For example, once everything is set up, sending a test message looks like this:
select send_email_message('{
  "sender": "sender@mydomain.com",
  "recipient": "recipient@somewhere.com",
  "subject": "This is a test message from my Supabase app!",
  "html_body": "This message was sent from PostgreSQL using Supabase and MailerSend."
}');
The supabase-mailer repository has ready-made SQL for each part of the setup, including the function itself and an optional table for tracking the messages you send. You can also use it to create messages in advance and send them later, for example on a schedule or when another table is updated.
For full setup instructions, check out the MailerSend developer docs and Supabase developer docs for further instructions.
Other ways to send emails with Supabase
We've covered two ways to send emails with Supabase that we think will be enough for the majority of email senders. But they aren't the only ways to do it.
Here are a few other options worth knowing about:
Send email hook: This replaces Supabase's built-in email sending for authentication emails. Instead of using Supabase's templates, Supabase passes the details to your own function, which can send the email via the MailerSend API. This is useful if you want to use your own templates, send emails in multiple languages, or add custom logic.
Edge functions: Supabase's serverless functions let you call the MailerSend API from outside your database. They're a good fit for sending emails triggered by actions in your app, like a new order or a form submission.
Database webhooks: Rather than calling a function yourself, you can have Supabase send a request automatically whenever a row is added, updated or deleted in a table. Point the webhook at an Edge Function to send an email, like a welcome email when a new user profile is created.
For setup instructions, check out the Supabase docs and the MailerSend developer docs.
Send emails with Supabase and MailerSend
With MailerSend, you can add reliable email sending to your Supabase database in a matter of minutes. Our 14-day trial lets you start for free, and when it ends, you can choose a plan from just $7 per month for 5,000 emails.
Start your free trial
Get a 14-day free trial to add email sending to your app. Add your domain, generate SMTP credentials, and add them to Supabase in minutes.