What are email webhooks and how can you use them?
There’s no need to constantly poll the API to get up-to-date data on your transactional email events. Polling is a waste of your time and your server resources. Plus, there’s a risk that you may miss out on an event in between your requests because you’re sending them in a pre-determined order—not in response to an event.
The smarter way to receive updates is by using email webhooks. We’ll show you how MailerSend’s webhook feature enables you to subscribe to notifications about various email events without having to poll the API.
What are webhooks?
Webhooks are automated HTTP POST requests made to URL endpoints in response to specific events, such as when an email bounces or is opened. Also known as HTTP callbacks, they enable data sharing and real-time communications between programs without the need for constant polling.
The magic behind how webhooks work
Instead of sending requests to receive a response (as with API requests), webhooks simply wait for the response triggered by a specified event. When the event occurs, the webhook allows the source application to instantly send data to the callback URL of the receiving application.
Here’s how the process works. Let’s use the example of an email sent via MailerSend hard bouncing and a notification being sent to a CRM.
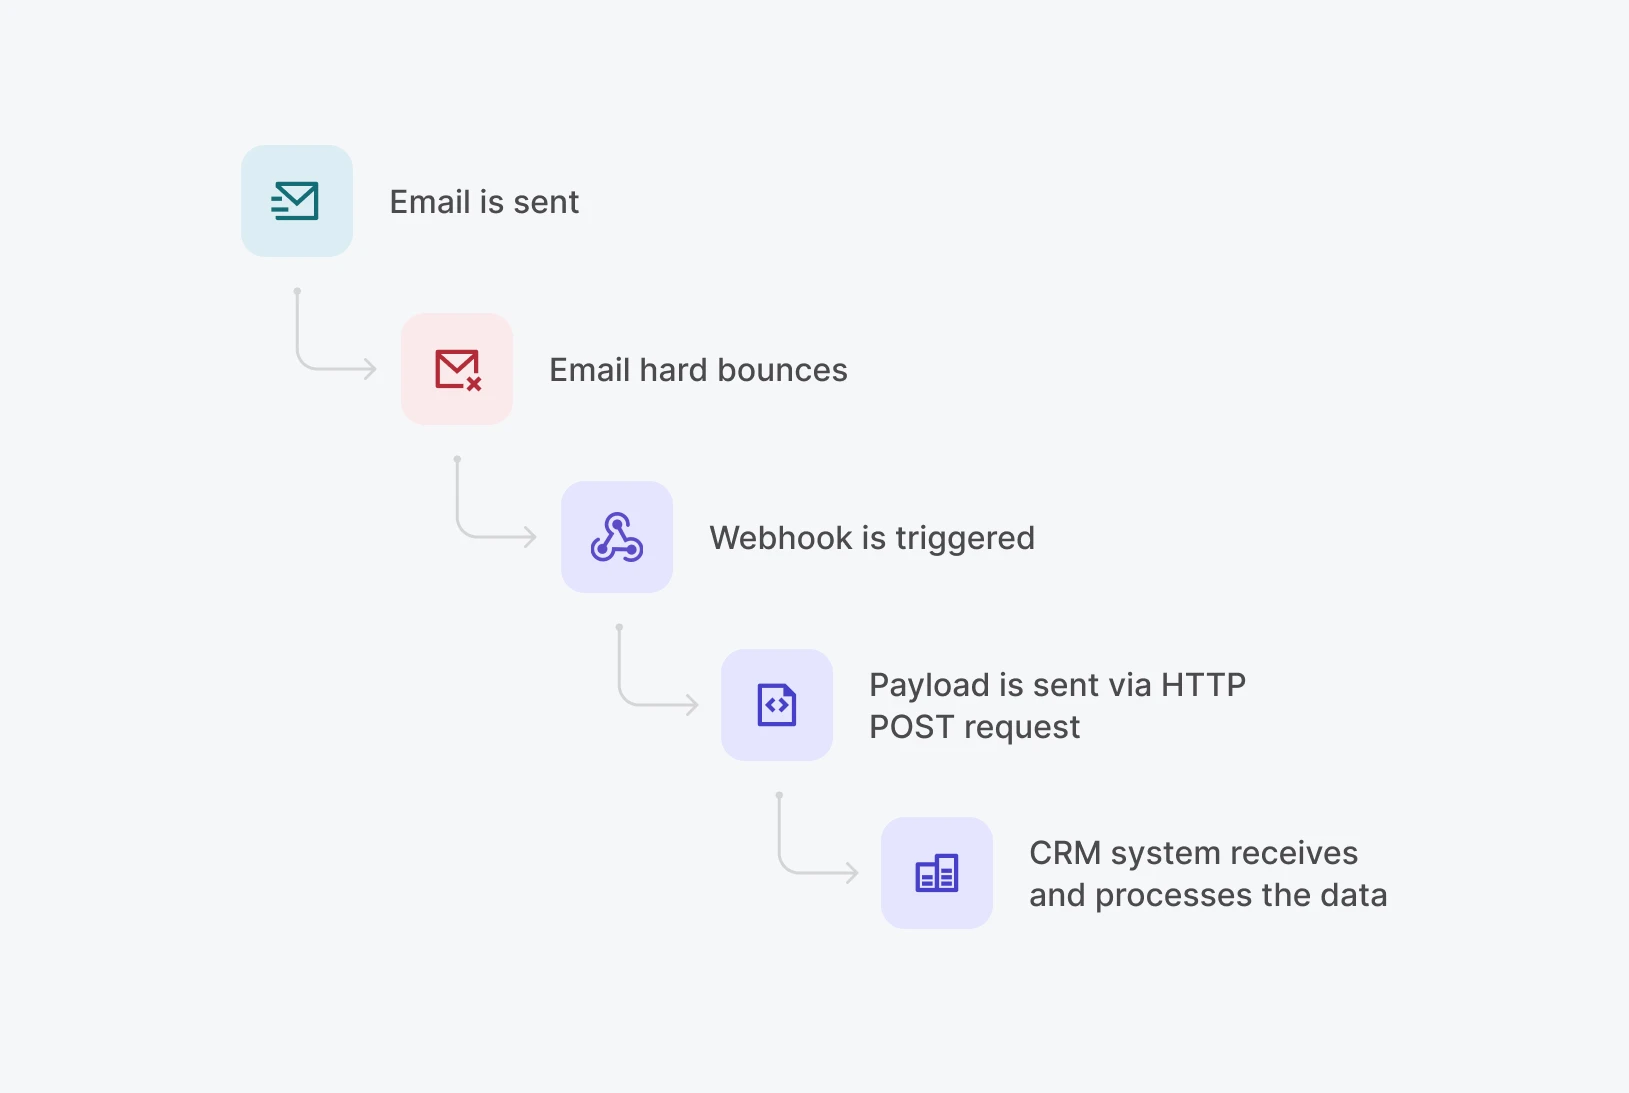
1. The event trigger occurs: In this case, the event trigger is a hard bounce. We sent the email to jerry@example.com and it hard bounces, resulting in the triggering of the webhook.
2. The payload is created: The payload is the data that will be sent from the source application (MailerSend) to the receiving application (CRM) about the event. It’s typically formatted in JSON and contains a header and body with all of the information needed for the receiving application to interpret it.
3. The HTTP POST request is sent: The JSON payload is sent as an HTTP POST request to the callback URL of the receiving application (CRM), which is specified in the webhook.
4. The receiving application receives and processes the webhook data: The CRM processes the data about the email sent to jerry@example.com hard bouncing as it is programmed to, and updates the recipient’s record in the CRM automatically.
And this is just one way you can utilize webhooks. Once you’ve played around with them a little, you’ll start to see the many ways they can be used to improve workflows in your tech stack.
Webhooks vs. API polling
API polling uses a pull-based model, meaning that when you want to check for new data with an API, you’ll send a request and then wait for a response. And you’d need to repeatedly “pull” data to stay up to date. API polling is useful for periodic data retrieval when real-time updates aren’t needed or webhooks are unavailable. However, constant polling is time-consuming and resource-intensive.
On the other hand, webhooks use a push-based model, meaning that they simply wait for a response which is then automatically sent to the receiving application. This makes webhooks a much more efficient and reliable solution, especially when frequent, real-time updates are needed.
Feature | API Polling | Webhooks |
Communication model | Pull-based (client requests) | Push-based (server sends) |
Data transfer initiation | Client-initiated | Server-initiated |
Data freshness | Potential delay in receiving updates due to dependence on fixed intervals | Up-to-date, real-time information |
Resource efficiency | Resource-intensive, constant requests | Efficient, data sent only when events occur |
Control and reliability | More control over timing, less prone to missed updates | Requires retry logic for reliability to avoid missed updates |
Bandwidth usage | Higher, due to constant polling | Lower, only transmits when necessary |
Server load | Continuous load on server | Reduced server load |
Use cases | Periodic data retrieval, APIs without webhook support | Real-time notifications, immediate reactions to events |
How to create email webhooks in MailerSend
Creating a new MailerSend webhook is pretty straightforward and there are two methods. The easiest is to add a webhook in the app or, if you prefer you can add and manage webhooks with the API. First, let’s have a look at how to do it in the app.
Add a webhook with the MailerSend app
1. Log in to MailerSend and head to the Domains page. Click Manage on the domain you want to add the webhook for.
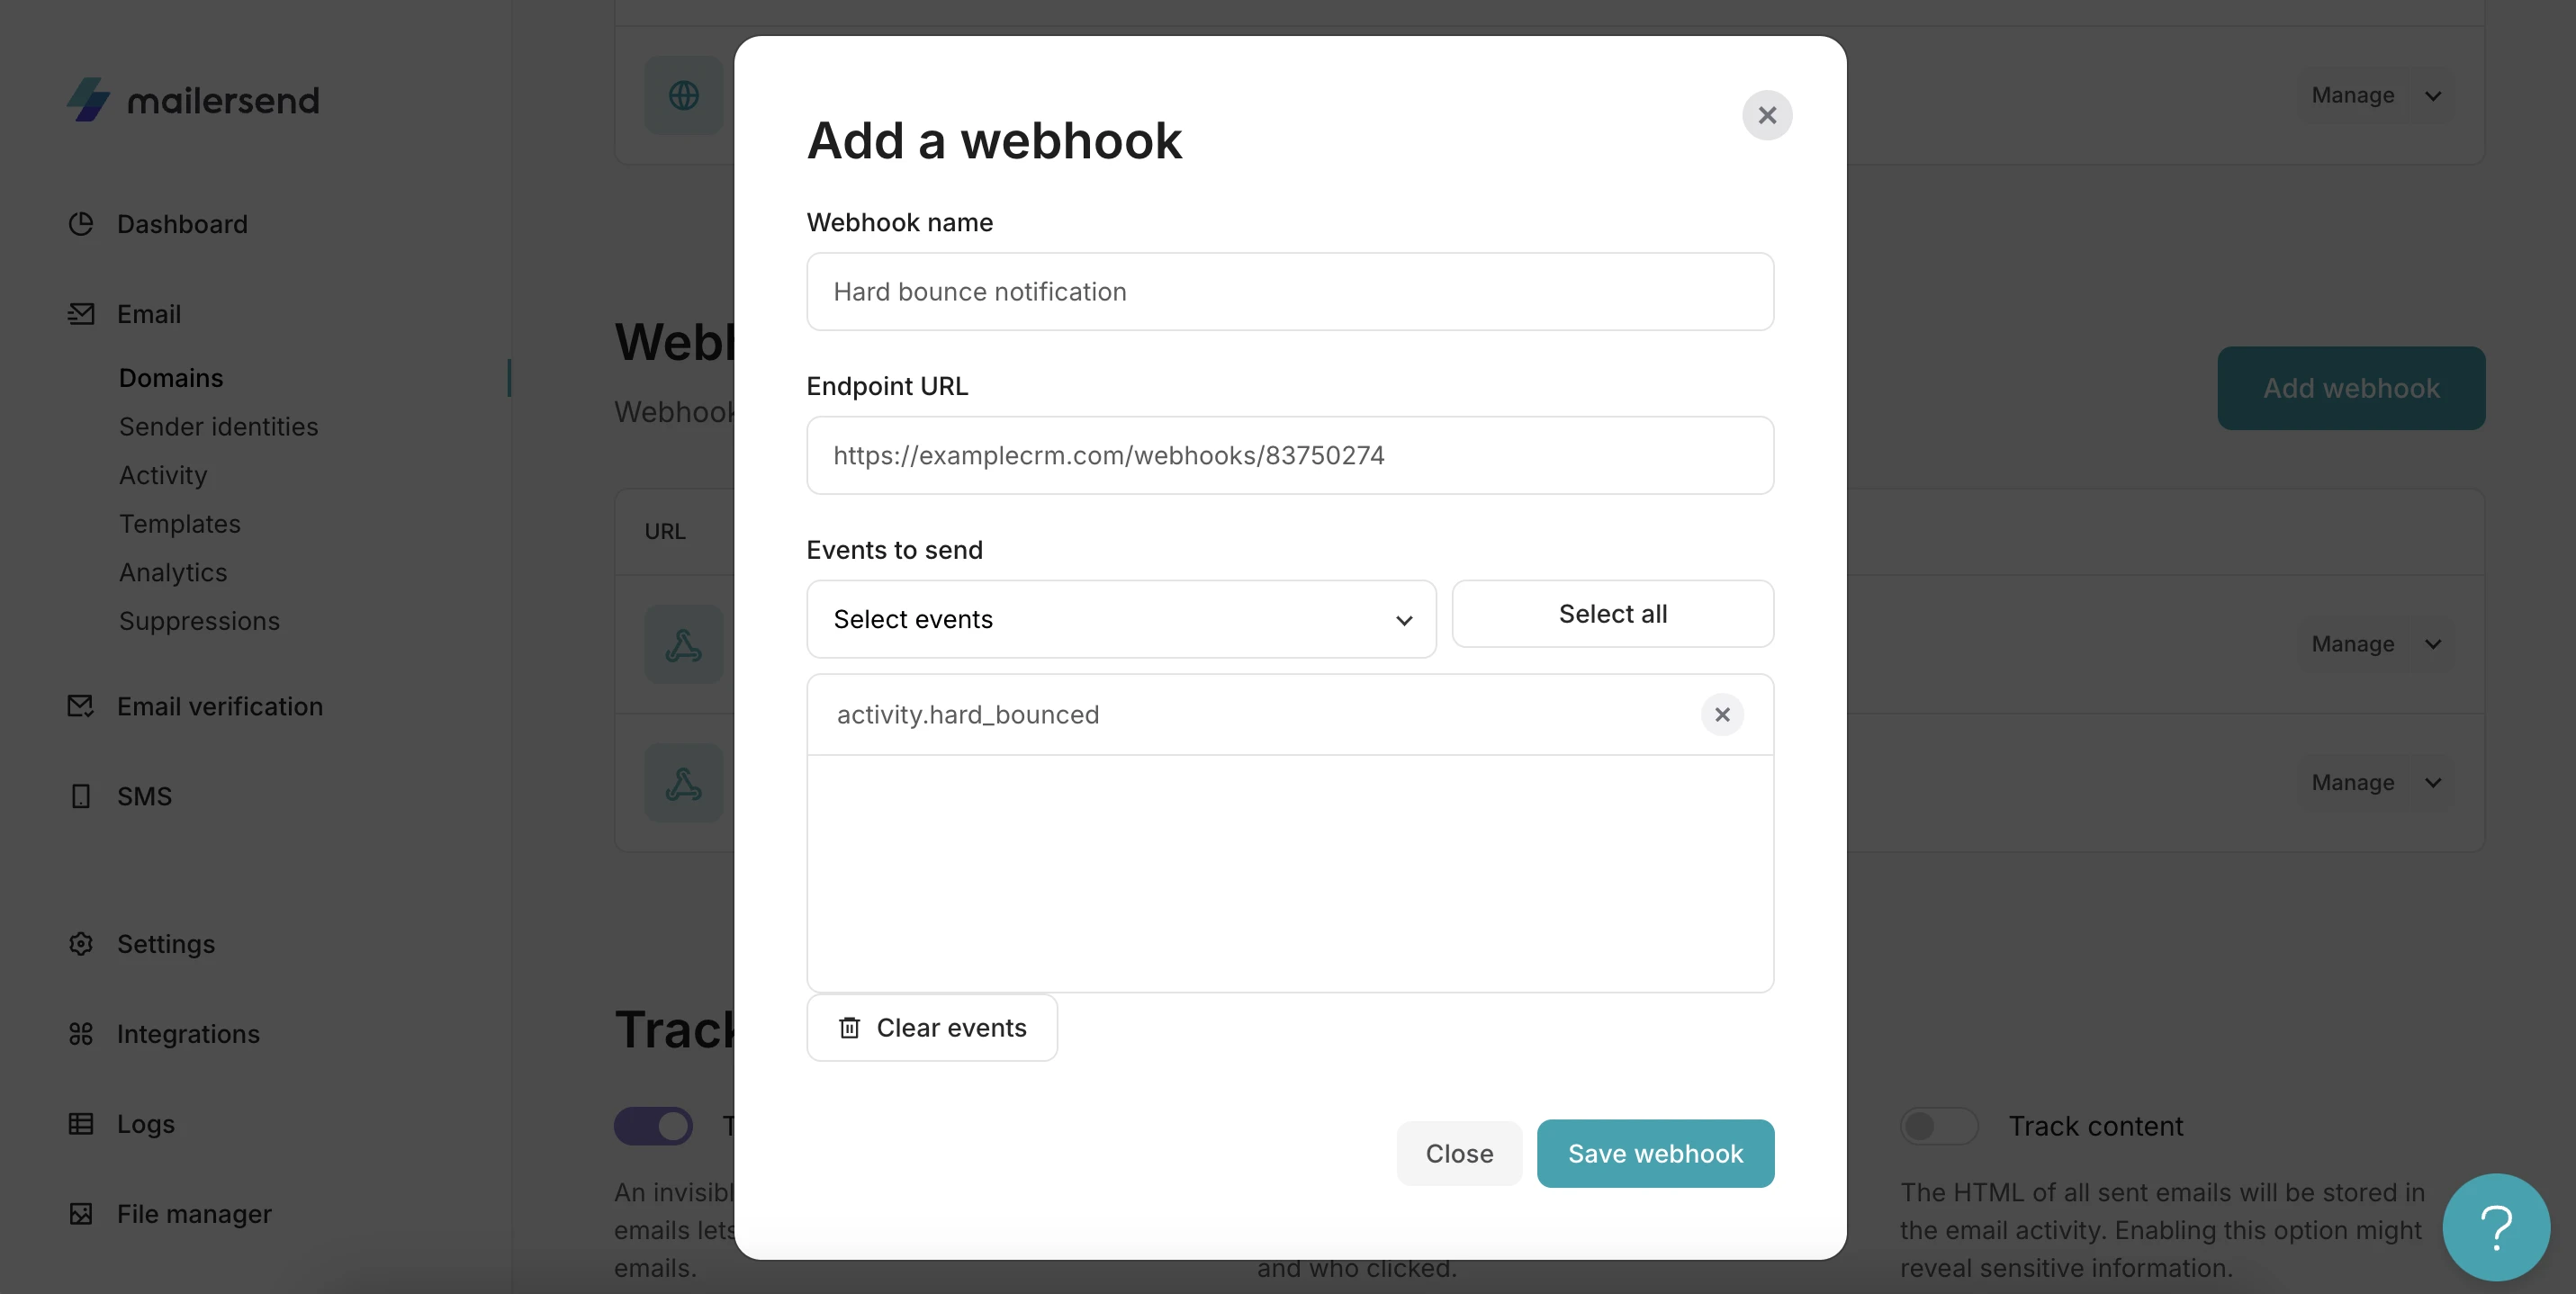
2. Scroll down to the Webhooks section and click Add webhook. Enter a name for the webhook, your endpoint URL (where you want the data to be sent to), and select the events you would like to use as a trigger.
If you’re sending the data to another application, you may be able to find the correct endpoint URL in the app.
You can choose 1 or more of the following events, or click Select all.
Sent
Delivered
Soft bounced
Hard bounced
Opened
Clicked
Unsubscribed
Spam complaint
3. Click on Save webhook and that’s it!
Add a webhook with the MailerSend API
Alternatively, you can also create a webhook using our API.
First, make sure you meet all the prerequisites and install the SDK for your language of choice. You can find all the information and repositories on GitHub.
Then you can create a new webhook with the following POST request. Be sure to replace the example data with your API key, variables, and options for your new webhook.
POST https://api.mailersend.com/v1/webhooks/PHP
use MailerSend\Helpers\Builder\WebhookParams;
use MailerSend\MailerSend;

$mailersend = new MailerSend(['api_key' => 'key']);

$mailersend->webhooks->create(
    new WebhookParams('https://webhook_url', 'Webhook name', WebhookParams::ALL_ACTIVITIES, 'domain_id')
);

// Or a disabled webhook

$mailersend->webhooks->create(
    new WebhookParams('https://webhook_url', 'Webhook name', WebhookParams::ALL_ACTIVITIES, 'domain_id', false)
);
NodeJs
import 'dotenv/config';
import {
    EmailWebhook,
    EmailWebhookEventType,
    MailerSend
} from "mailersend";

const mailerSend = new MailerSend({
    apiKey: process.env.API_KEY,
});

const emailWebhook = new EmailWebhook()
    .setName("Webhook Name")
    .setUrl("https://example.com")
    .setDomainId("domain_id")
    .setEnabled(true)
    .setEvents([EmailWebhookEventType.SENT, EmailWebhookEventType.OPENED]);

mailerSend.email.webhook.create(emailWebhook)
    .then((response) => console.log(response.body))
    .catch((error) => console.log(error.body));
Python
from mailersend import webhooks

api_key = "API key here"

webhookEvents = ["activity.sent", "activity.delivered"]

webhook = webhooks.NewWebhook(api_key)
webhook.set_webhook_url("https://webhooks.mysite.com")
webhook.set_webhook_name("my first webhook")
webhook.set_webhook_events(webhookEvents)
webhook.set_webhook_domain("domain-id")

webhook.create_webhook()
Go
package main

import (
    "context"
    "log"
    "time"

    "github.com/mailersend/mailersend-go"
)

var APIKey = "Api Key Here"

func main() {
    // Create an instance of the mailersend client
    ms: = mailersend.NewMailersend(APIKey)

        ctx: = context.Background()
    ctx,
    cancel: = context.WithTimeout(ctx, 5 * time.Second)
    defer cancel()

    domainID: = "domain-id"
    events: = [] string {
        "activity.sent", "activity.opened"
    }

        createOptions: = & mailersend.CreateWebhookOptions {
        Name: "Webhook",
        DomainID: domainID,
        URL: "https://test.com",
        Enabled: mailersend.Bool(false),
        Events: events,
    }

        _,
    _,
    err: = ms.Webhook.Create(ctx, createOptions)
    if err != nil {
        log.Fatal(err)
    }
}
Java
import com.mailersend.sdk.MailerSend;
import com.mailersend.sdk.exceptions.MailerSendException;
import com.mailersend.sdk.webhooks.Webhook;

public void CreateWebhook() {

  MailerSend ms = new MailerSend();
  ms.setToken("mailersend token");

  try {

    Webhook webhook = ms.webhooks().builder()
      .name("Webhook name")
      .url("Webhook url")
      .addEvent(WebhookEvents.ACTIVITY_OPENED)
      .addEvent(WebhookEvents.ACTIVITY_CLICKED)
      .createWebhook("domain id");

    System.out.println(webhook.name);

  } catch (MailerSendException e) {

    e.printStackTrace();
  }
}
Ruby
require "mailersend-ruby"

ms_webhooks = Mailersend::Webhooks.new
ms_webhooks.create(domain_id: "xxx2241ll", url: "https://domain.com/hook", name: "Webhook", events: ["activity.sent", "activity.delivered"], enabled: true)Managing webhooks
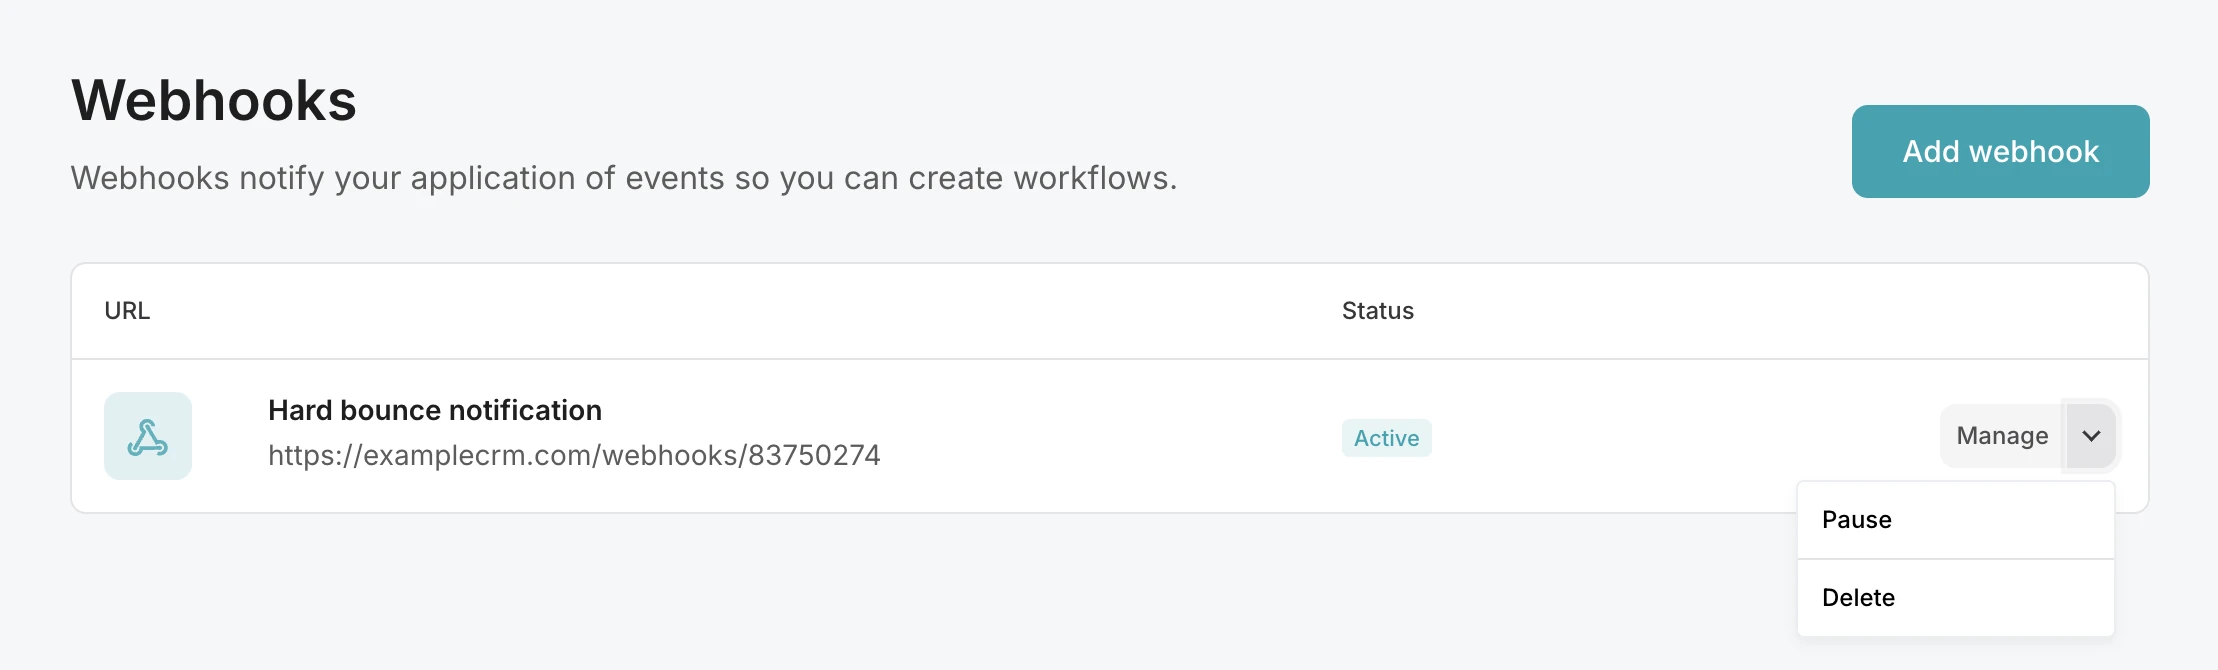
Once your webhook is saved, you’ll find it listed under the Webhooks section. You can manage your webhooks by clicking on “Manage” or the webhook name. Webhooks can also be paused or deleted here.
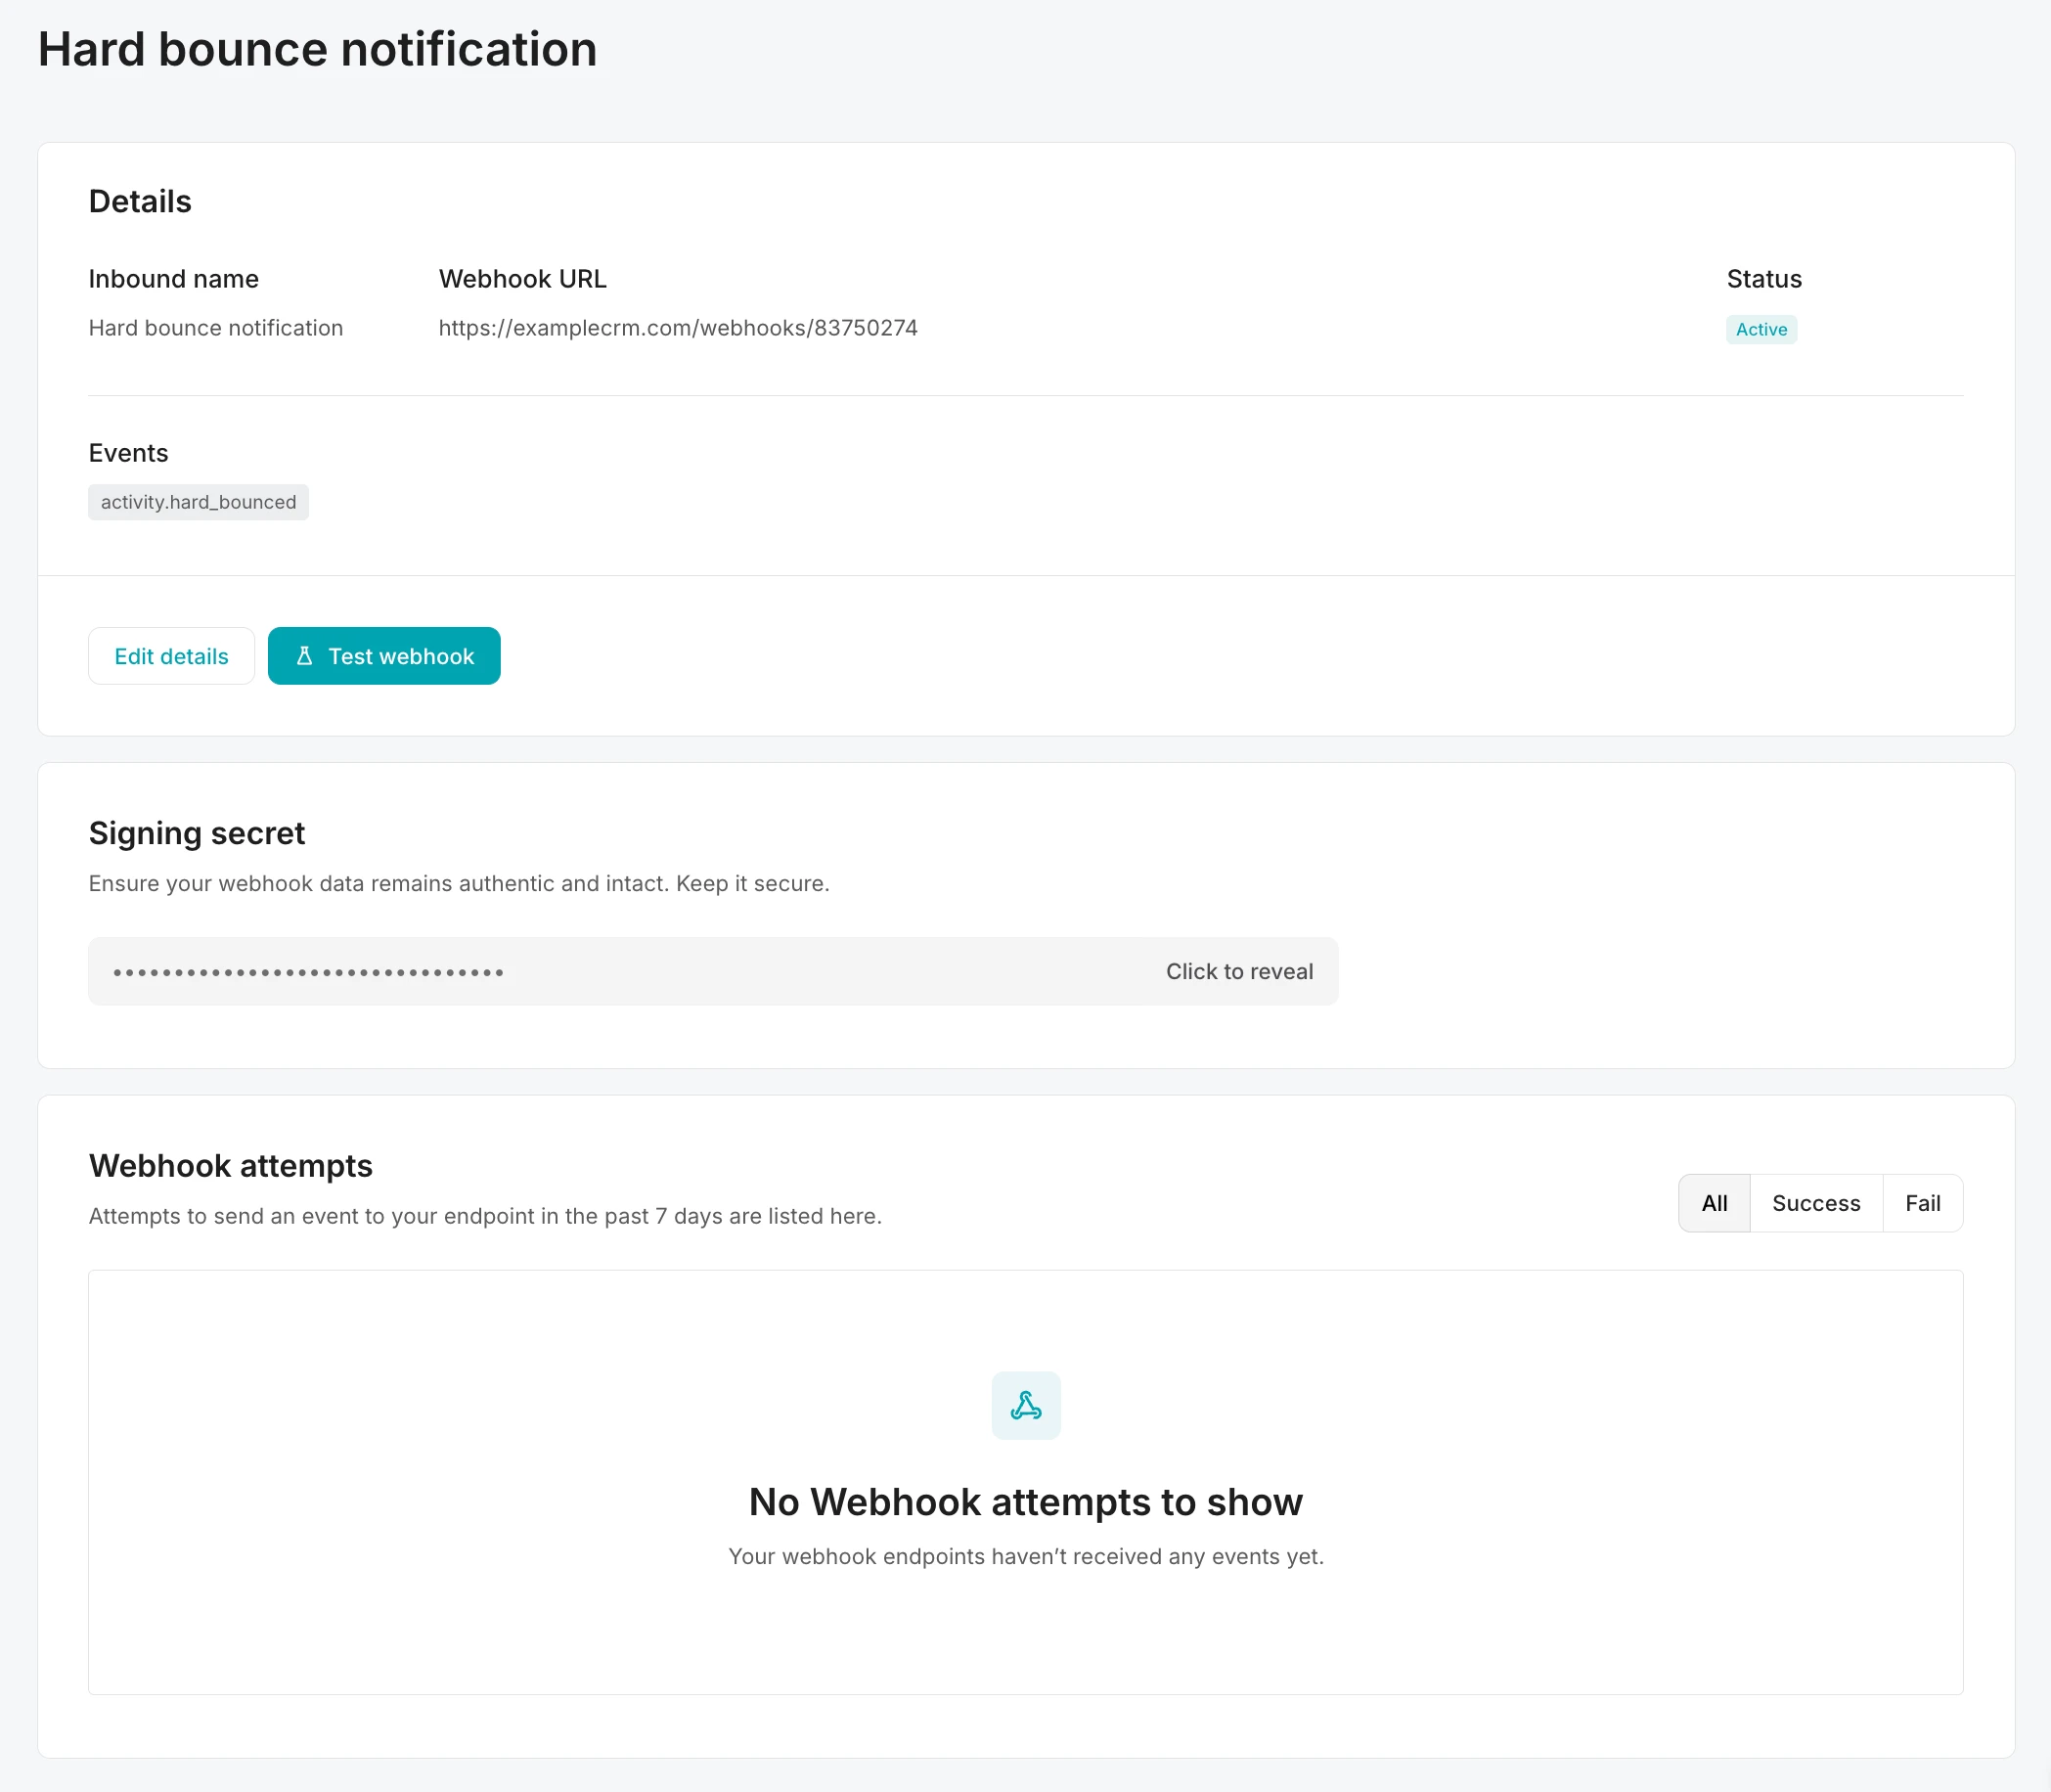
Going further into your webhook’s details, the secret webhook key to be shared with the receiving app is displayed here and you can test your webhook. Clicking on Edit details, you can change your webhook’s name, URL, status, or the email events that you’re monitoring.
To make your webhook requests more secure, MailerSend includes a signature header. Here’s how you can verify your signature.
What you can do with webhooks: 5 use case examples
You made it through the setup sections in one piece! Now it's time for your reward—here are a few of the cool ways you can use webhooks to optimize your email system.
1. Remove hard bounced emails from your list
If your email delivery platform supports webhooks, you can automatically remove hard-bounced emails from your email list or sync data across applications. This allows you to be proactive about protecting your sender reputation and maintaining great email deliverability. Plus, if you’re paying based on the number of emails you send, you could even save money by avoiding future sends to undeliverable mailboxes.
Create a webhook that listens for emails returning a hard bounce: activity.hard_bounced. When triggered, your app can mark the subscriber as “unsubscribed”, automatically keeping your mailing list clean.
2. Know when recipients have read your emails
In certain cases, it can be useful to know when customers have opened your emails. For example, if you’re setting up a helpdesk project, you can implement a “Seen” feature to know the status of the email in your dashboard.
Simply create an endpoint to monitor for activity.opened events and send the webhook’s payload to your helpdesk app.
3. Display real-time email metrics in a custom dashboard
If there are multiple people and teams interested in monitoring email performance and activity, you can deliver real-time metrics to an analytics dashboard that everyone has access to. This is particularly useful if you don’t want to give everyone access to your account, or are being frequently asked for analytics reports.
You can create a webhook that listens for all events and sends the data to your analytics app to be displayed on your custom dashboard in real time.
4. Send surveys and collect responses
Need to get some feedback from customers and collate all the data? Instead of using a third-party survey platform, you can create a survey email and collect the responses via webhooks. You could build the survey yourself or, if you’re a MailerSend user, quickly create a survey email template in the drag and drop editor with pre-built blocks. You can then use a webhook to track survey responses and send them to your own app, or use an automation platform like Zapier or Make to send the data to another third-party application, like Google Sheets or Airtable.
To add a new webhook for survey responses, select the activity.survey_opened and activity.survey_submitted events. When a survey email is opened, the webhook payload will be sent immediately. When a survey is submitted, the webhook payload will be sent with a delay of 30 minutes.
5. Get notifications about critical events
Monitoring transactional email activity is important for ensuring your deliverability remains intact and your users or customers are getting the best experience. With webhooks, you can learn immediately about a critical event, such as failed inbound forwarding or hard bounces, without the need to keep checking your activity dashboard. What’s more, if such an event does occur, you can trigger other actions in your workflow to address them.
For example, you could set up Slack notifications for your team to be notified whenever a recipient bounces, unsubscribes, or makes a spam complaint.
Firstly, add the MailerSend application for Slack app. Pick a channel that you want to send notifications to and a webhook URL will be generated for you. This is the endpoint URL that will receive all HTTP POST requests.
Next, create a webhook in MailerSend and paste the Slack webhook URL. All events like activity.hard_bounced, activity.unsubscribed and activity.spam_complaint will now be sent to your Slack channel for further action.
Using Zapier to send alerts
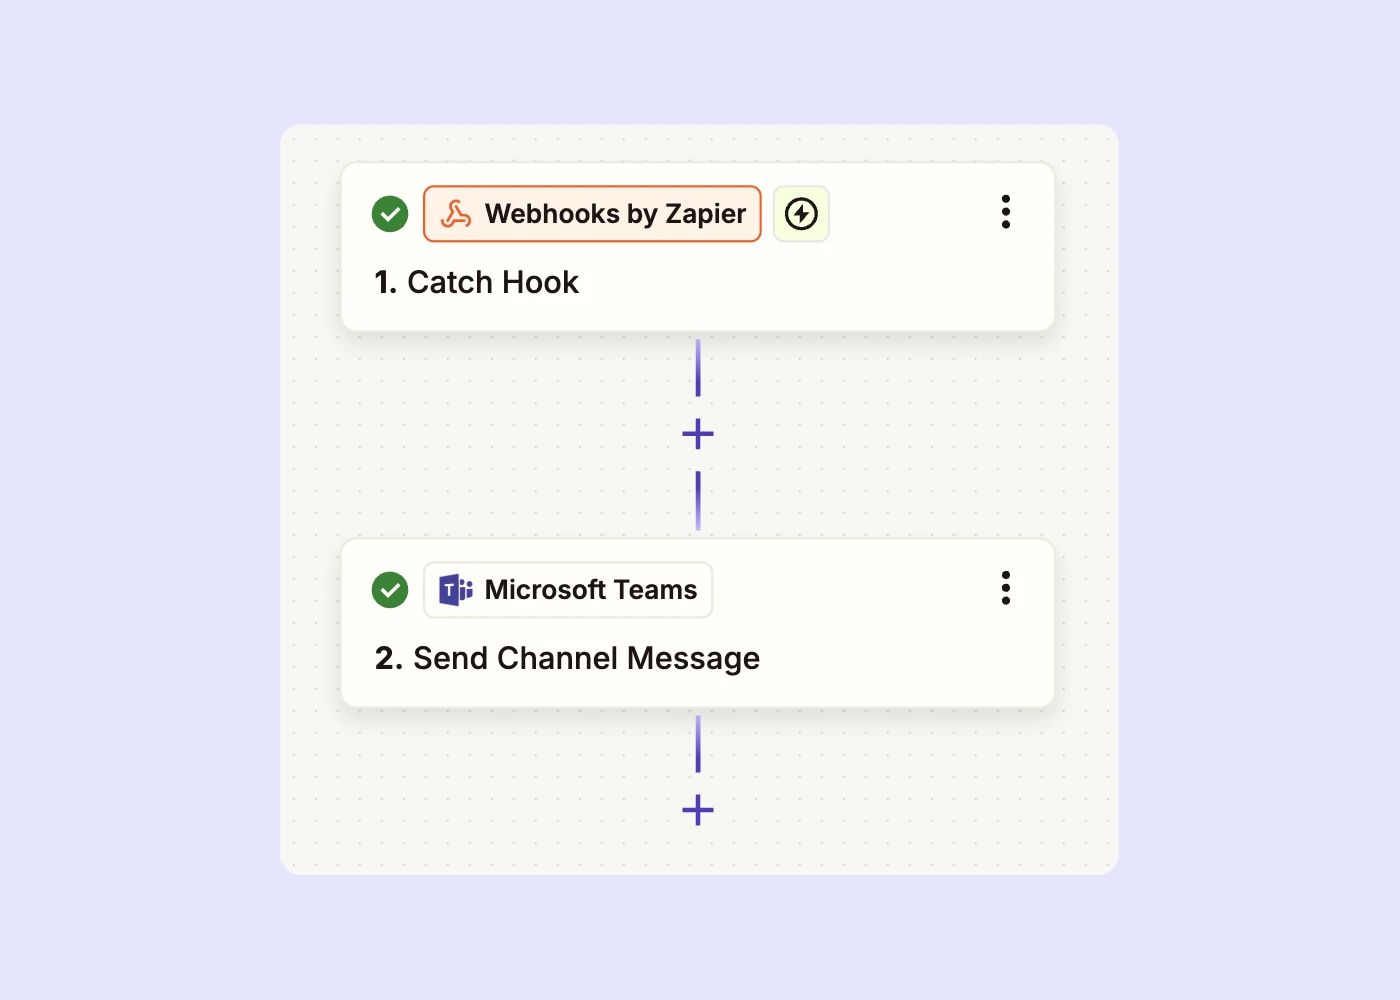
You can use Zapier or Make to send webhook notifications to thousands of other applications. For example, if you want to send a notification to a Microsoft Teams channel, you can follow these steps in Zapier:
1. Create a new Zap and for the trigger that starts it, add Webhooks by Zapier.
2. For the Trigger event, select Catch Hook. Catch Hook will format the data so you don’t have to process it yourself while Catch Raw Hook will keep the raw JSON string.
3. Proceed to the final step, where Zapier will give you your endpoint URL. Then, add a new webhook in MailerSend, select all of the events you would like to listen for, and enter the Zapier endpoint URL. This allows you to listen for multiple events in a single zap.
4. Next add an action step. Search for Microsoft Teams and select it.
5. For the Action event, choose Send Channel Message. This will also require you to install the Zapier app from the Teams store.
6. Connect your Teams account in Zapier and, if prompted, grant Zapier permission to access the account.
7. After connecting your account, set up your action by selecting the Team and Channel you want to send the message to, and setting the Message Text.
8. Test your Zap and deploy it!
Webhook best practices and recommendations
Implement proper error handling
Webhooks can fail from time to time and without proper error handling implemented, updates will be missed which could result in skewed data or worse, missing a critical event. To avoid this, you can use retry attempts, error logging, and alerts to catch any issues.
In MailerSend, all webhook attempts made in the past 7 days are shown on the webhook page. 2xx responses are shown as successes, others as failures.
What’s more, when a webhook fails on the first attempt, MailerSend retries after 10 seconds and again after 100 seconds if the second attempt fails. This avoids hammering the application you want to send the information to.
Optimize webhook implementation
Keeping your webhooks organized will help to keep your system running smoothly and make it much easier to manage. Some steps you should consider are:
Using a queueing system
Having a system in place to manage incoming webhooks will allow you to process requests asynchronously and prevent your system from becoming overwhelmed during periods of increased activity.
Ensure webhook security
Use strong authentication methods such as OAuth and API keys and always validate your webhook payloads with your signing secret. Plus, you should use HTTPS for all webhook communication.
Filter the data you need
You can minimize the processing load by using filters and customizing payloads. With filters, you can choose the events and data you need. You can also customize the payload itself to remove anything irrelevant.
More webhook resources
Check out our website for more help resources:
Knowledge base article: Getting started with webhooks
Developer documentation: Webhooks overview
Work smarter with notifications
Webhooks enable you to easily share data between applications in your stack. They’re a more efficient way of getting instant, real-time notifications about email events. Plus, they’re much easier to set up and maintain than making requests to an API. We hope this article has inspired you to automate your product and workflows by listening to and acting on events with webhooks.
Do you have any cool or unique use cases for webhooks? Share them in the comments! We love hearing about unique implementations.