How to get started with real-time email validation—with code examples
If you’re following email sending best practices, you’ll already know that email verification involves running your email list through a verification tool to identify invalid emails that should be removed.
Real-time email validation verifies emails but uses an API integrated into your webforms or backend to run checks against email addresses as they are being entered. This allows you to catch them before they get anywhere near your email list.
How real-time email verification works
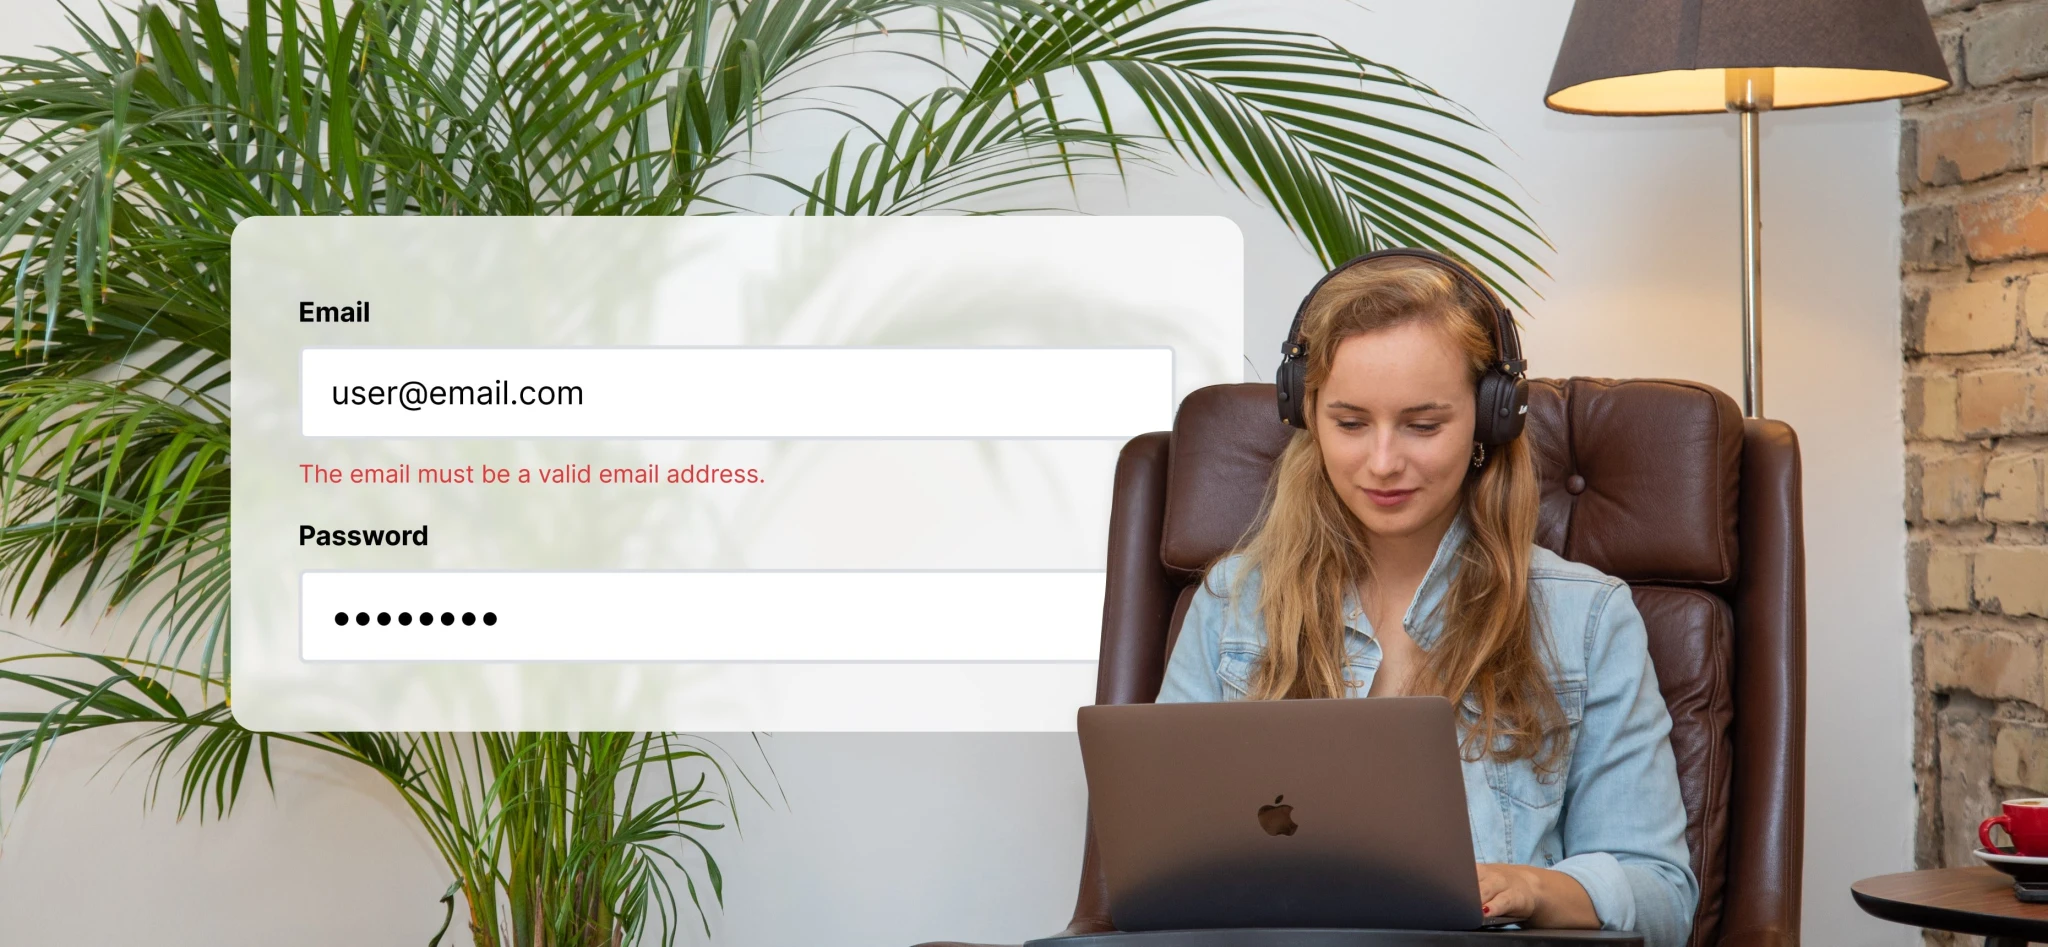
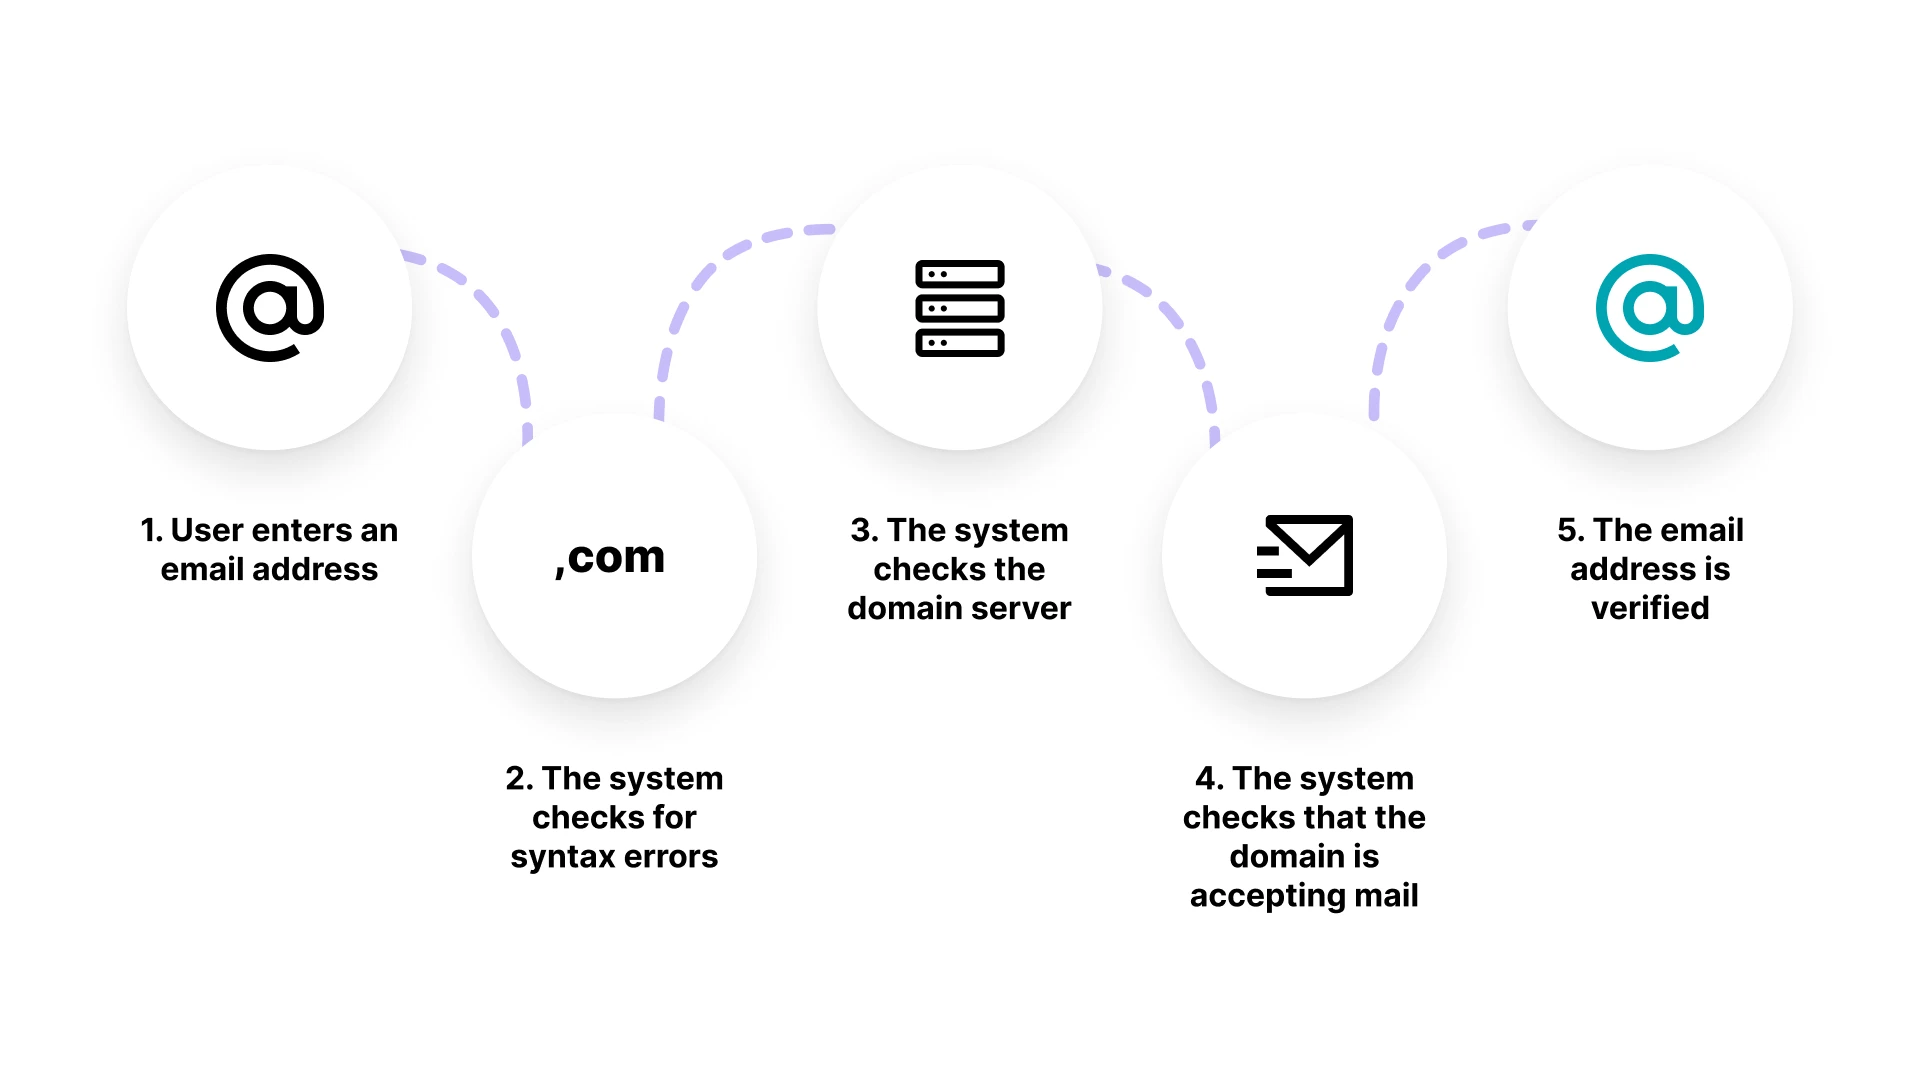
Using a simple email validation API, any developer can integrate real-time email validation with your website or app. When an email address is entered, the email validation service you are using verifies the validity of the email.
The email validation checker will then return the status of the email address in real time so that your website or app can decide what to do based on whether the email is valid or not.
For example, if the email address is invalid, you can instruct your website or app to display an error message to the user, prompting them to enter a valid email address.
The benefits of real-time email validation
We’ve explained what real-time email validation is but beyond keeping your email list clean, why should you use it? Here are 8 advantages of real-time email verification.
1. Maintain a healthy sender reputation and boost deliverability
Email sender reputation is a scoring system used by Internet Service Providers (ISPs) to help combat spam. It works by assigning a high (good) or low (bad) score to senders based on their sending practices.
If you keep a healthy, clean email list, you’ll reduce and prevent high bounce rates, spam complaints and unsubscribes. This will signal to ISPs that you’re a good sender, thus helping you to improve and maintain a good sender reputation.
A healthy sender reputation helps boost your deliverability. Higher deliverability rates help you maintain a healthy sender reputation. And that’s the cycle of email deliverability.
When it comes to maintaining and improving your sender reputation, cleaning your email list is essential. Adding in real-time email verification will make looking after your email list even easier, keeping your list cleaner between manual checks.
2. Reduce the risk of blocklisting
The cleaner your email list, the more real, engaged recipients you have. A high number of spam complaints, spam traps and other bad email addresses that result in high hard bounce rates are issues that can result in your IP address or domain being blocklisted. They tell ISPs that you are not maintaining your email list.
With real-time validation, invalid emails are caught before they ever get near your list, so the risk of being blocklisted is greatly reduced.
3. Increase engagement
Engagement metrics such as clicks, forwards and open rates help ISPs to determine if you’re following best practices for your content and email list.
Low engagement signals that either your recipients aren’t interested in your messages or that your email list is full of bad emails that don’t actually belong to real people. On the other hand, high engagement rates show that you’re sending your emails to a valid list of recipients who want to hear what you have to say.
Keeping a clean email list will help you to avoid the spam folder, deliver more emails and increase engagement.
4. Increase conversions
The cleaner your email list, the higher your deliverability and the more real recipients you’ll be able to reach. Combine this with more people engaging with your content and conversion rates will increase.
5. Enjoy more accurate data
Email engagement metrics are important for helping you to optimize your emails and sending strategy, and monitoring deliverability—but not if they’re inaccurate. Keeping your email list clean with real-time verification will allow you to make use of more accurate data.
Invalid emails skew data by making your engagement metrics appear much lower than they really are. For example, if you send an email to 100 people and 50 people click, your click rate will be 50%. But, if in fact 25 out of those 100 recipients are invalid, that means your total number of recipients is actually 75, not 100. So your click rate would be 66%. Results that you may put down to bad content or design might actually be because of invalid emails.
6. Improve the user experience
Imagine you sign up for a service or product only to never receive any email from them. It could be that you simply entered your email address incorrectly, but you’d never know if the website or app doesn’t inform you.
Real-time email address validation solves this issue by immediately displaying an error message to the user if they enter an invalid email address. All they need to do is enter it again correctly and they’re good to go.
7. Save on sending costs
If improving your sender reputation, deliverability and engagement weren’t enough, how about saving money?
If you’re sending emails to a bunch of people that don’t actually exist, you’ll still have to pay for those sendings. Having a significant number of invalid email addresses will drive your sending quota up to much more than you need, resulting in unnecessarily higher sending costs.
Making sure those invalid emails never hit your list means your recipients will stay as valid as possible and you’ll never pay more than you need to for your sending.
8. Avoid legal ramifications and fines
There are regulations in place, such as CAN-SPAM and the GDPR, that protect consumers from spam, and violating them can land you a hefty fine.
How to set up a real-time email verification API with MailerSend
1. If you haven’t done so already, sign up for a free account and create an API token so that you can link your app and MailerSend with the API key, by going to Integrations, API tokens, Manage and clicking Generate new token.
2. Configure the HTML form on your app or website so that the email addresses collected will be sent using JavaScript to your backend where they will then be sent to MailerSend to be verified.
To do this, change the <script> element of your HTML page to the following:
<script>
	document.getElementById('signupForm').addEventListener('submit', function(event) {
		event.preventDefault(); // Prevent the form from submitting
		const emailInput = document.getElementById('email');
		const errorMessage = document.getElementById('error-message');

		fetch('http://localhost/', {
				method: 'POST',
				headers: {
					'Content-Type': 'application/json'
				},
				body: JSON.stringify({
					email: emailInput.value
				})
			})
			.then(response => response.json())
			.then(result => {
				console.log(result);
				if (result.success) {
					errorMessage.textContent = ''; // Clear any previous error message
					alert('Email is valid! Form submitted.');
				} else {
					errorMessage.textContent = result.text || 'Please enter a valid email address.';
				}
			});

	});
</script>
This submits the email into your backend.
3. You’ll then need another script on your backend to retrieve the form submission, send the email address to MailerSend, and return the results to your HTML form. Here’s an example for each language:
NodeJS
In this case, we use the `express` package to make handling the form submission easier. This script also assumes you’ve installed the dotenv package and have created a file named .env in the root directory of your project and added your API token to it.
const express = require('express');
const cors = require('cors');
require('dotenv').config(); // Load environment variables from .env file

const app = express();

app.use(express.json());
app.use(cors());

app.post('/', function(request, response) {
	let email = request.body.email;

	fetch('https://api.mailersend.com/v1/email-verification/verify', {
			method: 'POST',
			headers: {
				'Authorization': `Bearer ${process.env.MAILERSEND_API_TOKEN}`, // Use environment variable for API token
				'Content-Type': 'application/json'
			},
			body: JSON.stringify({
				email
			})
		})
		.then(response => response.json())
		.then(data => {
			if (data.status === 'valid') {
				response.json({
					success: true,
					text: 'Email is valid.',
					color: 'green',
				});
			} else {
				response.json({
					success: false,
					text: 'Email is invalid.',
					color: 'red',
				});
			}
		})
		.catch(error => {
			console.error('Error:', error);

			response.json({
				success: false,
				text: 'An error occurred during validation.',
				color: 'red',
			});
		});
});

app.listen(80, () => {
	console.log('Listening at port 80');
});
Laravel
This script uses the GuzzleHTTP client to make the API request.
<?php

namespace App\Http\Controllers;

use Illuminate\Http\Request;
use GuzzleHttp\Client;
use Illuminate\Support\Facades\Log;

class EmailValidationController extends Controller
{
    public function validateEmail(Request $request)
    {
        $request->validate([
            'email' => 'required|email',
        ]);

        $email = $request->input('email');
        $apiKey = env('MAILERSEND_API_KEY');

        try {
            $client = new Client();
            $response = $client->post('https://api.mailersend.com/v1/email-verification/verify', [
                'headers' => [
                    'Authorization' => 'Bearer ' . $apiKey,
                    'Content-Type'  => 'application/json',
                ],
                'json' => [
                    'email' => $email,
                ],
            ]);

            $data = json_decode($response->getBody(), true);

            if ($data['status'] === 'valid') {
                return response()->json([
                    'success' => true,
                    'text' => 'Email is valid.',
                    'color' => 'green',
                ]);
            } else {
                return response()->json([
                    'success' => false,
                    'text' => 'Email is invalid.',
                    'color' => 'red',
                ]);
            }
        } catch (\Exception $e) {
            Log::error('Error:', ['error' => $e->getMessage()]);

            return response()->json([
                'success' => false,
                'text' => 'An error occurred during validation.',
                'color' => 'red',
            ]);
        }
    }
}
PHP
Again, the script uses the GuzzleHTTP client to make the API request and assumes you have a basic PHP environment set up with composer to manage dependencies. To use the env variable for your API token, you’ll also need to use the vlucas/phpdotenv package and create a file named .env in the root directory of your project and add your API key to it. Here’s the script:
<?php
require "vendor/autoload.php";

use GuzzleHttp\Client;
use Dotenv\Dotenv;

// Load environment variables from .env file
$dotenv = Dotenv::createImmutable(__DIR__);
$dotenv->load();

header("Access-Control-Allow-Origin: *");
header("Content-Type: application/json");

if ($_SERVER["REQUEST_METHOD"] === "POST") {
    $input = json_decode(file_get_contents("php://input"), true);
    $email = $input["email"] ?? "";

    if (!filter_var($email, FILTER_VALIDATE_EMAIL)) {
        echo json_encode([
            "success" => false,
            "text" => "Invalid email format.",
            "color" => "red",
        ]);
        exit();
    }

    $apiKey = getenv("MAILERSEND_API_TOKEN"); // Get the API key from the environment variable

    try {
        $client = new Client();
        $response = $client->post(
            "https://api.mailersend.com/v1/email-verification/verify",
            [
                "headers" => [
                    "Authorization" => "Bearer " . $apiKey,
                    "Content-Type" => "application/json",
                ],
                "json" => [
                    "email" => $email,
                ],
            ]
        );

        $data = json_decode($response->getBody(), true);

        if ($data["status"] === "valid") {
            echo json_encode([
                "success" => true,
                "text" => "Email is valid.",
                "color" => "green",
            ]);
        } else {
            echo json_encode([
                "success" => false,
                "text" => "Email is invalid.",
                "color" => "red",
            ]);
        }
    } catch (Exception $e) {
        error_log("Error: " . $e->getMessage());

        echo json_encode([
            "success" => false,
            "text" => "An error occurred during validation.",
            "color" => "red",
        ]);
    }
} else {
    echo json_encode([
        "success" => false,
        "text" => "Invalid request method.",
        "color" => "red",
    ]);
}
?>
Java
This script uses the Spring Boot framework to handle the form submission, send the submitted email address to MailerSend for verification, and return the results to the HTML form. To access the API key while keeping it hidden, you’ll also need to store the API key in an env variable and update the application.properties file (or application.yml if you use YAML) to allow access to environment variables.
Here’s the script:
package com.example.emailvalidation;

import org.springframework.beans.factory.annotation.Value;
import org.springframework.http.HttpHeaders;
import org.springframework.http.MediaType;
import org.springframework.http.ResponseEntity;
import org.springframework.web.bind.annotation.*;
import org.springframework.web.reactive.function.client.WebClient;
import org.springframework.web.reactive.function.client.WebClientResponseException;

import javax.validation.Valid;
import javax.validation.constraints.Email;
import javax.validation.constraints.NotBlank;
import java.util.HashMap;
import java.util.Map;

@RestController
@CrossOrigin
public class EmailValidationController {

  @Value("${mailersend.api.key}")
  private String apiKey;

  private final WebClient webClient;

  public EmailValidationController(WebClient.Builder webClientBuilder) {
    this.webClient = webClientBuilder.baseUrl("https://api.mailersend.com/v1/email-verification").build();
  }

  @PostMapping("/")
  public ResponseEntity < Map < String, String >> validateEmail(@RequestBody @Valid EmailRequest emailRequest) {
    Map < String, String > responseMap = new HashMap < > ();
    try {
      String response = this.webClient.post()
        .uri("/verify")
        .header(HttpHeaders.AUTHORIZATION, "Bearer " + apiKey)
        .header(HttpHeaders.CONTENT_TYPE, MediaType.APPLICATION_JSON_VALUE)
        .bodyValue(emailRequest)
        .retrieve()
        .bodyToMono(String.class)
        .block();

      if (response.contains("\"status\":\"valid\"")) {
        responseMap.put("success", "true");
        responseMap.put("text", "Email is valid.");
        responseMap.put("color", "green");
      } else {
        responseMap.put("success", "false");
        responseMap.put("text", "Email is invalid.");
        responseMap.put("color", "red");
      }
    } catch (WebClientResponseException e) {
      responseMap.put("success", "false");
      responseMap.put("text", "An error occurred during validation.");
      responseMap.put("color", "red");
    }

    return ResponseEntity.ok(responseMap);
  }

  public static class EmailRequest {
    @NotBlank
    @Email
    private String email;

    public String getEmail() {
      return email;
    }

    public void setEmail(String email) {
      this.email = email;
    }
  }
}
Python
This script uses the Flask framework to handle form submission, send the email address to MailerSend, and return the results. To keep the API key hidden, you’ll need to set the environment variable in your operating system and use the os module in your script to read the API key from the environment variable.
from flask import Flask, request, jsonify
import requests
import os

app = Flask(__name__)

@app.route('/', methods=['POST'])
def validate_email():
    data = request.json
    email = data.get('email')

    if not email:
        return jsonify({
            'success': False,
            'text': 'Email is required.',
            'color': 'red'
        })

    api_token = os.getenv('MAILERSEND_API_KEY')  # Read the API token from the environment variable
    if not api_token:
        return jsonify({
            'success': False,
            'text': 'API token is missing.',
            'color': 'red'
        })

    url = 'https://api.mailersend.com/v1/email-verification/verify'

    headers = {
        'Authorization': f'Bearer {api_token}',
        'Content-Type': 'application/json'
    }

    response = requests.post(url, headers=headers, json={'email': email})

    if response.status_code == 200:
        result = response.json()
        if result['status'] == 'valid':
            return jsonify({
                'success': True,
                'text': 'Email is valid.',
                'color': 'green'
            })
        else:
            return jsonify({
                'success': False,
                'text': 'Email is invalid.',
                'color': 'red'
            })
    else:
        return jsonify({
            'success': False,
            'text': 'An error occurred during validation.',
            'color': 'red'
        })

if __name__ == '__main__':
    app.run(port=80)
Go
This example in Go uses the Gin framework and the go-resty library for HTTP requests. You’ll also need to set the environment variable on your operating system and use the os.Getenv() function to access and read the API key from your environment variable.
Here’s the code:
package main

import (
	"github.com/gin-gonic/gin"
	"github.com/go-resty/resty/v2"
	"net/http"
	"os"
)

type EmailRequest struct {
	Email string `json:"email" binding:"required,email"`
}

type EmailResponse struct {
	Success bool   `json:"success"`
	Text    string `json:"text"`
	Color   string `json:"color"`
}

func main() {
	r := gin.Default()
	r.Use(corsMiddleware())

	r.POST("/", func(c *gin.Context) {
		var emailReq EmailRequest
		if err := c.ShouldBindJSON(&emailReq); err != nil {
			c.JSON(http.StatusBadRequest, gin.H{"error": "Invalid email format"})
			return
		}

		client := resty.New()
		apiToken := os.Getenv("MAILERSEND_API_TOKEN")

		resp, err := client.R().
			SetHeader("Authorization", "Bearer "+apiToken).
			SetHeader("Content-Type", "application/json").
			SetBody(map[string]string{"email": emailReq.Email}).
			Post("https://api.mailersend.com/v1/email-verification/verify")

		if err != nil {
			c.JSON(http.StatusInternalServerError, EmailResponse{
				Success: false,
				Text:    "An error occurred during validation.",
				Color:   "red",
			})
			return
		}

		var result map[string]interface{}
		if err := resp.Result().(*map[string]interface{}); err != nil {
			c.JSON(http.StatusInternalServerError, EmailResponse{
				Success: false,
				Text:    "An error occurred during validation.",
				Color:   "red",
			})
			return
		}

		status, ok := result["status"].(string)
		if !ok || status != "valid" {
			c.JSON(http.StatusOK, EmailResponse{
				Success: false,
				Text:    "Email is invalid.",
				Color:   "red",
			})
		} else {
			c.JSON(http.StatusOK, EmailResponse{
				Success: true,
				Text:    "Email is valid.",
				Color:   "green",
			})
		}
	})

	r.Run(":80")
}

func corsMiddleware() gin.HandlerFunc {
	return func(c *gin.Context) {
		c.Writer.Header().Set("Access-Control-Allow-Origin", "*")
		c.Writer.Header().Set("Access-Control-Allow-Methods", "POST, OPTIONS")
		c.Writer.Header().Set("Access-Control-Allow-Headers", "Origin, Content-Type, Authorization")
		if c.Request.Method == "OPTIONS" {
			c.AbortWithStatus(204)
			return
		}
		c.Next()
	}
}
In each case the script checks the status of the MailerSend response and passes the result to the HTML form to be displayed to the user. Valid emails will result in an “Email is valid.” message in green, and invalid emails will result in an “Email is invalid.” message in red
If the status in the response is “valid”, it will update the result div with the success message (“Email is valid.”) and make it green. If not, the result div will be updated with an error message (“Email is invalid.”) in red.
Here’s all the errors MailerSend detects
MailerSend runs a fairly comprehensive set of checks—it’s even able to detect email addresses that have had past delivery issues. Here’s all the statuses that a MailerSend email verification report can return.
Send to | Valid | Email is safe to send. |
Risky | Catch-all | The recipient's mail server will accept emails to this address but we cannot guarantee this email address belongs to a person. |
Mailbox full | The recipient’s inbox is full and may not be able to receive new emails. | |
Role-based | Email is role-based and may not be associated with a single, specific person but a group of people. | |
Unknown | We are unable to determine if the email is valid. | |
Do not send to | Syntax error | The email address is not valid. |
Typo | The email address has a typo. Correct the email address and retest. | |
Mailbox not found | The recipient’s inbox does not exist. | |
Disposable | This is a disposable email address that leads to a temporary inbox and should be removed from your lists. | |
Mailbox blocked | The email address’ mailbox is blocked by its service provider due to poor sending practices. |
Other email validation methods
In addition to preventing invalid emails with real-time verification, it’s also recommended that you periodically perform manual email list cleaning as well. (No, we don’t mean picking out emails by hand, one by one! An email verifier will do this for you.)
The reason for this is that, even if an email address is valid when a user signs up, it doesn’t mean their email address will remain active forever. So it’s important to run a check around every 6 months to clean up any emails that have gone inactive in that time.
A manual email validation check involves uploading your list via CSV to an email checker tool, like MailerSend’s. Once you’ve uploaded your list, MailerSend will do its magic, validate your emails and return a detailed report about the status of each recipient. You can then download your report and easily add invalid and risky emails to your suppressions list.
Learn how to verify a list of email addresses with MailerSend.
Email validation best practices
Email verification is something that all senders should be doing—it’s essential for maintaining a high-quality list, good email deliverability, and a healthy sender reputation. Here are 5 best practices that should help you on your way.
1. Validate emails at the point of entry
Even if you have an impeccable list, there’s nothing to stop it from becoming tainted with invalid emails that impact your deliverability. Catching them at the point of entry will prevent them from getting past your registration forms and help you to better maintain the integrity of your email list between bulk list cleanings. So make sure you have real-time email validation integrated into your website and apps.
2. Provide clear error messages
Letting users know when the email they’ve entered is invalid improves the user experience and prompts them to enter the correct email address. The more simple and clear the better—avoid technical jargon and use simple messages such as “Email address is invalid” or “Please enter a valid email address”.
3. Use double opt-in email verification
Double opt-in requires users to click a link in a verification email sent to the email address they’ve entered. In cases where the email address is valid but perhaps the user doesn’t actually have access to the associated mailbox, double opt-in email verification offers a failsafe solution. It confirms the email’s validity and that the user has entered it with the right intentions, reducing the chances of spam complaints and spam traps.
4. Regularly perform bulk email list cleaning
Only preventing invalid emails from reaching your list doesn’t guarantee its health. Recipient list quality deteriorates over time as emails become inactive, users lose access to them, and—in some cases—the emails even become repurposed as spam traps. To keep your email list as healthy as possible, it’s also important to perform regular bulk email verification at least every 6 months, to weed out any emails that have gone bad.
5. Identify and monitor risky email addresses
While some types of email addresses very clearly shouldn’t be sent to (like non-existent mailboxes), others might be deliverable but risky, leaving you with the decision of whether to remove them or not. For example, it’s not uncommon for employees to sign up with role-based emails, like support@example.com. These emails will often be deliverable, but they might go unopened, impacting your engagement and potentially your deliverability. We recommend that you remove all types of risky emails, but if you choose to send to them, you should closely monitor their engagement and remove subscribers who never open your emails.
Say goodbye to invalid emails
Real-time email address verification is the most efficient way to keep your email recipient list clean and healthy. It will help improve deliverability and engagement and make your periodic, manual clean-ups less of a chore by preventing invalid emails from building up in between checks. Kind of like using a robot vacuum cleaner between deep cleans of your house.
With MailerSend’s email validation API, and a few tweaks to your website or app, you can quickly set up real-time email validation and let MailerSend do the rest!
Do you have any other tips for avoiding invalid emails getting onto your email list? Let us know in the comments!
Try MailerSend for free today!
Get 500 emails/month free with access to real-time email verification, suppression management and more.
This article was originally published in November 2022 and has since been updated with more comprehensive code examples and best practices.