Protect your sending reputation with suppression lists

Warren Buffett once said, "It takes 20 years to build a reputation and 5 minutes to ruin it. If you think about that you'll do things differently." While the famed investor may not have been talking about email senders, his words ring true for your sending reputation.
Thankfully, you don’t have to wait 20 years to build your reputation as a sender, but you could easily lose it in an instant. Careless sending practices affect your deliverability and your ability to land in the inbox.
The good news is that you can do things differently. Learn how to use suppression lists to stop sending emails to addresses that damage your sending reputation.
What is a suppression list?
A suppression list is a contact list of recipients that you do not want to send emails to. These people are in the suppression list because their email addresses are invalid. Contacting them will harm your sender reputation and put your domain at risk of being blocklisted by major Internet Service Providers (ISPs) like Gmail.
For example, if you continue to send email messages to a hard-bounced address, not only does your behavior look spammy but there is also the risk that inactive emails may be repurposed into spam traps. Sending to them would land you on a watchlist of errant senders from which it is difficult to leave.
Why you need a suppression list
Suppression lists are integral to successfully managing your transactional email. They can also play a part in ensuring that you respect user preferences and provide a better user experience. Here’s how:
1. Honor user preferences
Unlike marketing or commercial emails, transactional emails don’t require you to include an unsubscribe link. You must, however, be extremely careful about the content you include in your transactional emails—it should be kept on a strictly need-to-know basis.
If you want to provide a good user experience, you can include an unsubscribe link in some types of transactional emails to give recipients the choice to opt out of future emails. There are some types of emails that users shouldn’t be able to opt out of—these are messages that contain essential information, such as password resets or receipts. In this case, it’s good practice to let recipients know why they are still receiving these emails and why they can’t opt out of them.
2. Protect sender reputation
If you send an email to a recipient and it hard bounces, and then you continue to send emails to it, you’ll signal to ISPs that you’re not maintaining good email list hygiene and they’ll look at this behavior as spammy. The same goes if someone reports your emails as spam. Even worse, though, if these inactive email addresses have been employed as spam traps, your IP address or domain will be directed straight to a blocklist.
And although you might think that landing on a blocklist is the worst that can happen, it’s how all of this affects your sender reputation that is the most concerning. Sender reputation can take time to build up, but your progress can disappear in an instant with bad sending practices.
3. Maintain good email deliverability
By moving any inactive, hard-bounced or spam complaint email addresses to your suppressions list, you’ll protect your sender reputation and improve and maintain a good level of deliverability. If ISPs can see you are actively removing these email addresses and keeping your email list clean, they’ll see you are a trustworthy sender, and your emails will more likely to be delivered to the inbox instead of the spam folder.
4. Save on sending resources (and money!)
If all of this wasn’t enough to convince you to use suppression lists, then how about saving a few buckaroos?
Every email you send counts towards your sending quota. If you’re sending emails to a bunch of inactive emails (a list that will keep growing, by the way) it will drive up your requirements and result in higher sending costs.
So, who wants to send emails to addresses that will never receive them, damage their sender reputation, decrease their deliverability, and waste money all while a suppression list could be taking care of these inactive emails for them? No one.
How suppression lists work
1. Suppressed emails are automatically added
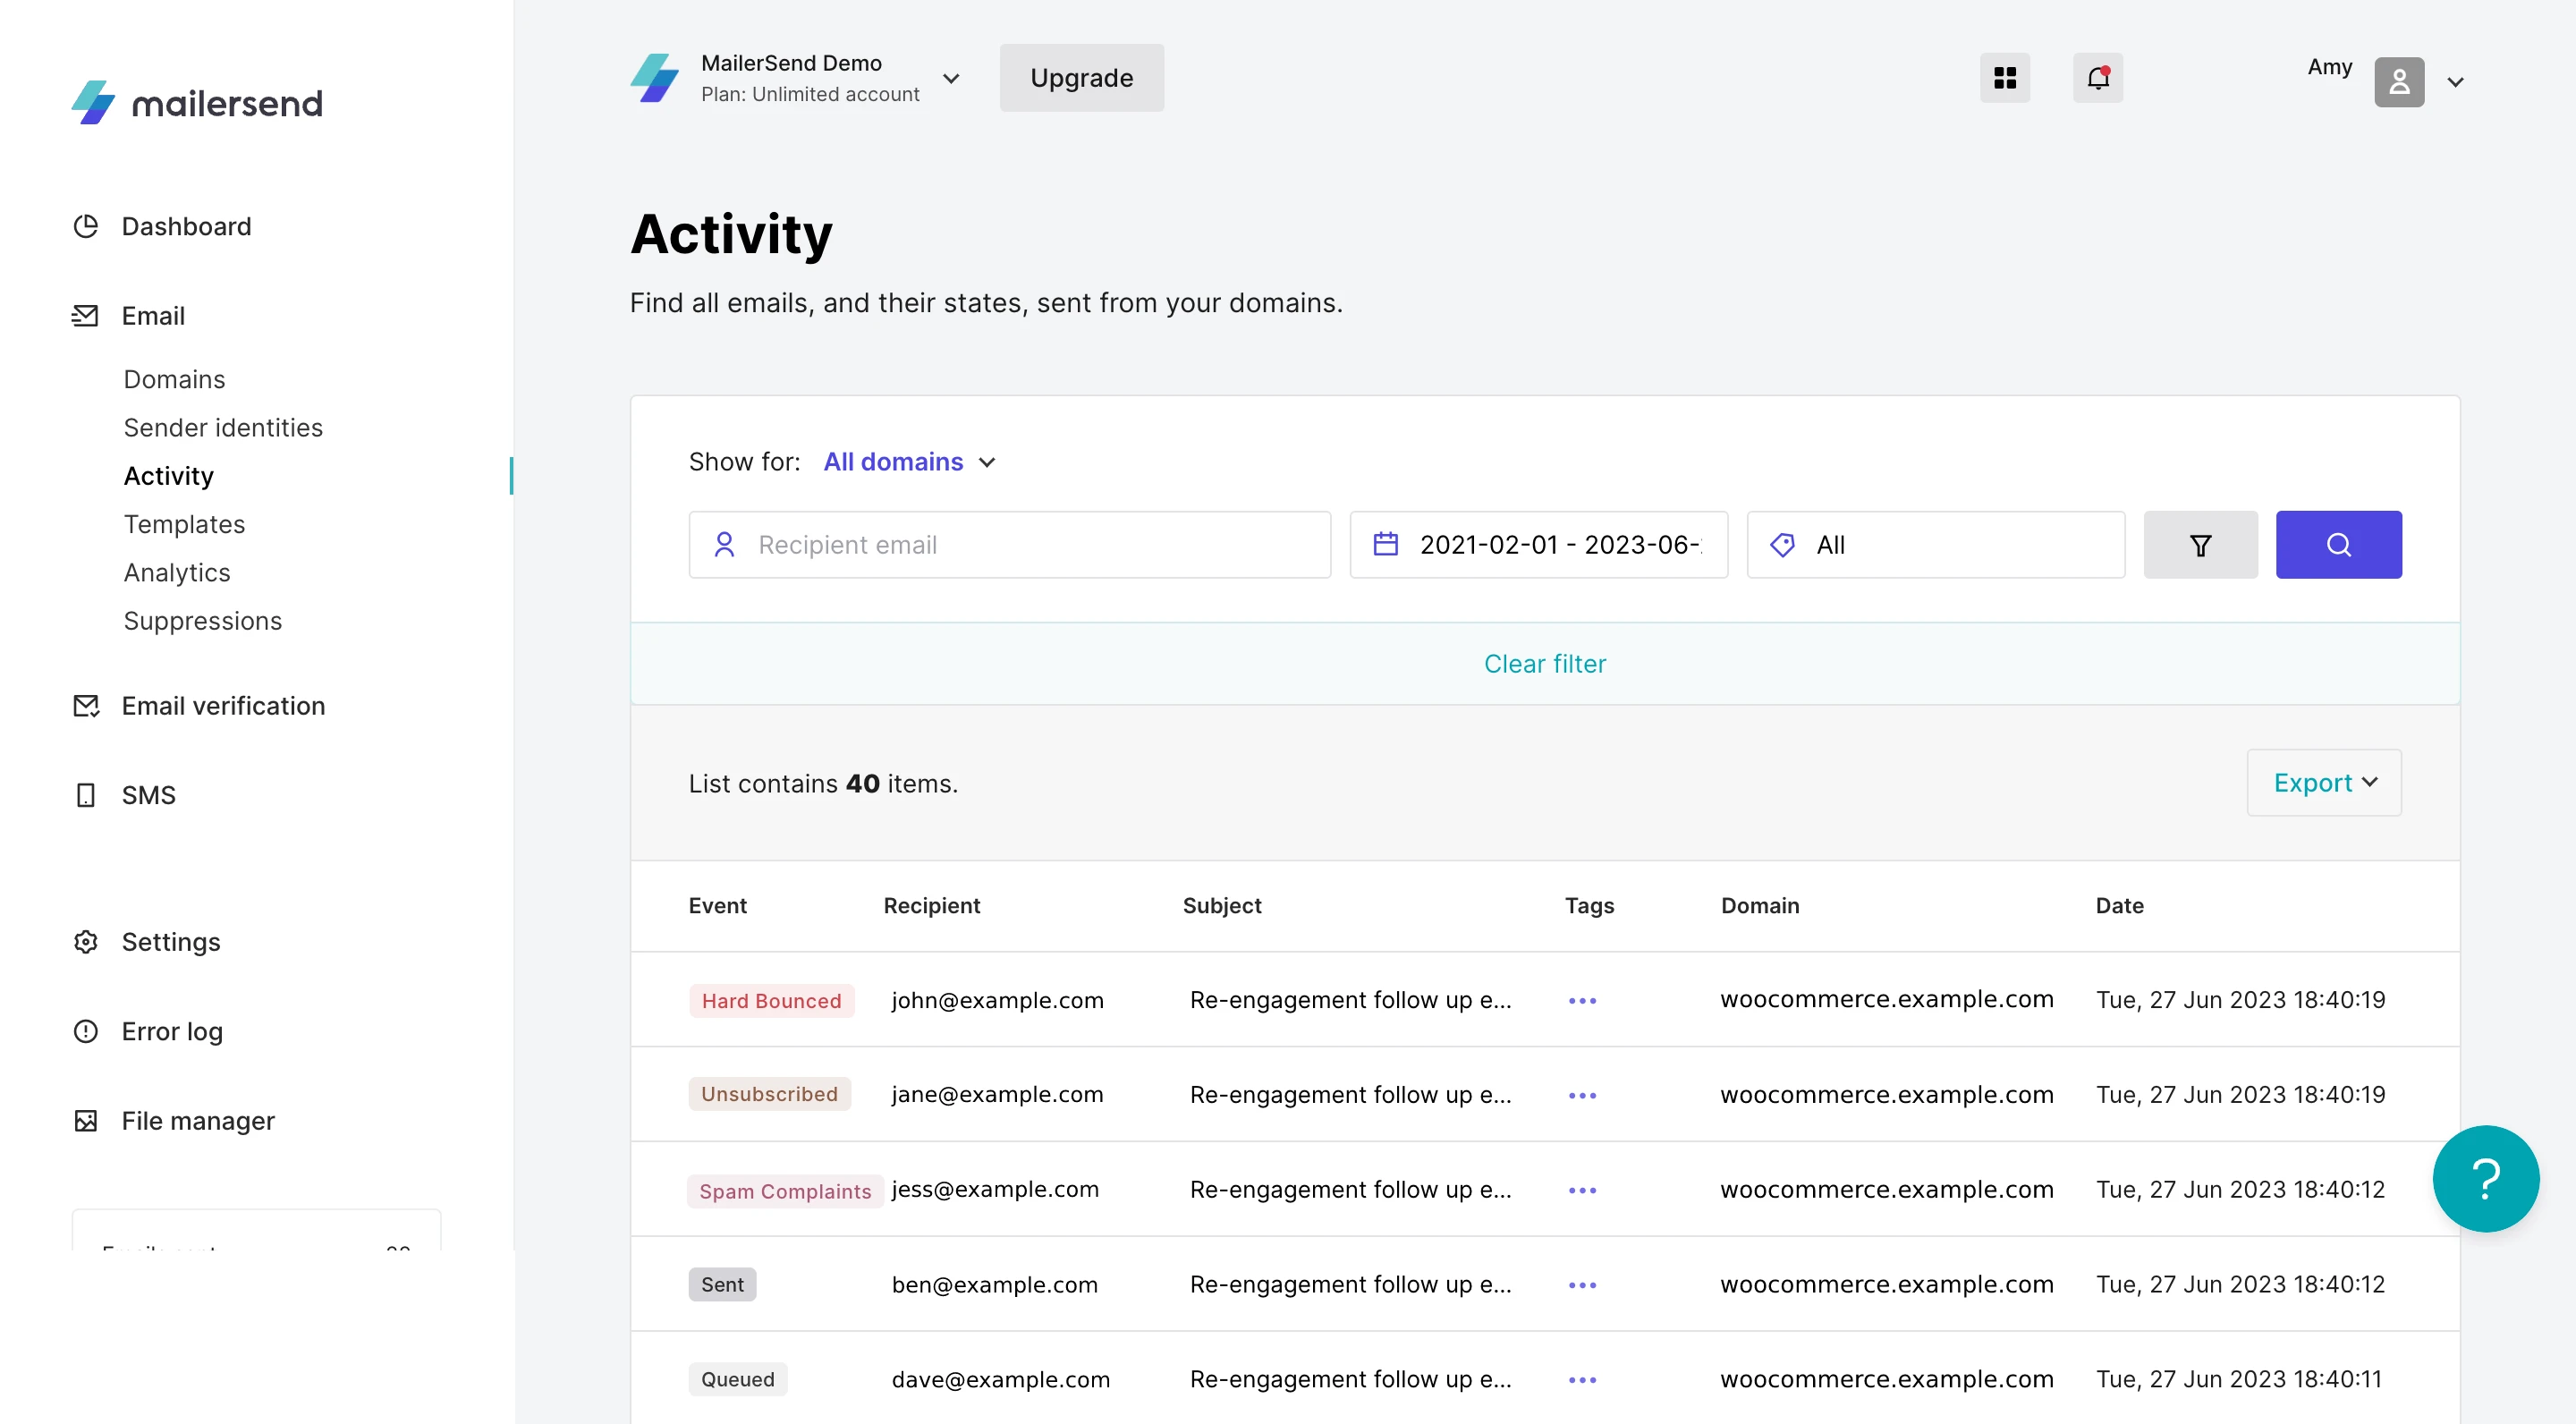
MailerSend takes care of the suppression list for you on the backend. Emails that affect your sending reputation—hard bounces, unsubscribes and spam complaints—are automatically added to the suppression lists. And you can also manually add emails. You can easily view hard-bounces, unsubscribes and spam complaints in the Activity tab.
2. Suppressed emails are automatically blocked
Next, when the owner of a suppressed email address completes an action that would normally trigger a transactional email, the sending will be blocked by the suppression list.
Types of suppression lists
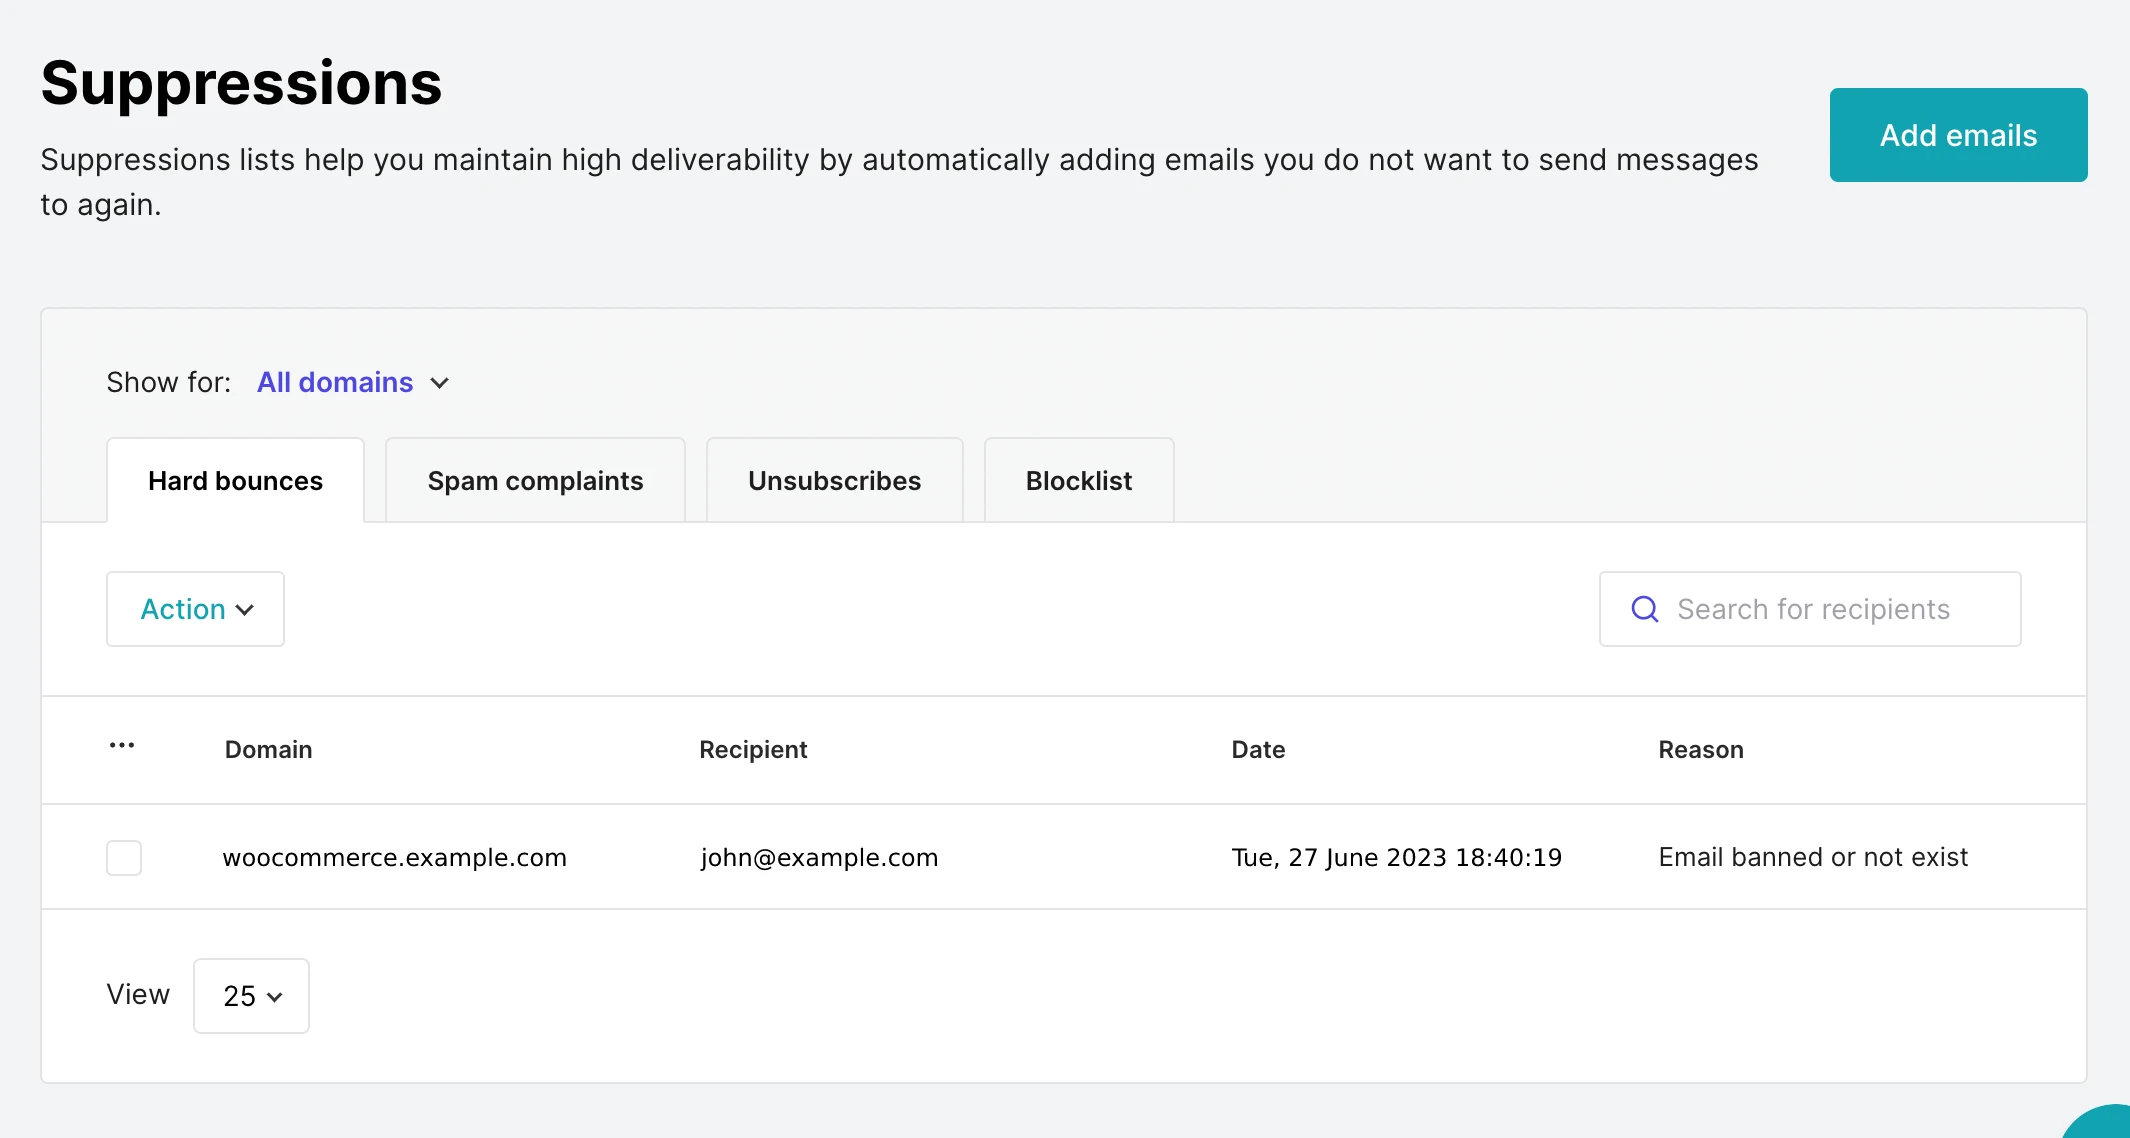
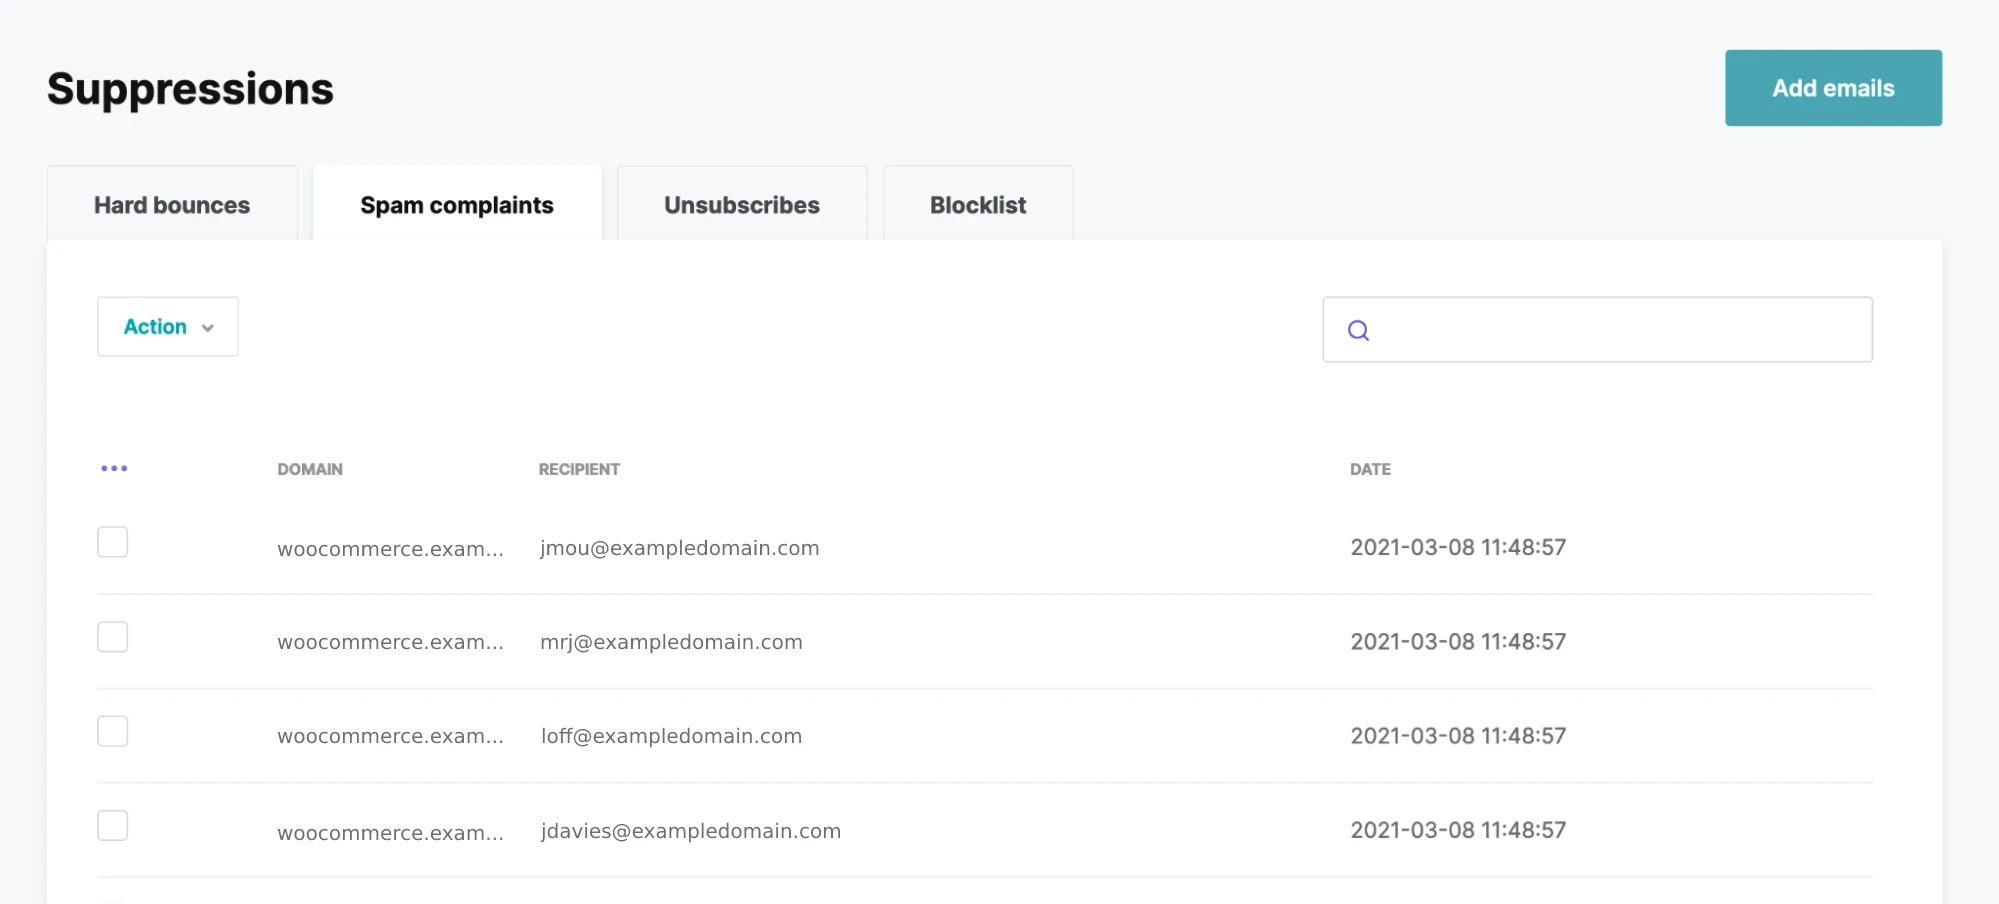
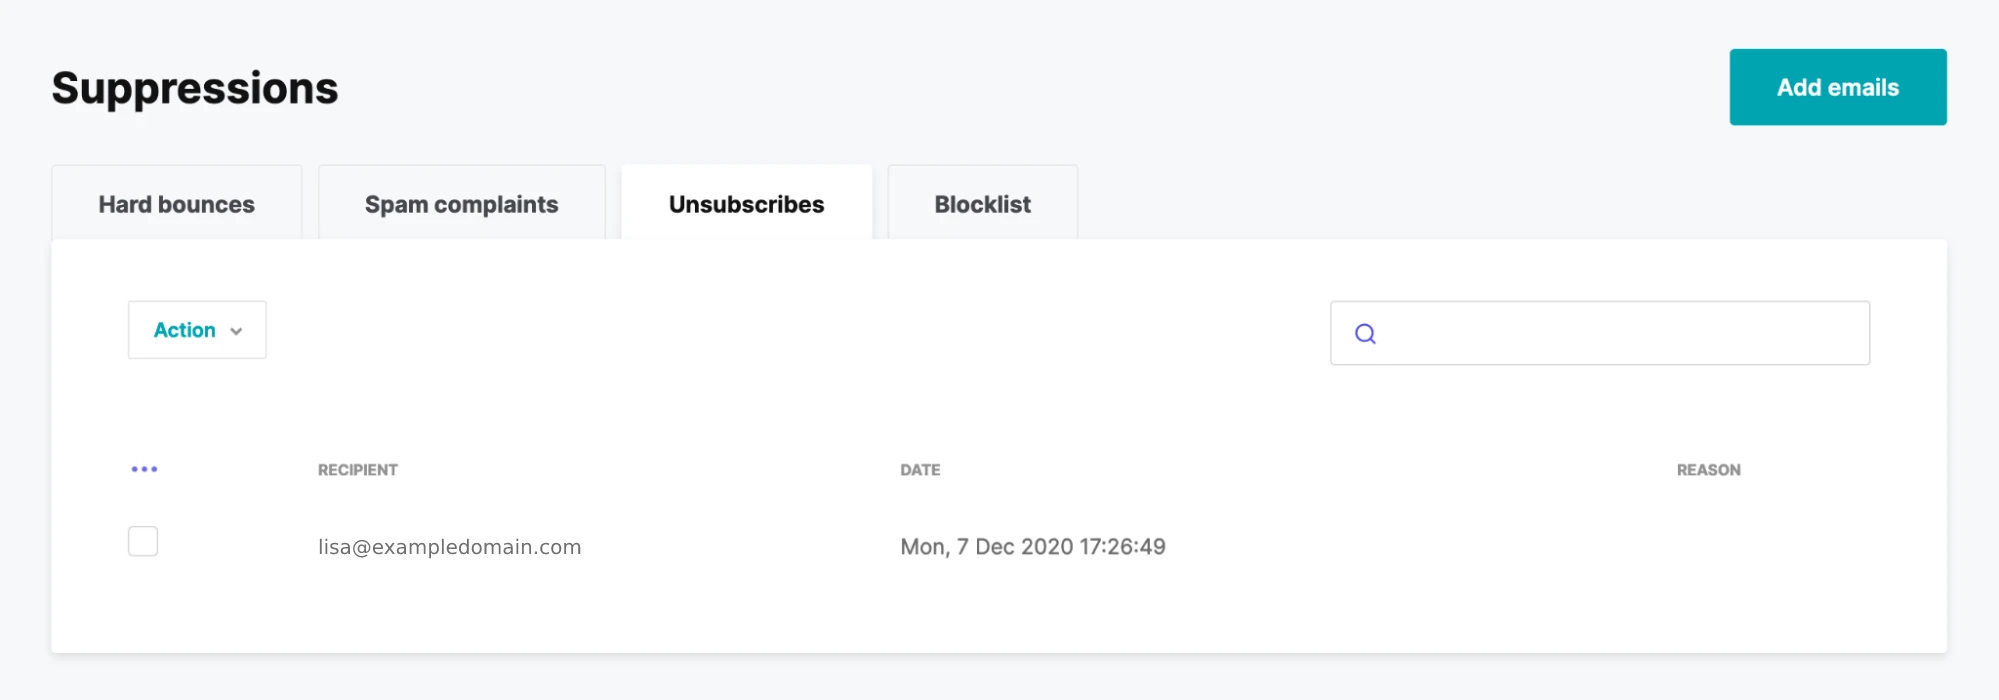
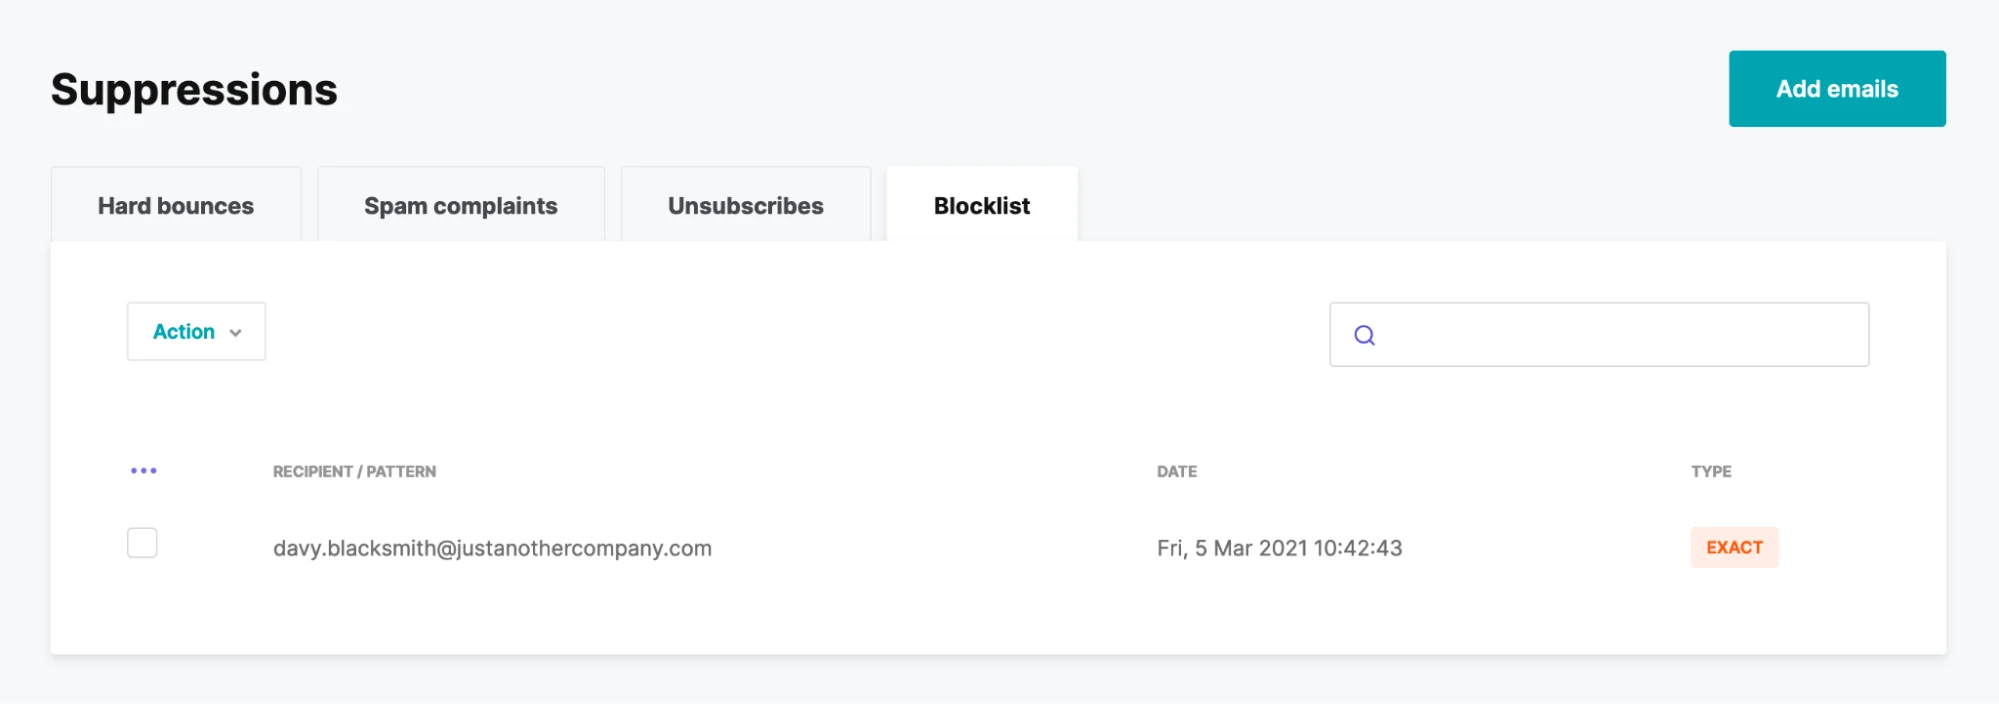
Your suppression list is conveniently divided into four main categories in MailerSend: hard bounces, spam complaints, unsubscribes, and the blocklist. Clicking on a tab will show you the suppressed emails listed under each category.
1. Hard bounces
Hard bounced emails are those that cannot be delivered successfully due to permanent email errors such as a non-existent mailbox. These emails are automatically added to the suppression list because they pose the greatest risk to your sending reputation.
2. Spam complaints
A spam complaint occurs when a recipient reports your email as spam. Their email is automatically added to the suppression list under the Spam complaints tab if their ISP supports feedback loops (FBL).
3. Unsubscribes
An unsubscribe request happens when a recipient clicks on an unsubscribe link in your email or through the List-Unsubscribe header. If unsubscribe tracking is enabled in MailerSend, their email address is automatically added to the email suppression list.
4. Blocklist
Sometimes you may want to avoid emailing certain recipients. You might have discovered catch-all domains while verifying your email list with a checker like MailerSend's inbuilt email verification tool. Or perhaps you need to block someone that asked you to delete their data for GDPR purposes. The blocklist can act as your custom list where you can create rules to add email addresses based on regular expressions.
Adding emails to suppression lists
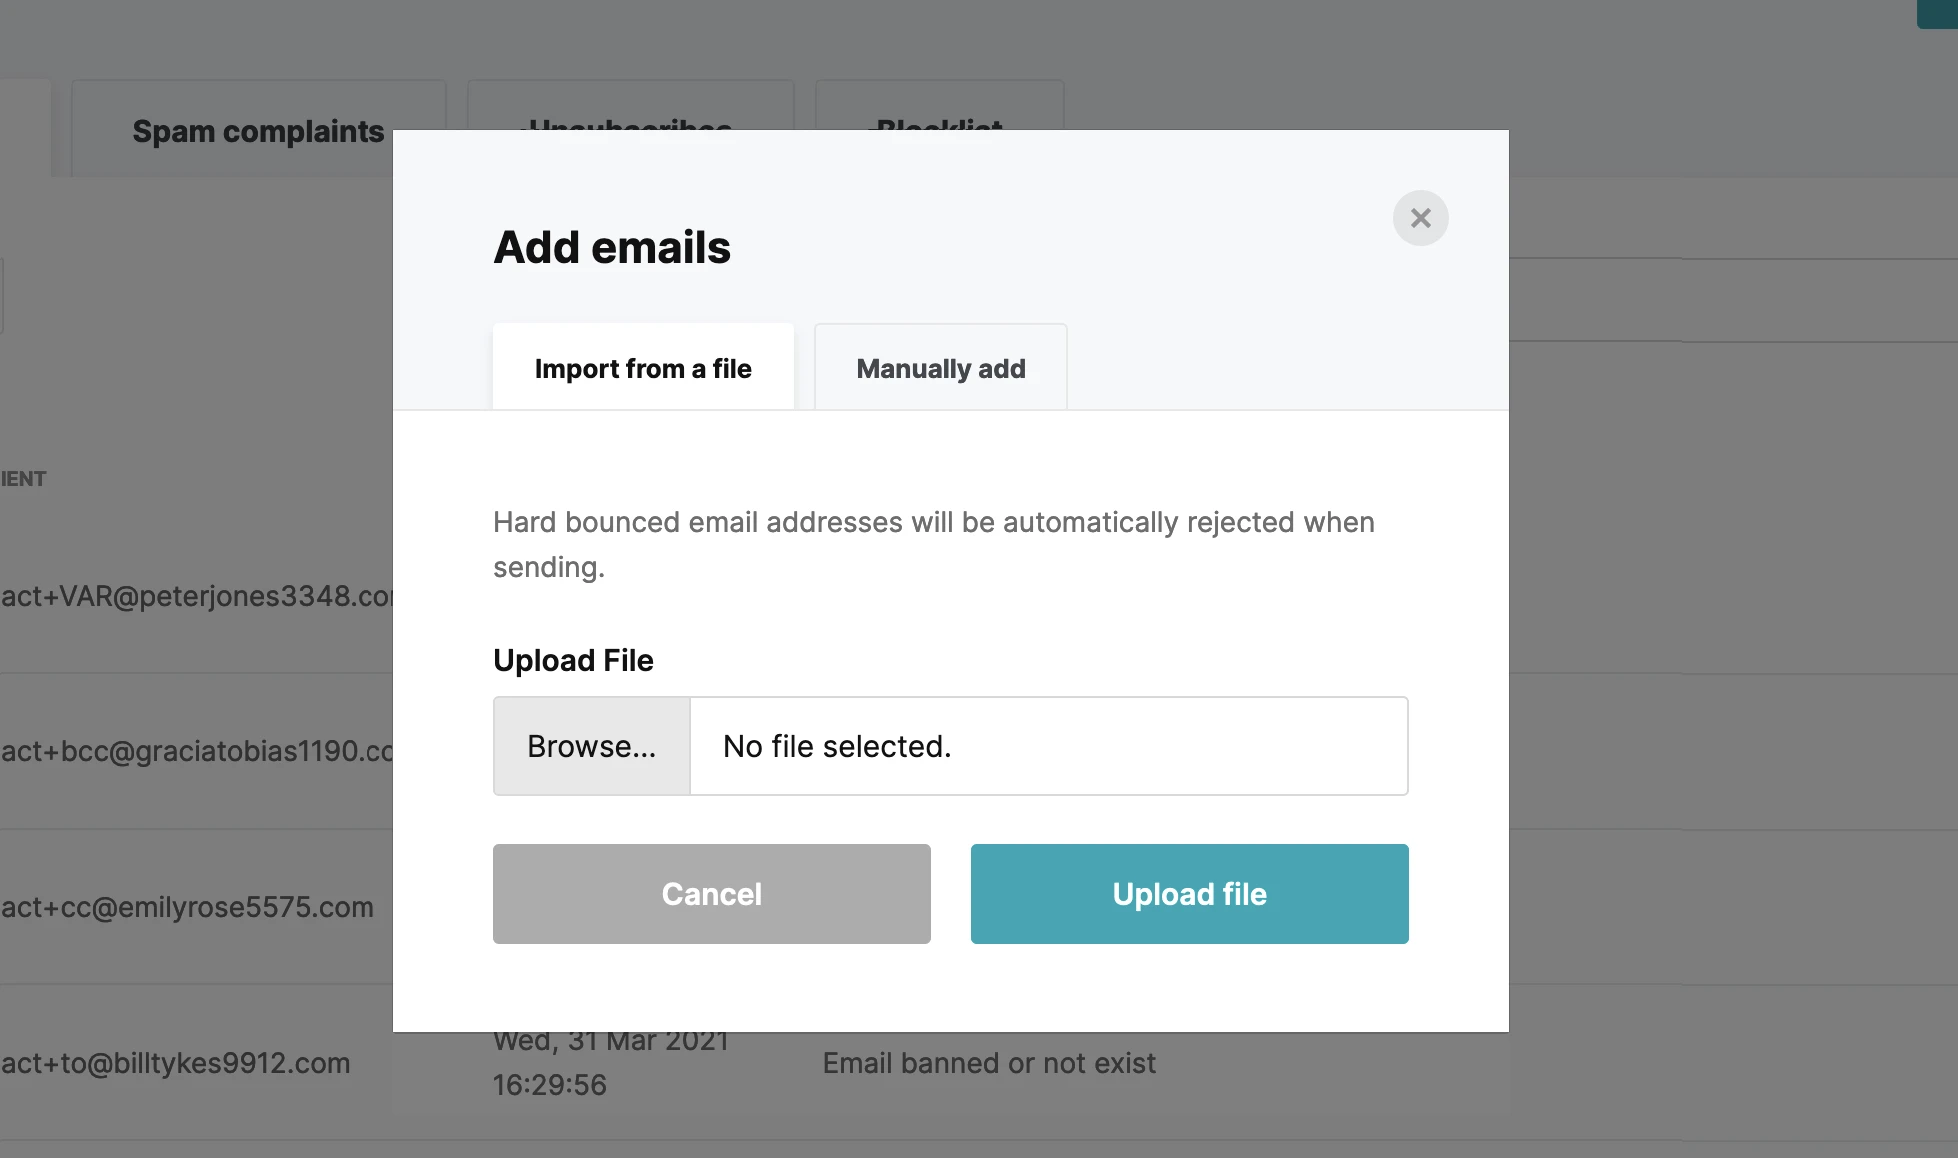
If you’re moving from another ESP or email suppression tool, you can easily import your old suppression list into MailerSend. Choose the list you want to update and then click on Add emails. Then upload a CSV or TXT file, or copy and paste the emails.
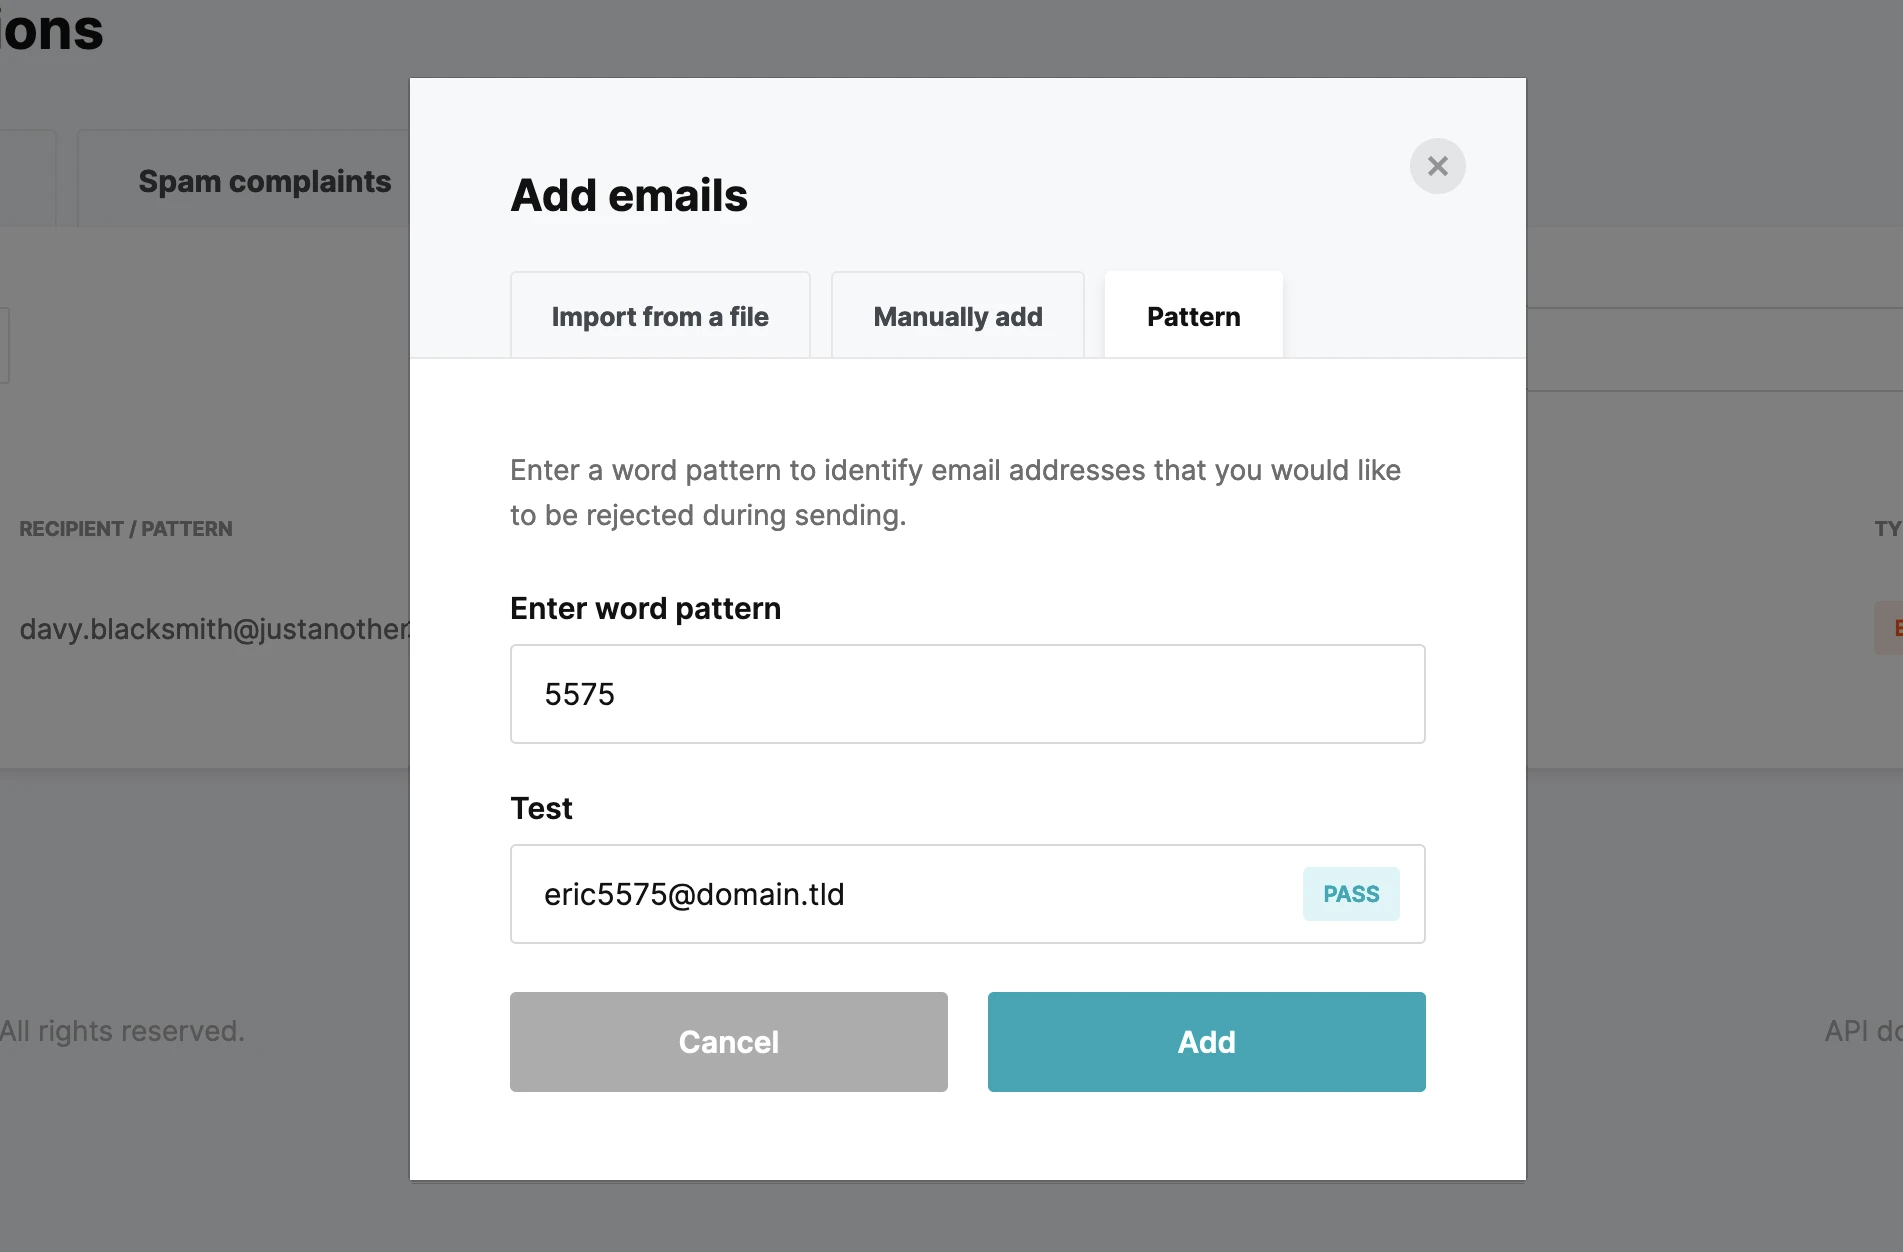
For blocklists, you can also specify a word pattern. For example, if you enter "5575", emails like eric5575@domain.tld or email@eric5575.tld will be rejected during sending. If you want to block a specific domain, you can add it as @eric5575.tld, for example.
Best practices for maintaining your suppression list
1. Monitor performance, reputation and email delivery
Keeping tabs on performance doesn’t just help with optimizing your email strategy. It can also give you a heads-up if something has gone awry with your recipient list. By monitoring your email analytics, you’ll know which email addresses are hard bouncing, making spam complaints or unsubscribing and therefore should be added to your suppression list.
What’s more, if it looks like your sender reputation has taken a hit, or emails aren’t being delivered at all, the first place to look is your recipient list. Give it a clean and add any invalid or risky emails to your suppressions.
MailerSend automatically adds these emails to your suppressions, but you can still easily monitor performance and get in-depth metrics about your emails with our advanced email analytics.
2. Use an email verification tool
Good email list hygiene is essential for great deliverability and an awesome sender reputation. The best way to ensure your list is in tip-top condition is by using an email verification tool. In doing so, you’ll be able to upload your list to analyze and identify any invalid or risky email addresses, such as disposable emails, catch-all emails, and emails with syntax errors and typos. You can then download a report of all the invalid and risky addresses to add to your suppression list.
MailerSend makes it easy to clean your email list with its built-in email verification tool. You can even implement real-time email validation via API, so that invalid emails never reach your database, making it easier to maintain a healthy list.
3. Use rules to automatically add specific types of emails
To make managing suppressions more efficient, and ensure you don’t let any stragglers through the net, try creating rules with specific expressions to filter certain types of emails and add them to your suppression list.
For example, if you know a particular domain is for disposable emails, you can enter that domain as a word pattern, like “disposable.com”. You can also use this approach to add role-based emails to your suppression list, for example, “support@”.
4. Sync databases with other apps
If you’re managing emails with multiple apps, for example, one platform for transactional emails and one for email marketing campaigns, you can integrate the apps to sync your databases. This will allow you to update your suppressions across both platforms simultaneously. For example, if an email is sent from Platform A, hard bounces and is added to Platform A’s suppression list, it will pass this information on to Platform B so that the same email address is automatically added to Platform B’s suppression list too.
Protect your investment now
You invest time and money to build your sending reputation with the major ISPs. Don’t leave all that hard work to chance! Start protecting your goodwill using suppression lists. Who knows, as Warren Buffett said, your reputation might last a good 20+ years!
Do you have any special automations for treating blocklisted recipients in your workflow? Share in the comments.
Editor's note: This article was originally published in April 2021 and has been updated to include new tips and best practices.