Node.js email validation: How to check emails in your website or app
It’s common practice (and highly recommended) to use at least basic email validation on your frontend to verify email syntax wherever a user enters an email address. But by using an email verification module or API, your check can go much deeper. You’ll be able to block invalid or disposable emails, verify MX records by doing a DNS check, verify SMTP mail server responses, and give feedback to the user if they’ve entered a blocked or incorrect address.
So let’s get into how you can implement email validation for your Node.js application.
1. Basic client-side validation
The first step is to add frontend validation to verify the syntax of the email address. This will help you to quickly catch basic formatting errors and provide feedback to the new user before submitting the email for more in-depth verification. For example, you’ll be able to catch an email missing the ‘@’ symbol.
To do this, you can use a simple JavaScript function that inputs the submitted email address and then uses regular expressions (regex) to check against the criteria you define.
Here’s a basic script that defines the isValidEmail function that takes a single argument, email, and checks it against the regex pattern we have specified: /^[a-zA-Z0-9._%+-]+@[a-zA-Z0-9.-]+\.[a-zA-Z]{2,}$/ using the test() method. It then returns true if it matches, and false if it doesn’t, which then returns the corresponding string.
function isValidEmail(email) {
    const pattern = /^[a-zA-Z0-9._%+-]+@[a-zA-Z0-9.-]+\.[a-zA-Z]{2,}$/;
    if (pattern.test(email)) {
        return "Valid email.";
    }
    return "Invalid email format.";
}

// Test cases
    console.log(isValidEmail("hello@example.com"));        // Valid email.
    console.log(isValidEmail("invalid-email@com"));        // Invalid email format.
    console.log(isValidEmail("test.user@sub.domain.com")); // Valid email.
    console.log(isValidEmail("bad@.com"));                 // Invalid email format.
The regex pattern here specifies that the email address should:
Start with a username part that consists of 1 or more characters, including letters, digits, and the symbols “. _ % + -”
Contains the “@” symbol after the username part
Contains a domain name part that consists of 1 or more characters, including letters, digits, and the symbols “. -”
Contains a “.” symbol before the Top-Level Domain (TLD)
Contains a TLD of at least 2 letters
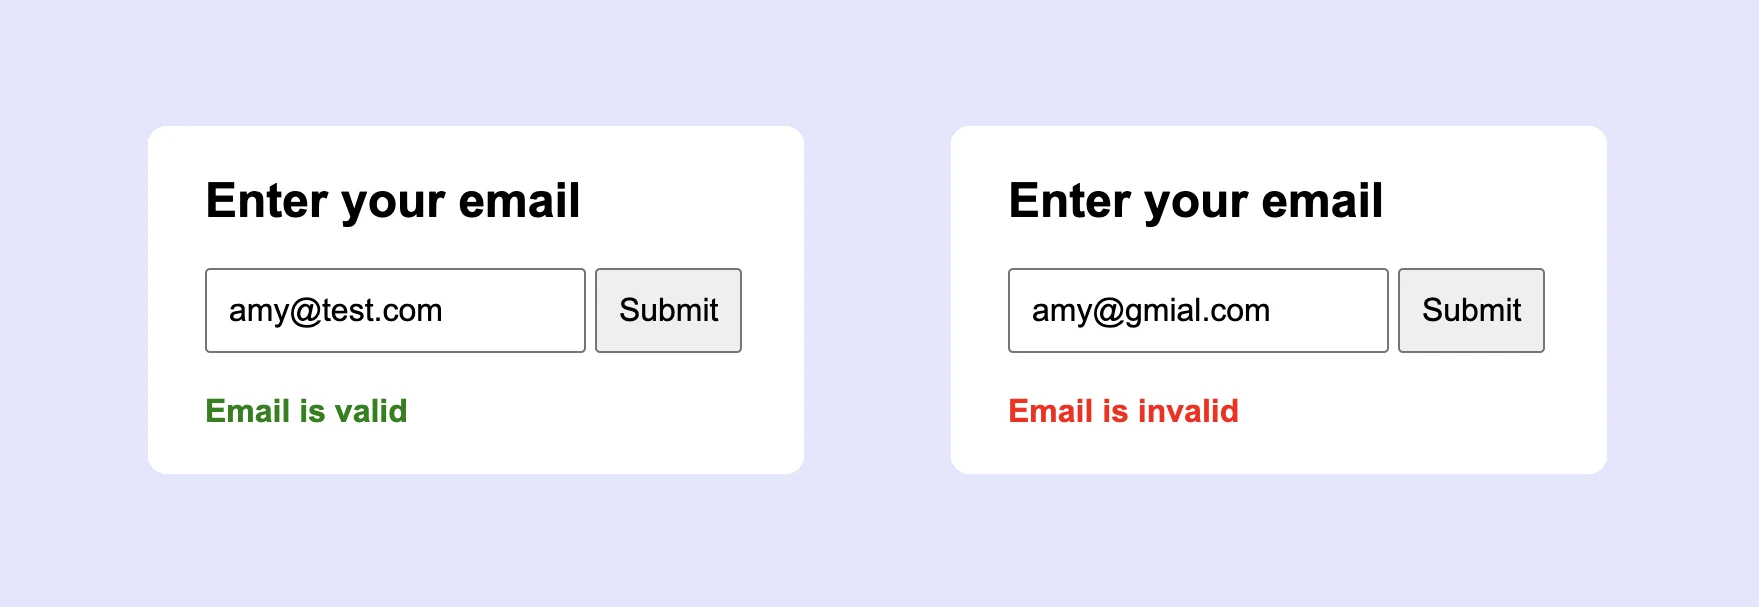
Here’s our script added to a simple form, which displays the status to the user:
<html>
<head>
  <title>Email Validation</title>
  <style>
    body {
      font-family: Arial, sans-serif;
      margin: 40px;
    }
    input, button {
      padding: 10px;
      font-size: 16px;
    }
    #result {
      margin-top: 20px;
      font-weight: bold;
    }
  </style>
</head>
<body>

  <h2>Enter your email</h2>
  <form id="emailForm">
    <input type="text" id="emailInput" placeholder="you@example.com" required>
    <button type="submit">Submit</button>
  </form>

  <div id="result"></div>

  <script>
    function isValidEmail(email) {
      const pattern = /^[a-zA-Z0-9._%+-]+@[a-zA-Z0-9.-]+\.[a-zA-Z]{2,}$/;
      if (pattern.test(email)) {
        return "Valid email.";
      } else {
        return "Invalid email format.";
      }
    }

    document.getElementById("emailForm").addEventListener("submit", function(e) {
      e.preventDefault(); // Prevent form from reloading the page

      const email = document.getElementById("emailInput").value.trim();
      const result = isValidEmail(email);

    if (result === "Valid email.") {
      // ✅ You can add your form submission logic here
      // e.g., send email to server, display a success message, etc.
    }

      document.getElementById("result").textContent = result;
      document.getElementById("result").style.color = result === "Valid email." ? "green" : "red";
    });
  </script>

</body>
</html>

A simple script like this is an effective way to catch formatting mistakes and let users instantly know that they need to correct the email address. You can also play around with the regex and make them as complex as you want or need. It helps to make the user experience just a little bit smoother, and also preserves your API quota by preventing the submission of syntactically incorrect emails for API verification.
What it won’t do, though, is detect typos in the domain (like gmial), verify that the mailbox exists and can be delivered to, or identify disposable email addresses. It’s an awesome first line of defence, but shouldn’t be the only email verification you rely on.
2. Server-side validation with Node.js
To do those extra checks and make sure an email address exists, is active and deliverable, you need to send it to your backend, where you can use an API to verify it. We’ll go through the steps using MailerSend’s API and Node.js SDK.
What you’ll need to get started
A MailerSend account. The email service is free with a Free plan (which includes 500 emails per month) and you'll get 10 email verification credits to test the feature. For more credits, you will need to purchase credits for email verification (priced at $0.01 per credit)
An API token. You can create a new API token by going to Integrations and clicking Manage in the API token section. Then click Create new token and configure the options. You can also create a new token via the API
1. Make sure you have an up-to-date version of Node.js installed on your system and create a new Node.js project by running npm init in your project directory and setting up your package.json file.
2. Install the MailerSend SDK and other required dependencies:
npm install express mailersend dotenv cors body-parser3. Create a .env file in the root directory of your Node.js project and name it .env. Add a variable for your API token:
API_TOKEN=Your_API_Key_Here4. Use a Node.js script to configure your backend to retrieve the email address submission, send the email to MailerSend, and respond accordingly. You might want to tag the email, synchronize it to a database, or accept or reject the email. In this example, we’re simply returning the results to the form.
require('dotenv').config();
const express = require('express');
const bodyParser = require('body-parser');
const cors = require('cors');
const { MailerSend } = require('mailersend');

const app = express();
const PORT = 3000;

// Middleware
app.use(cors());
app.use(bodyParser.json());

// Initialize MailerSend
const mailerSend = new MailerSend({
  apiKey: process.env.API_TOKEN,
});

// POST route for email verification
app.post('/verify', async (req, res) => {
  const { email } = req.body;

  if (!email || typeof email !== 'string') {
    return res.status(400).json({ error: 'A valid email string is required.' });
  }

  try {
    const response = await mailerSend.emailVerification.verifyEmail(email);

// Add this log to see exactly what MailerSend returns
    console.log("MailerSend response body:", response.body);

    res.json({
      success: true,
      result: response.body,
    });
  } catch (error) {
    console.error('Verification error:', error?.body || error?.message || error);
    res.status(500).json({
      success: false,
      error: 'Failed to verify email. Please try again later.',
    });
  }
});

// Start server
app.listen(PORT, () => {
  console.log(`✅ Server running at http://localhost:${PORT}`);
});
5. Configure your submission form to send the email to the backend and then retrieve the result and display a message to the user.
<head>
  <meta charset="UTF-8">
  <title>Email Validation</title>
  <style>
    body {
      font-family: Arial, sans-serif;
      margin: 40px;
    }

    input, button {
      padding: 10px;
      font-size: 16px;
    }

    #result {
      margin-top: 20px;
      font-weight: bold;
    }
  </style>
</head>
<body>

  <h2>Enter your email</h2>
  <form id="emailForm">
    <input type="text" id="emailInput" placeholder="you@example.com" required>
    <button type="submit">Submit</button>
  </form>

  <div id="result"></div>

  <script>
    // Regex validation
    function isValidEmail(email) {
      const pattern = /^[a-zA-Z0-9._%+-]+@[a-zA-Z0-9.-]+\.[a-zA-Z]{2,}$/;
      return pattern.test(email);
    }

    document.getElementById("emailForm").addEventListener("submit", async function (e) {
      e.preventDefault();

      const email = document.getElementById("emailInput").value.trim();
      const resultEl = document.getElementById("result");

      // Step 1: Frontend regex validation
      if (!isValidEmail(email)) {
        resultEl.textContent = "❌ Invalid email format.";
        resultEl.style.color = "red";
        return;
      }

      // Step 2: Send to backend for MailerSend verification
      try {
        const response = await fetch("http://localhost:3000/verify", {
          method: "POST",
          headers: {
            "Content-Type": "application/json",
          },
          body: JSON.stringify({ email }),
        });

        const data = await response.json();

        if (data.success && data.result) {
  // Use 'status' instead of 'is_valid'
  const status = data.result.status; // 'valid', 'invalid', etc.
  const reason = data.result.reason || "No reason provided";

  const isValid = status === "valid";

  resultEl.textContent = `Email is ${isValid ? "valid" : "invalid"}`;
  resultEl.style.color = isValid ? "green" : "red";
        } else {
          resultEl.textContent = "❌ Verification failed. Please try again.";
          resultEl.style.color = "red";
        }
      } catch (error) {
        console.error("Request error:", error);
        resultEl.textContent = "❌ Error verifying email.";
        resultEl.style.color = "red";
      }
    });
  </script>

</body>
</html>
And now you’re ready to test. The above gives us the following result:
And if you have a Professional or Enterprise plan, you can also see the response in the MailerSend app in the logs.
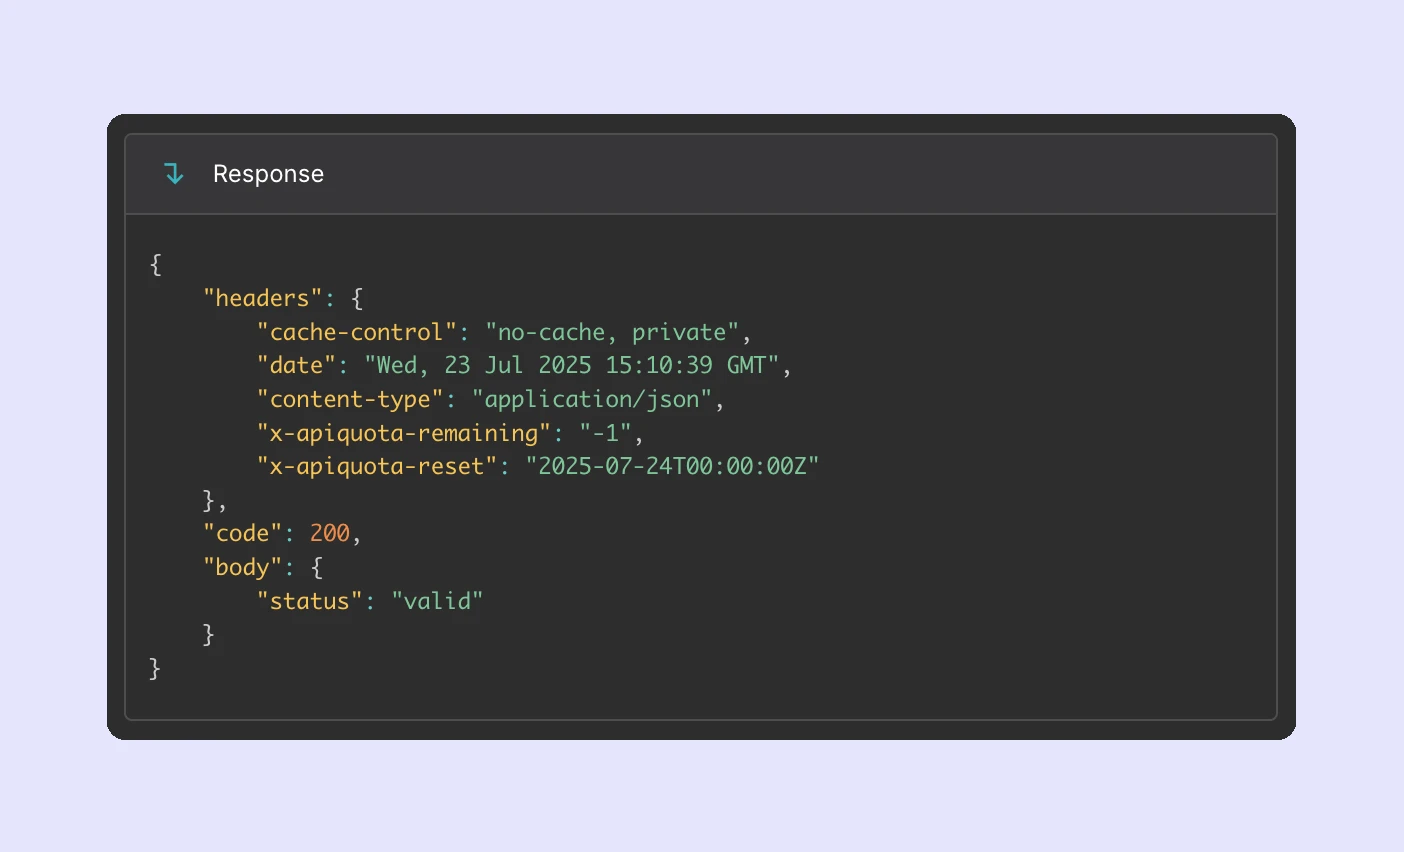
In this example, we kept things simple by returning the message “Email is invalid” for any email address with a status other than ‘valid’. But the MailerSend API will return specific statuses for different types of emails, including catch-all, mailbox full, role-based, syntax error, typo, mailbox not found, and disposable. So it’s up to you to handle these different types of emails as you see fit.
Validation statuses and how to handle them
You can program your email verification process to behave in any way you want, making it as simple or sophisticated as needed for your use case. For example:
Catch-all: Catch-all emails can be risky, but they are often used by businesses. You could accept these emails but tag them as being catch-all so that you can monitor them
Typo: Check the domain part of the email against typos of common email domains like Gmail, Yahoo, or Outlook. If it matches one of these typos, display a message suggesting the correct spelling
Mailbox not found: This is the result of a live SMTP check and indicates that the mailbox doesn’t exist. Here, you can simply let the user know that the mailbox couldn’t be found and that they should enter a valid email address
Disposable: Block emails that return a status of disposable to prevent abuse or, at the very least, a build-up of inactive email addresses in your database
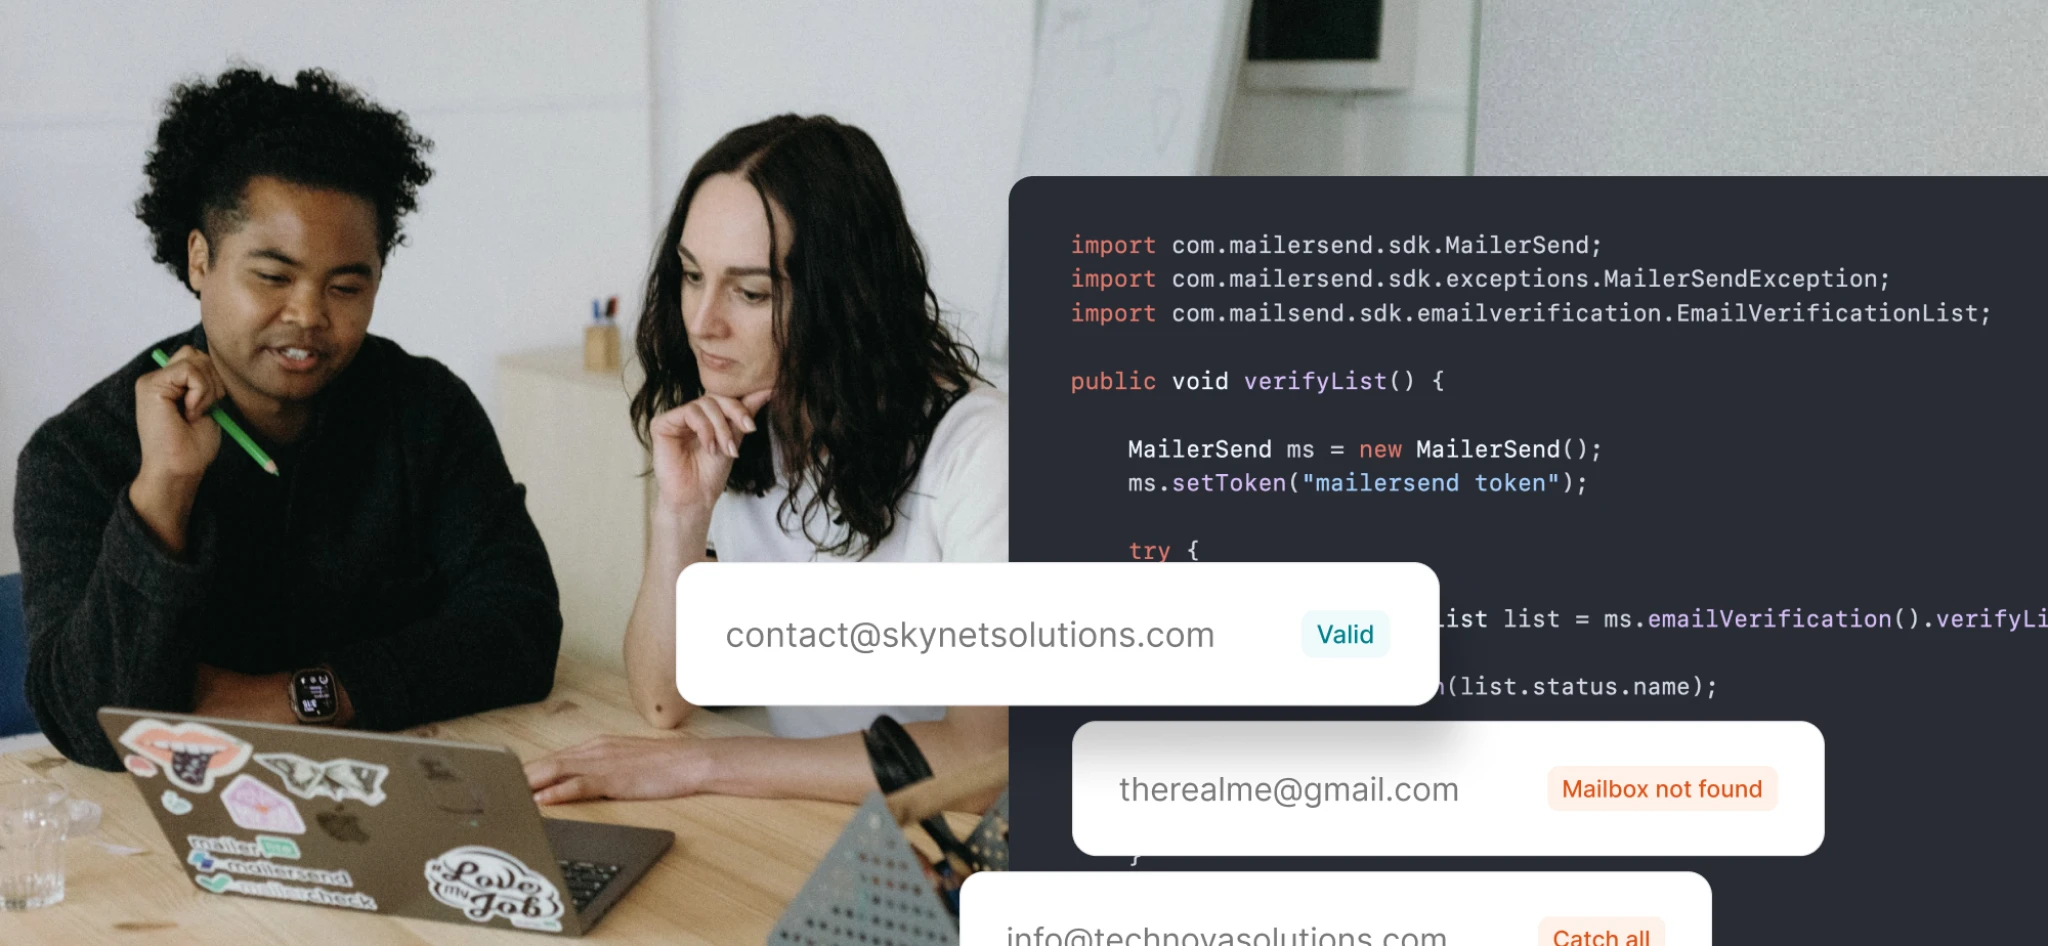
Verify emails in bulk
If you need to verify a list of emails, or automate validating emails in bulk instead of individually, you can use mailerSend.emailVerification.create to create a list and then mailerSend.emailVerification.verifyList to verify it. If you want to schedule this, for example, if you want to schedule a bulk verification every hour or every day, you can use a cron job.
This example fetches emails from a database every hour, creates a list, and then sends it for verification (we’ve added space for your database logic and example emails for testing).
You’ll need to install the following packages:
npm install mailersend dotenv node-cronAnd here’s the bulk email verification example:
import 'dotenv/config';
import { MailerSend, EmailVerification, EmailVerificationResultType } from 'mailersend';
import cron from 'node-cron';

console.log('🔑 API Key loaded:', process.env.API_TOKEN ? 'Yes' : 'No');

const mailerSend = new MailerSend({
  apiKey: process.env.API_TOKEN,
});

// Simulate fetching emails collected in the last hour
async function getEmailsFromLastHour() {
// Replace with actual DB query
  return [
    'info@mailersend.com',
    'test@example.com',
    'hello@world.com',
  ];
}

// Create a new email verification list
async function createVerificationList(emails) {
  console.log('📨 Attempting to create list with emails:', emails);

  const emailVerification = new EmailVerification()
    .setName(`Verification List - ${new Date().toISOString()}`)
    .setEmails(emails);

  try {
    const response = await mailerSend.emailVerification.create(emailVerification);
    console.log('✅ List created successfully:', response.body);
    const verificationId = response.body.data.id;
    return verificationId;
  } catch (err) {
    console.error('❌ Failed to create verification list:', err?.body || err);
    throw err;
  }
}

// ✅ Poll until the list is fully uploaded
async function waitForUploadCompletion(verificationId) {
  console.log(`⏳ Waiting for list ${verificationId} to finish uploading...`);
  const pollInterval = 5_000;
  const maxAttempts = 20;
  let attempt = 0;

  while (attempt < maxAttempts) {
    try {
      const response = await mailerSend.emailVerification.single(verificationId);
      const status = response.body.data.status.name;
      console.log(`🕒 Upload status (attempt ${attempt + 1}): ${status}`);

      if (status === 'created') {
        console.log('✅ List upload complete!');
        return;
      } else if (status === 'failed') {
        throw new Error('❌ List upload failed.');
      }
    } catch (err) {
      console.error('⚠️ Error while checking upload status:', err?.body || err);
    }

    await new Promise(resolve => setTimeout(resolve, pollInterval));
    attempt++;
  }

  throw new Error('⏱ Timed out waiting for list to finish uploading.');
}

// Submit the list for verification
async function submitForVerification(verificationId) {
  console.log(`📤 Submitting list ${verificationId} for verification...`);

  try {
    const response = await mailerSend.emailVerification.verifyList(verificationId);
    console.log('✅ Verification submitted:', response.body);
  } catch (err) {
    console.error('❌ Failed to submit list for verification:', err?.body || err);
    throw err;
  }
}

// Poll for verification results
async function pollForVerificationResults(verificationId) {
  console.log(`🔁 Polling verification results for ID: ${verificationId}...`);
  const pollInterval = 10_000;
  const maxAttempts = 30;
  let attempt = 0;

  while (attempt < maxAttempts) {
    try {
      const response = await mailerSend.emailVerification.single(verificationId);
      const status = response.body.data.status.name;
      console.log(`⏳ Attempt ${attempt + 1}: Status = ${status}`);

      if (status === 'verified') {
        // Fetch detailed results
        const resultsResponse = await mailerSend.emailVerification.getListResult(verificationId, {
          limit: 100,
          page: 1,
          result: [
            EmailVerificationResultType.VALID,
            EmailVerificationResultType.INVALID,
            EmailVerificationResultType.CATCH_ALL,
            EmailVerificationResultType.DISPOSABLE,
            EmailVerificationResultType.UNKNOWN,
            EmailVerificationResultType.TYPO,
            EmailVerificationResultType.MAILBOX_NOT_FOUND,
            EmailVerificationResultType.ROLE_BASED,
            EmailVerificationResultType.SYNTAX_ERROR,
          ]
        });

        const results = resultsResponse.body.data;
        console.log('✅ Final results:');
        results.forEach(result => {
          console.log(`${result.address} → ${result.result}`);
        });
        return;
      }
    } catch (err) {
      console.error('⚠️ Error while polling verification:', err?.body || err);
    }

    await new Promise(resolve => setTimeout(resolve, pollInterval));
    attempt++;
  }

  console.warn('⚠️ Verification polling timed out.');
}

// Main flow
async function runVerificationJob() {
  console.log('🔍 Starting email verification job...');

  const emails = await getEmailsFromLastHour();

  if (!emails.length) {
    console.log('⏳ No emails found in the past hour.');
    return;
  }

  try {
    const listId = await createVerificationList(emails);
    await waitForUploadCompletion(listId);
    await submitForVerification(listId);
    await pollForVerificationResults(listId);
  } catch (err) {
    console.error('❌ Verification job failed:', err);
  }
}

// Schedule hourly
cron.schedule('0 * * * *', runVerificationJob);
console.log('📆 Email verification scheduler is running every hour...');

// Run now
runVerificationJob();
A few things to note about this example:
When the request is made to create the list, we poll the API to get the list creation status before moving on to the verification. We’ve set it to poll every 5,000 milliseconds, or 5 seconds. You can change this to poll the API less frequently and depending on how large your list is
When the list status is returned as ‘created’, the request is made for the list to be verified. Again, we poll the API for the list verification status, this time with an interval of 10,000 milliseconds or 10 seconds. You can adjust this to poll the API less frequently, or even better, use a webhook with the email_list.verified event to receive a notification when the list verification is complete
We’ve scheduled the verifier to run every hour, but you can change this to an interval that’s more suitable
Why email validation is always a good idea
When you’re developing your app or website, email validation is probably right down there at the bottom of your to-do list. But it’s an important process that impacts multiple elements of your project, from email deliverability and sender reputation, to user experience, security, and your peace of mind—because seriously, you don’t want to clean up thousands of invalid emails down the line. It’s much better to be proactive.
It will help with:
Reducing and preventing high bounce rates
Maintaining engagement rates
Protecting your sender reputation and deliverability
Preventing your sending IP or domain from being blocklisted
Providing a solid user experience by ensuring users are notified of invalid email submissions and that they get important communication from you
Preventing abuse from bots
Preserving your time and resources—no sending to large numbers of invalid emails (which costs)
Getting accurate data on your email volume, delivery and performance
A multi-step approach is key for better email management
Simple client-side validation is an effective first step for validating emails. But for even better management of your users and communication, in-depth server-side API validation is a must for modern web apps. And with MailerSend’s Node.js SDK you can quickly implement comprehensive email checks for an efficient, reliable system.
Create your free MailerSend account
Start sending in minutes and subscribe to a Free plan for 500 emails per month, 10 verification credits, and access to the email validation API.